|
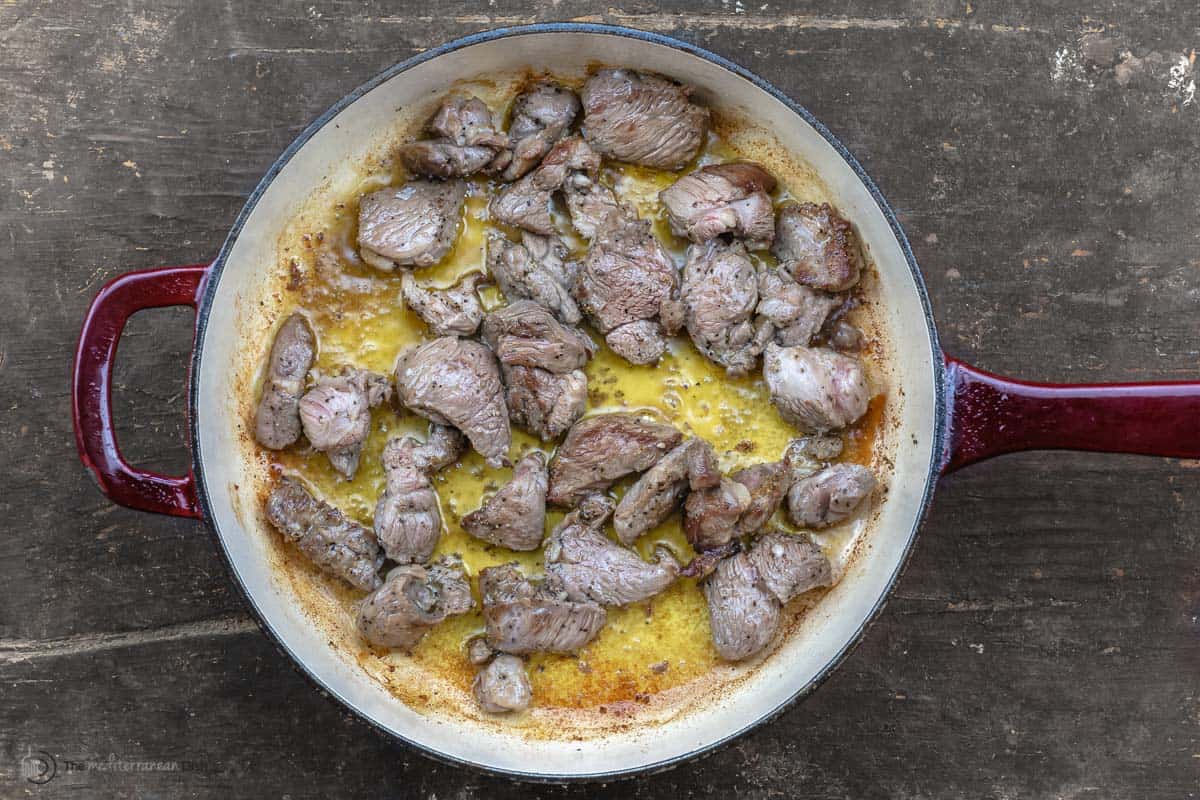
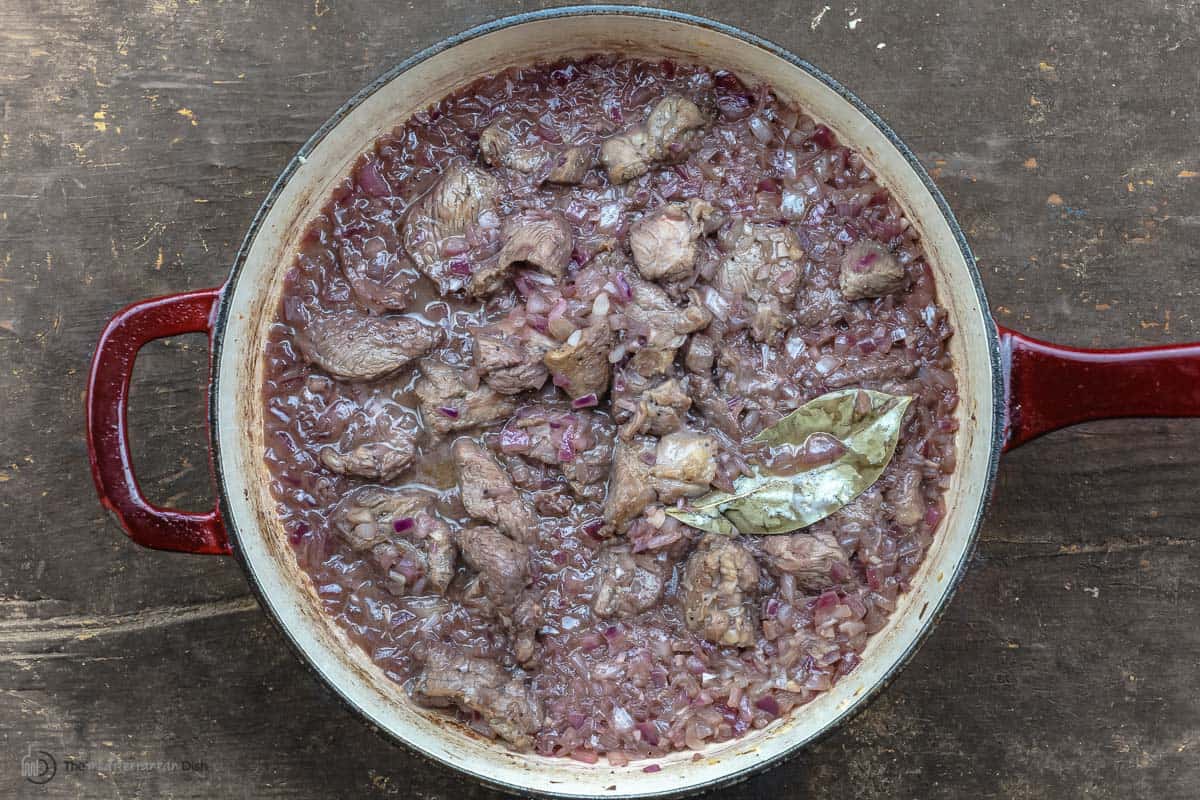
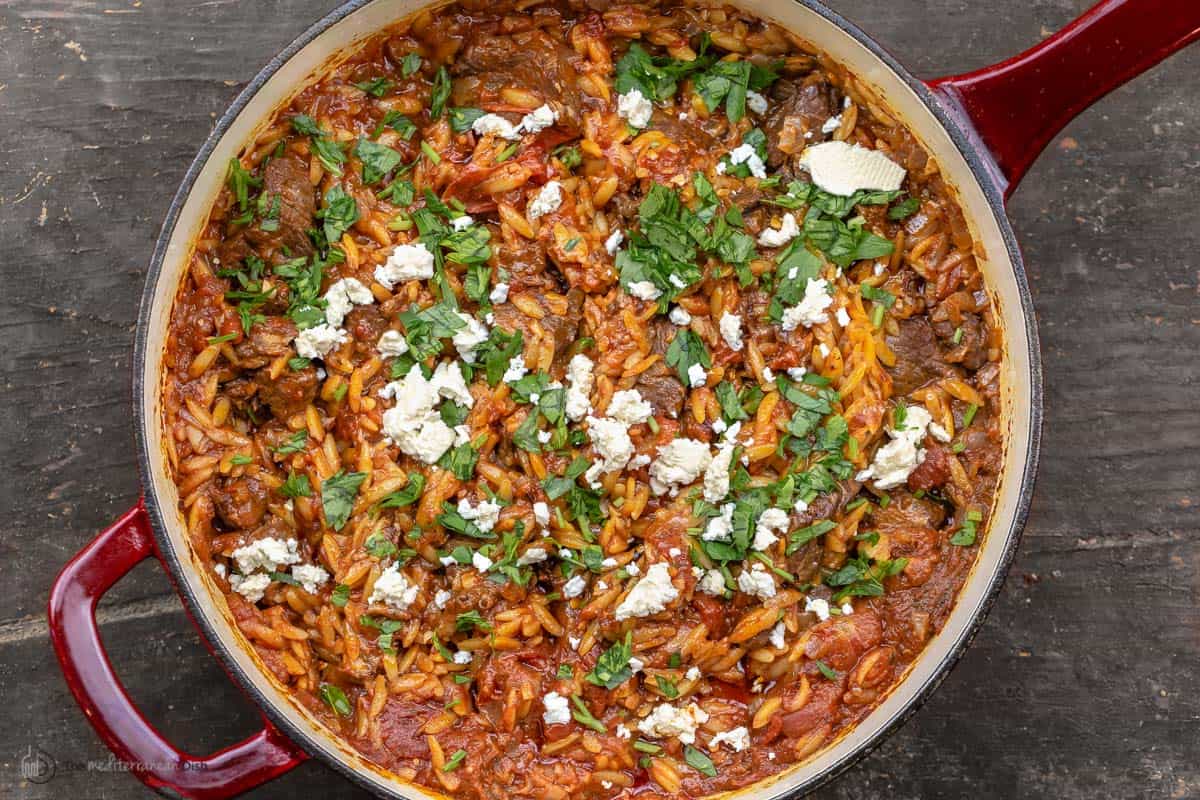
Youvetsi is comforting Greek dish made of tender pieces of lamb (or beef) and small noodles such as orzo, all cooked together in an aromatic tomato sauce with garlic, oregano, and other comforting Greek flavors! Tips and make-ahead instructions included. 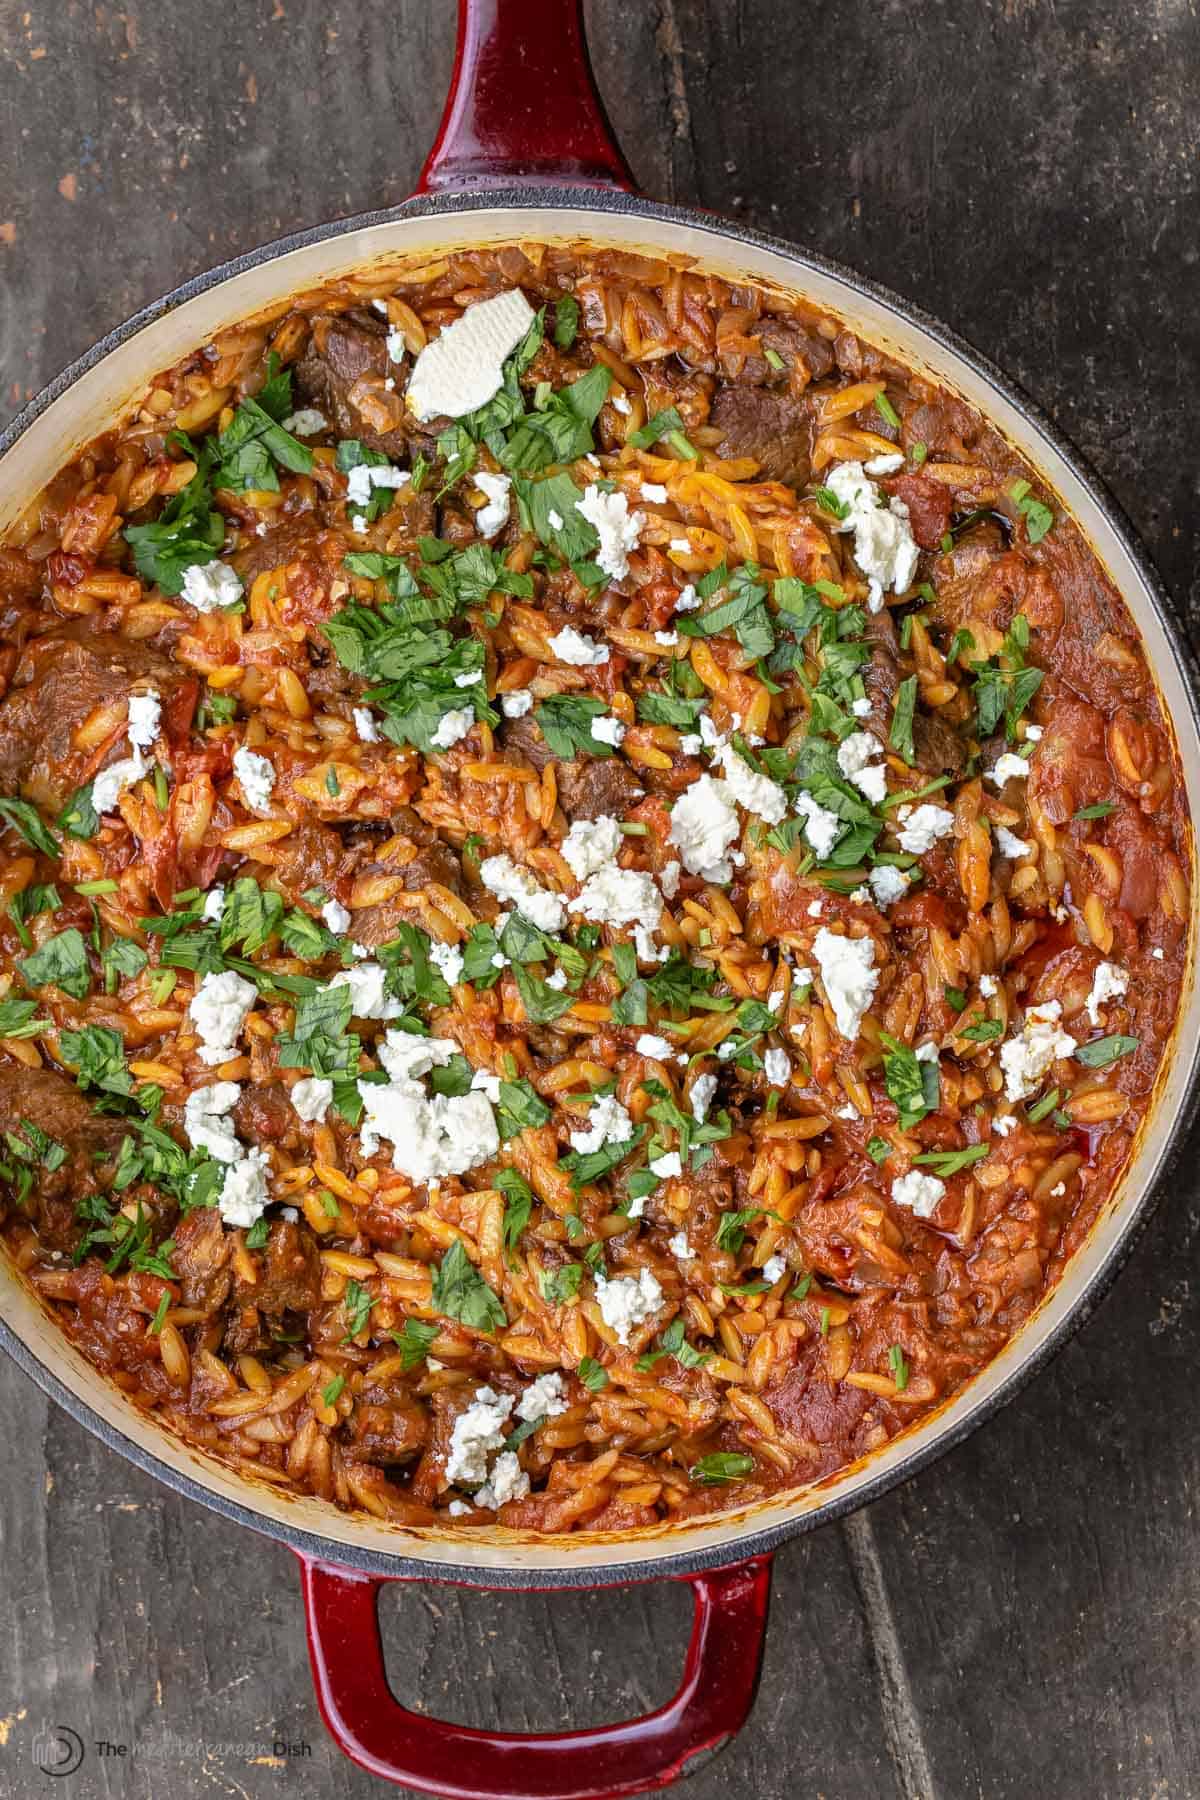 What is youvetsi?Youvetsi--sometimes spelled Giouvetsi, likely from the Turkish güveç--is a popular and comforting Greek stew made with tender bits of lamb or beef, cooked with small noodles such as orzo. You might also see it with chicken(like my earlier chicken orzo recipe), but red meat is more typically used. While the original Turkey güveç referred to the specific clay vessel in which food was slow-cooked, the Greek version refers simply to the preparation of a slow-cooked meat and pasta dish. The type of dish it's cooked in and the manner, whether on the stovetop or in the oven, differ from one household to another. But youvetsi will always include tender cooked meat and pasta. Many years back, traditional youvetsi was assembled in special earthenware dishes and cooked in wood burning ovens. But in this easy modern version, I use a large, heavy ceramic braising pan with a lid. And although many recipes call for baking youvetsi, it is easy to cook entirely on the stovetop. You'll start with browning the meat (for added flavor and color), and then simmering it in the sauce until perfectly tender. Finally, stirring in the orzo to cook for a few minutes until it has absorbed a good bit of the sauce! For me, the true draw to this one-pot lamb stew with orzo is in the delicious sauce made with sweeter San Marzano canned tomatoes, red wine, lots of garlic and onions, dry oregano, and warm spices. It's the perfect warm-your-belly dinner during the chilly fall and winter months! 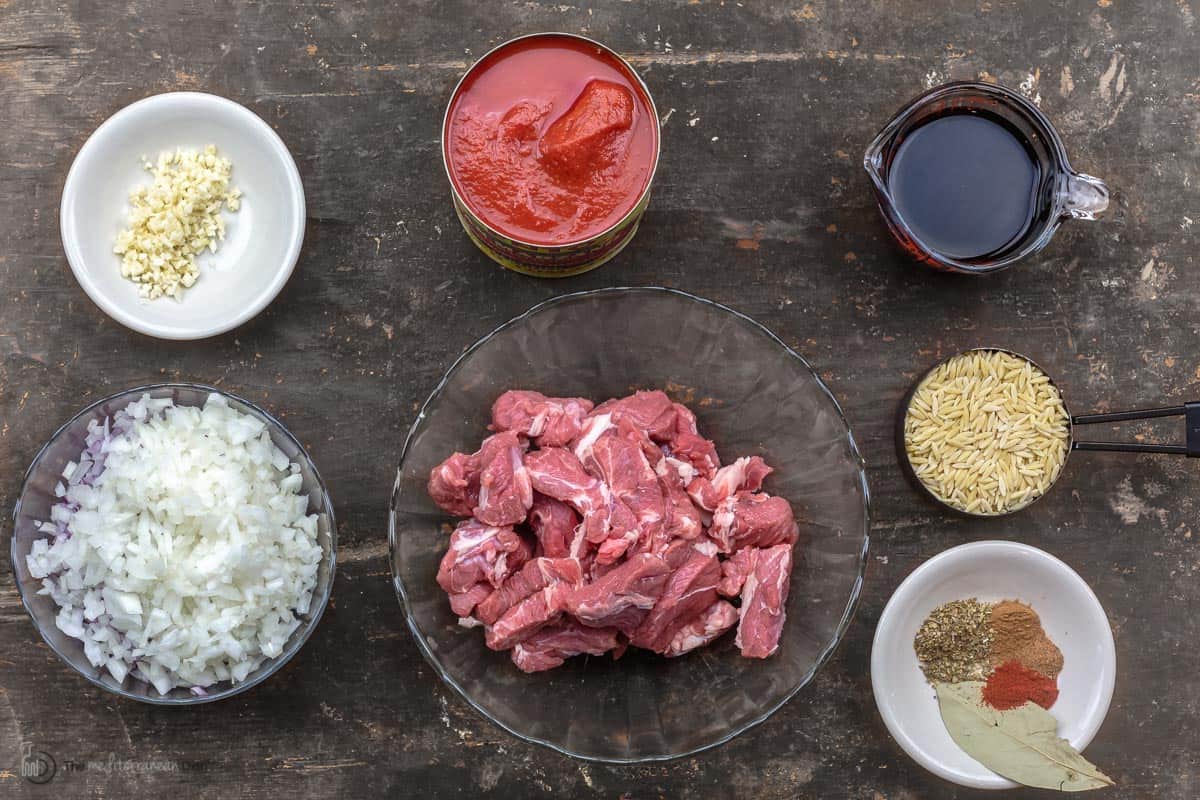 What you'll need to make itThis Greek lamb with orzo requires just a handful of ingredients and a few warm spices. And if you don't like lamb, you can absolutely use beef instead. Here's what you'll need:
How to make Greek lamb stew with orzo (youvetsi)This easy lamb orzo recipe is made entirely on the stovetop in a few simple steps:
Make-ahead youvetsiTo cut down on dinner prep and wait time for this lamb and orzo, you can cook the meat one night in advance. Just stop before adding the orzo. The next day, you can warm up the meat on the stovetop and add the orzo to cook for another 15 minutes or so. Tips and variationsYouvetsi is a simple comfort food that doesn't require too many tips or tricks, but here are a few things to consider.
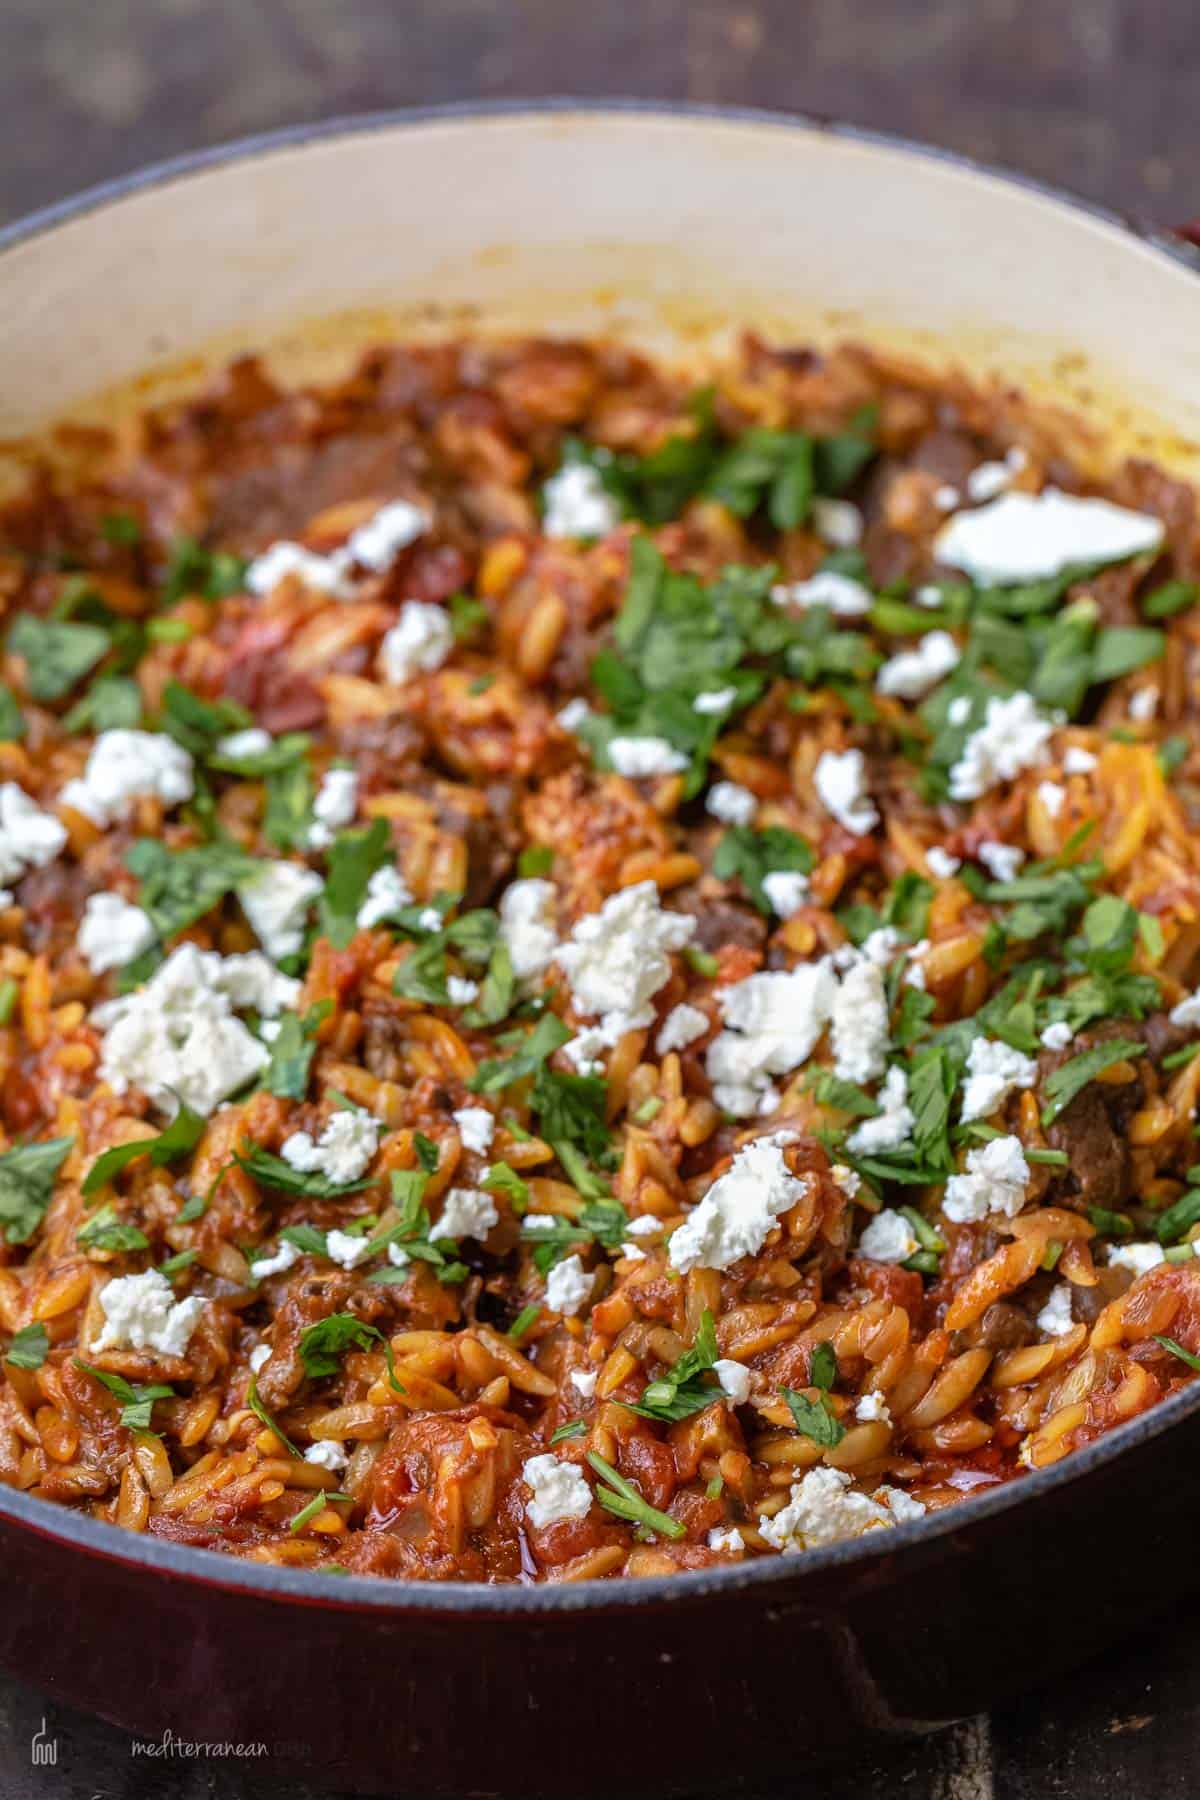 To serve this Greek lambOne of the wonderful things about youvetsi is that it's truly a complete one-pan meal. There's no need to add anything else to make this a meal, just transfer to individual bowls and top with parsley and feta. If you're looking for something green to add next to this hearty dish, try Greek green bean salad or a traditional Greek salad. 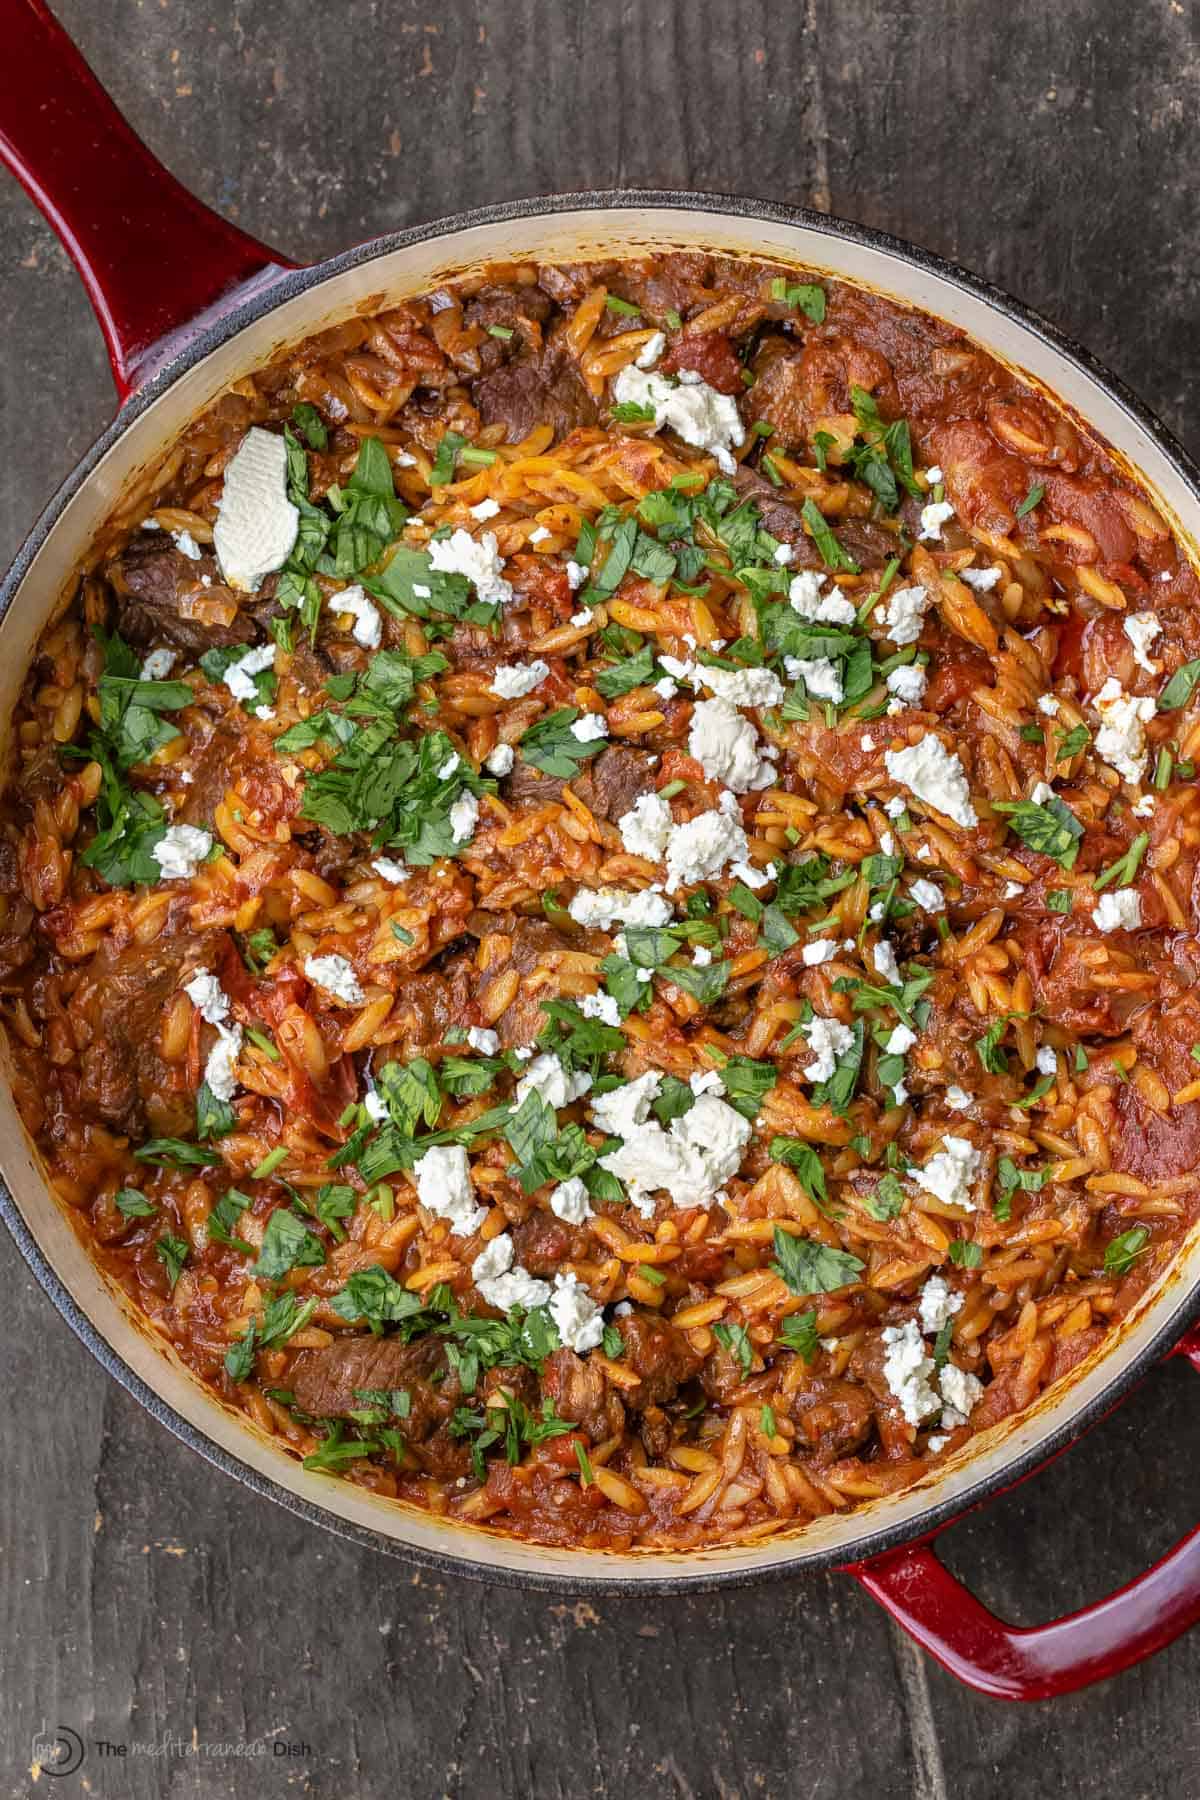 How to store leftoversThis Greek lamb stew is best enjoyed straight from the pan, when the orzo is perfectly cooked. However, any leftovers can be stored in the fridge for up to 3 days. As it sets and cools, the orzo will continue to soak up any remaining liquid. When reheating, you may need to add some additional liquid to prevent it from drying out. I recommend reheating on the stovetop for best results. 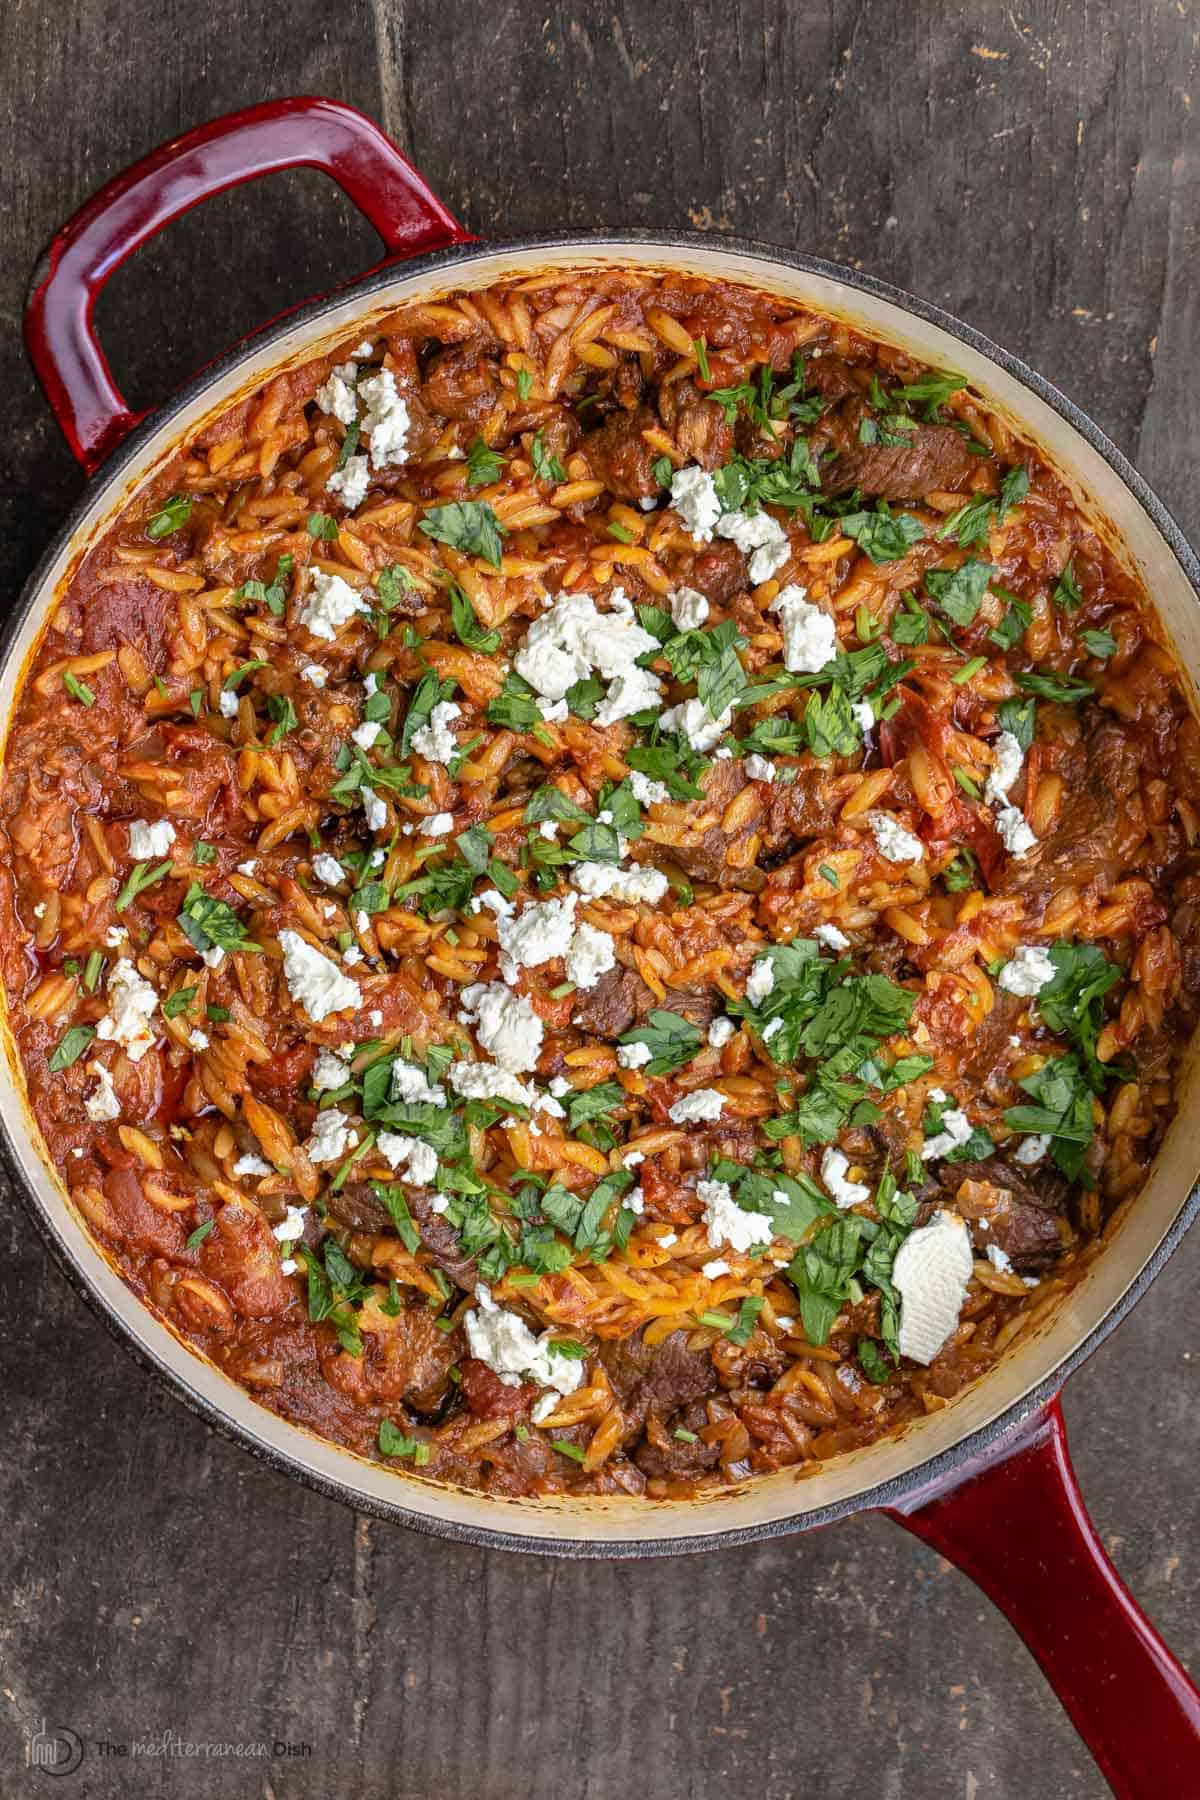 More Greek recipes:
Browse all Greek recipes. Browse more Mediterranean recipes.  Youvetsi: Greek Lamb Stew with Orzo
Easy stovetop youvetsi can be made with lamb or beef and small orzo noodles, all cooked together in an aromatic tomato sauce with garlic, oregano, and other comforting Greek flavors! Tips and make-ahead instructions included.
Servings 6 servings
Calories 197.6kcal
Ingredients
Instructions
Notes
Nutrition
Calories: 197.6kcal | Carbohydrates: 21.3g | Protein: 13.2g | Fat: 3g | Saturated Fat: 1g | Polyunsaturated Fat: 0.4g | Monounsaturated Fat: 1.1g | Cholesterol: 30.5mg | Sodium: 233.2mg | Potassium: 292.2mg | Fiber: 1.4g | Sugar: 1.1g | Vitamin A: 593.7IU | Vitamin C: 7.3mg | Calcium: 33mg | Iron: 1.9mg
The post Youvetsi: Greek Lamb Stew with Orzo appeared first on The Mediterranean Dish. via The Mediterranean Dish https://www.themediterraneandish.com/youvetsi-greek-lamb-stew/
0 Comments
With a handful of fresh ingredients, these Mediterranean Breakfast Bowls are healthy and filling, a great way to start the day! Use up what vegetables you have on hand and change the seasonings for for a unique dish every time. Make-ahead tips are included for those busy mornings! Vegetarian & Gluten Free.  15 minutes to the best vegetarian breakfast bowls!People often ask me for Mediterranean diet breakfast ideas that are easy and quick to make. On busy weekdays, I regularly rotate between make-ahead egg muffins, simple toast, and today's healthy breakfast bowls--a big hit with my family! I love the idea of savory breakfast bowls, made with eggs and hummus (for a good bit of fiber and satisfying protein) along with veggies, sautéed in extra virgin olive oil. With the hummus made ahead of time, it takes 15 minutes to put together, and you'll have the perfect power bowl to get the day started! And, if you prefer, you can prepare these bowls ahead of time too and enjoy them for several days. 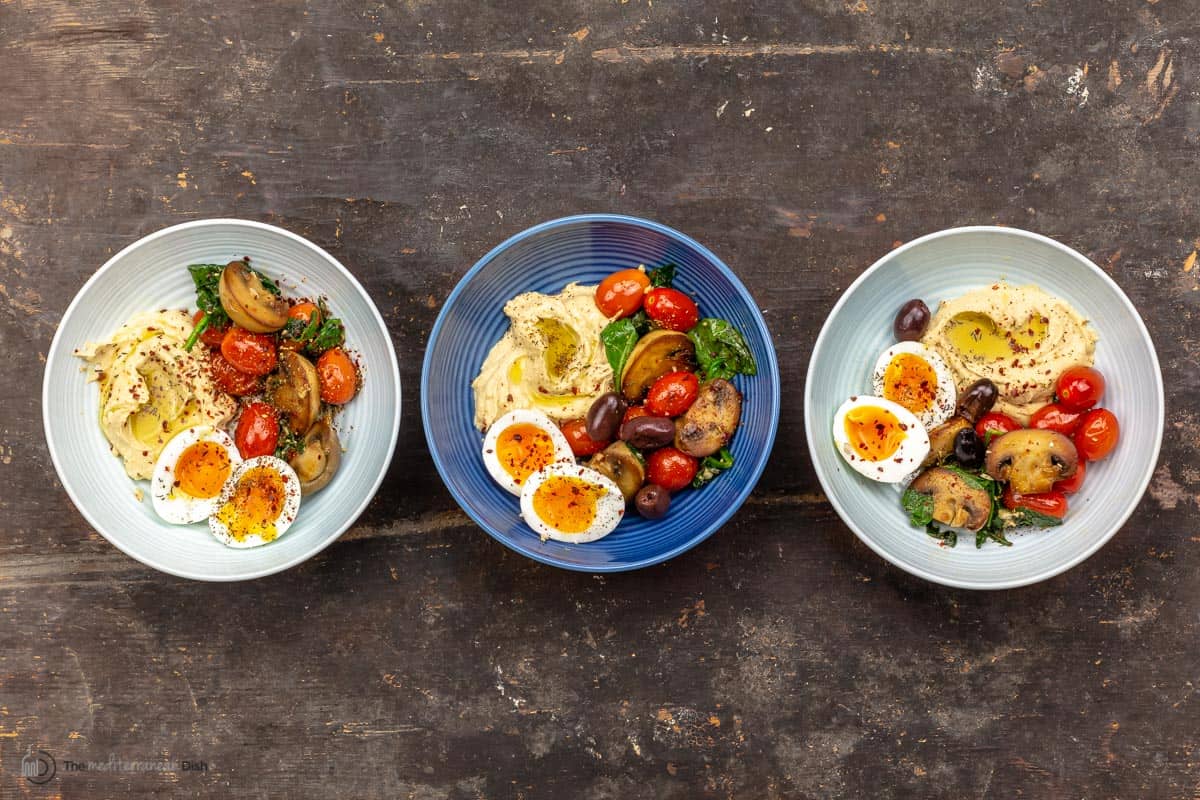 What goes in a a great breakfast bowl? A quick guide:I like to think of these bowls as a great way to use up what ingredients and vegetables I have on hand to make a colorful and satisfying savory breakfast bowl. Here's my quick guide for how to make the perfect breakfast bowls that are satisfying and won't leave you heavy or tired:
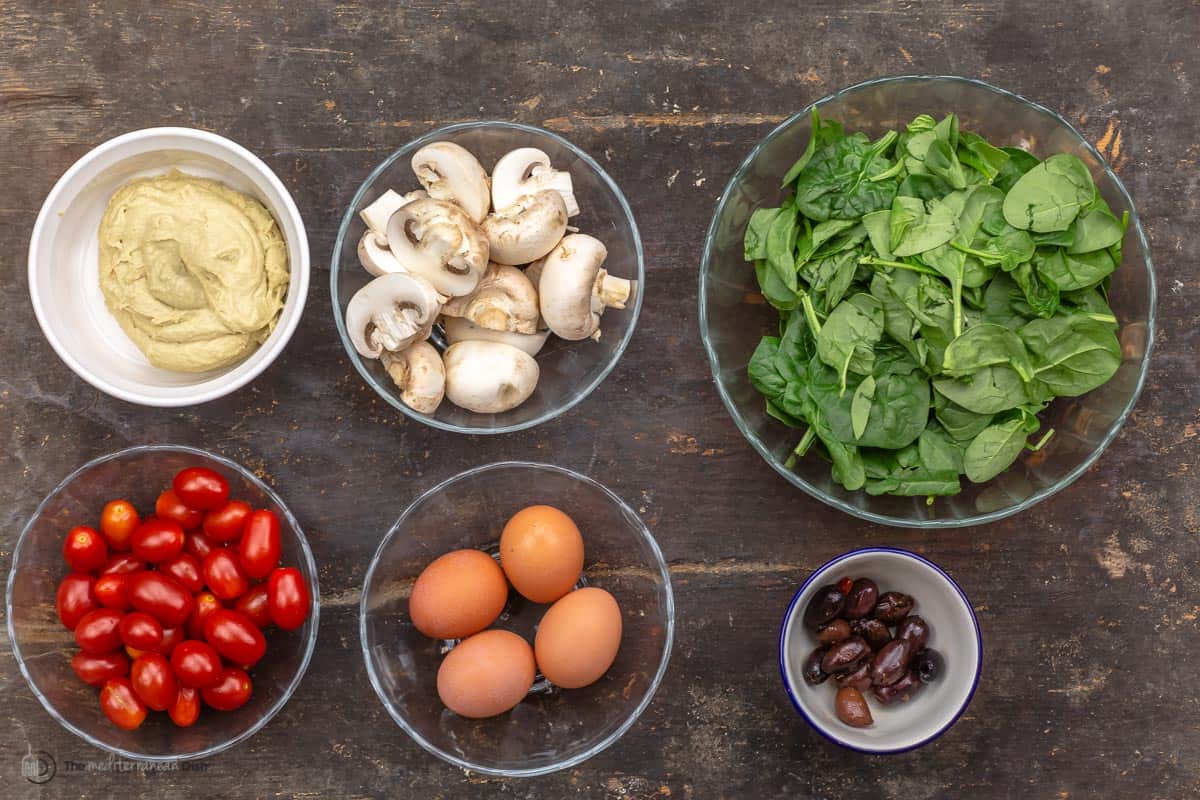 What you'll need to make these bowlsThese healthy breakfast bowls (with eggs) require only a handful of fresh, flavorful ingredients and your favorite seasonings. The great thing about making these is how easy they are to adapt to your preferred ingredients, so feel free to change things up like I mentioned earlier.
 How to make these vegetarian breakfast bowlsThese healthy breakfast bowls are so easy to make - just prepare the eggs, cook the vegetables, assemble and enjoy! Depending on how you prefer your eggs, these could be ready in as little as 15 minutes!
Make them veganIt's easy to turn this into a vegan breakfast bowl! All you need to do is omit or substitute the eggs. If you want to substitute them, fried tofu is a great option. Of course, you can always just add more vegetables too. 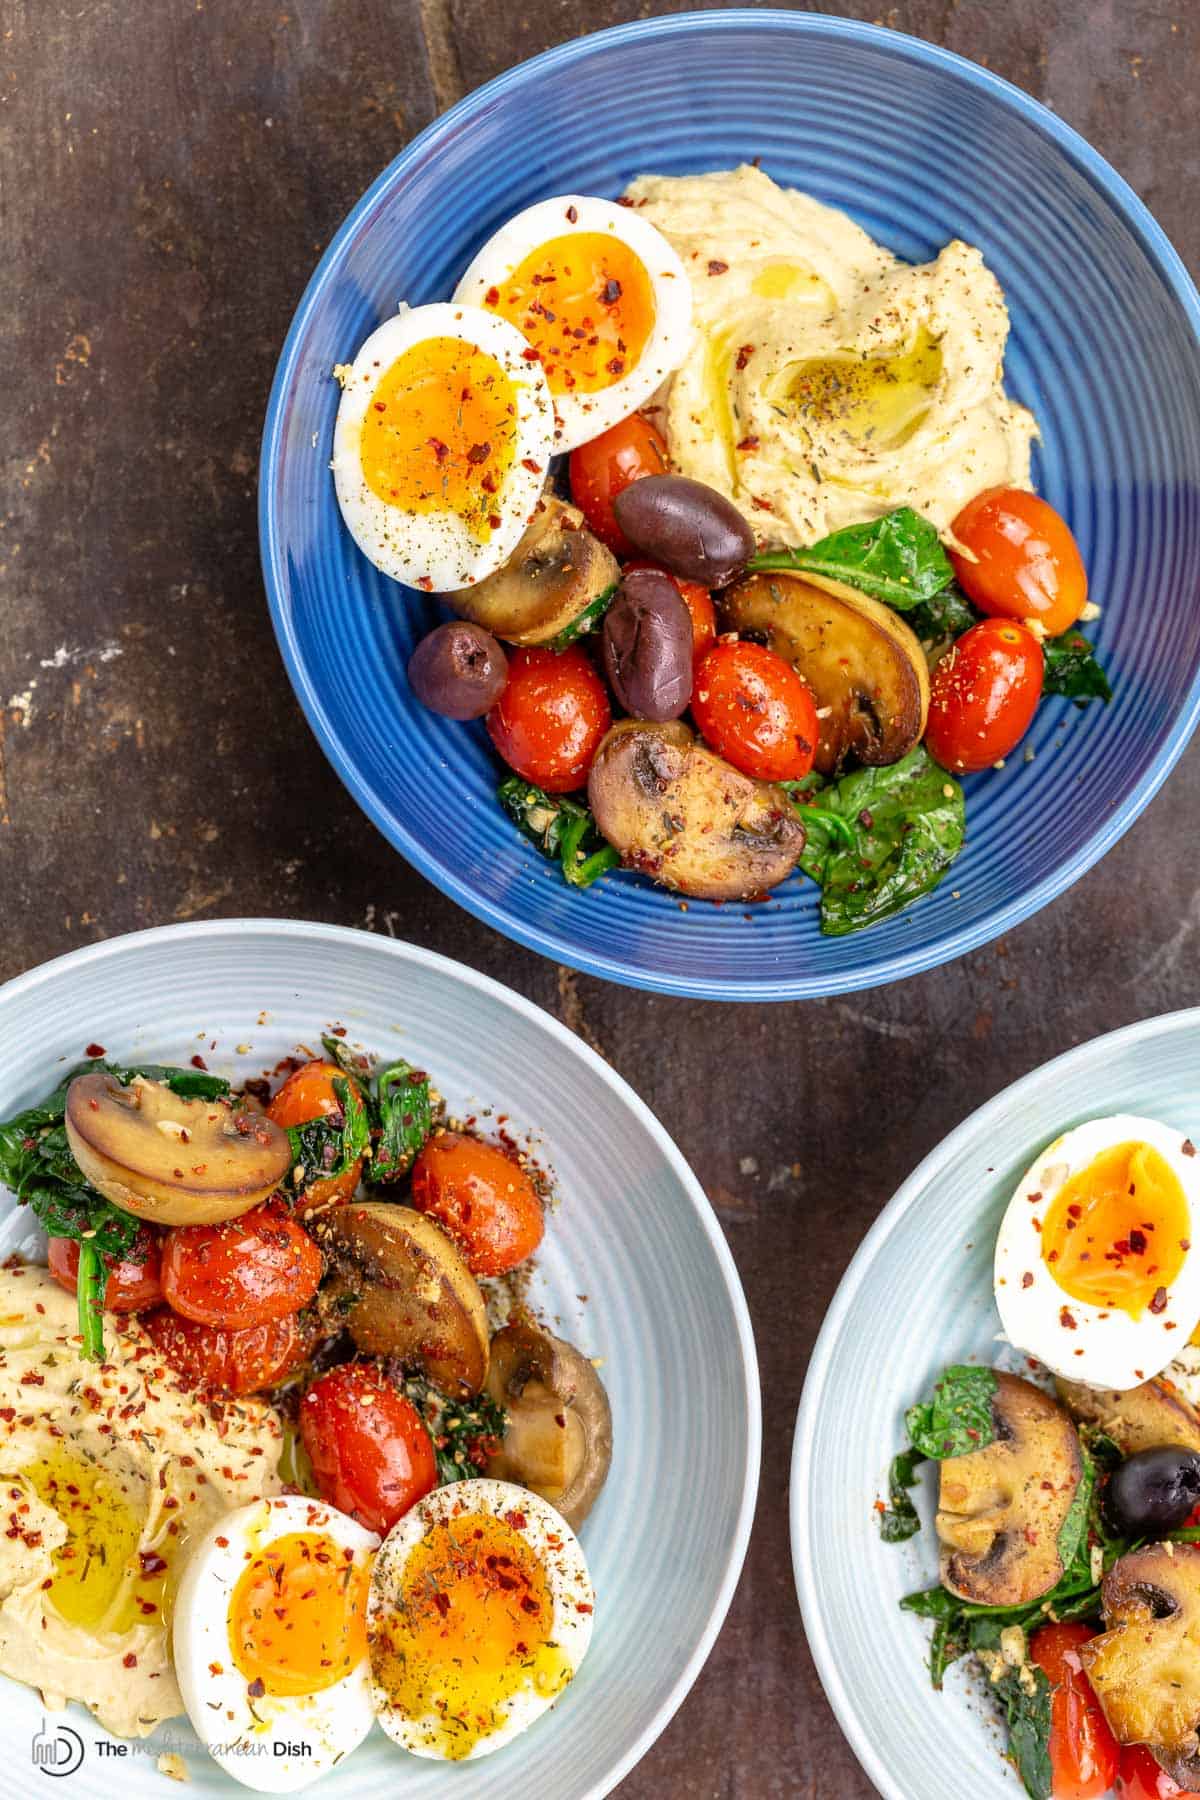 Can I make these bowls ahead of time?YES! My preferred way to prepare these bowls ahead of time is to simply prepare the different components-- the hummus, boiled eggs, and sauteed vegetables--and store them in separate containers in the fridge. But if you like, you can fully assemble the bowls and cover them tightly to keep in the fridge for up to 3 days. Do not reheat, they will be best at room temperature. More easy breakfast recipes:
Browse more Mediterranean diet recipes. Browse all Mediterranean recipes. Visit our shop.  Mediterranean Savory Breakfast Bowls
With a handful of fresh ingredients, these Mediterranean Breakfast Bowls with eggs, hummus and veggies are delicious and filling--the perfect way to start your day! Use this recipe as a guide, but feel free to use what vegetable you have on hand and experiment with different seasonings you love! Use plain hummus or another flavored hummus of your choice.
Servings 4 people
Calories 246.5kcal
Ingredients
Instructions
VideoNotes
Nutrition
Calories: 246.5kcal | Carbohydrates: 19.1g | Protein: 15.8g | Saturated Fat: 2.7g | Trans Fat: 0.1g | Cholesterol: 163.7mg | Sodium: 435.1mg | Potassium: 700.5mg | Fiber: 7g | Vitamin A: 2036.2IU | Vitamin C: 22.6mg | Calcium: 85.8mg | Iron: 4.2mg
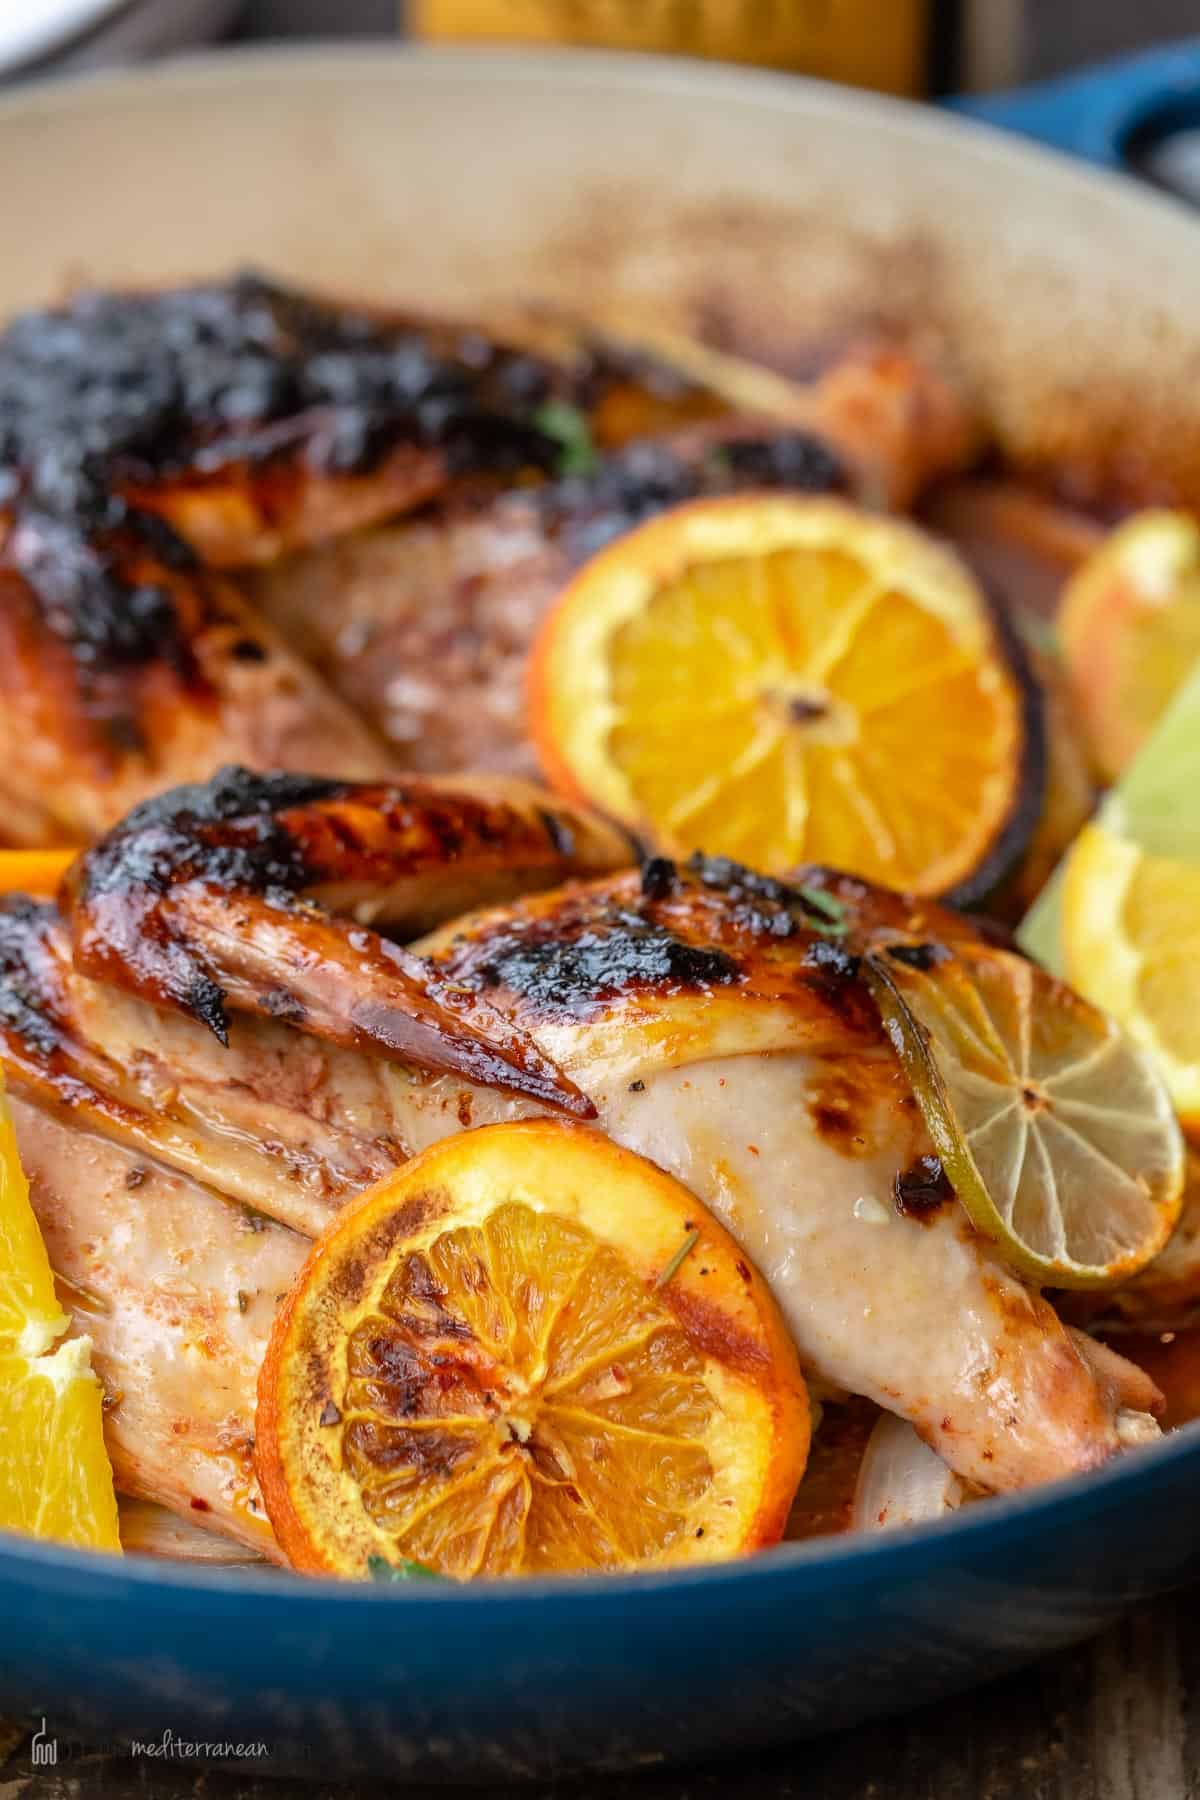
The post 15-Minute Mediterranean Breakfast Bowls appeared first on The Mediterranean Dish. via The Mediterranean Dish https://www.themediterraneandish.com/breakfast-bowls/ Crisp, tangy, and succulent citrus rosemary chicken, seasoned Mediterranean-style with garlic, rosemary, and oregano, and covered in a bold wine and orange marinade. A glass of Erath Pinot Noir is the perfect pairing to make this dish extra special! This post is sponsored by Erath Wines. All opinions are my own. 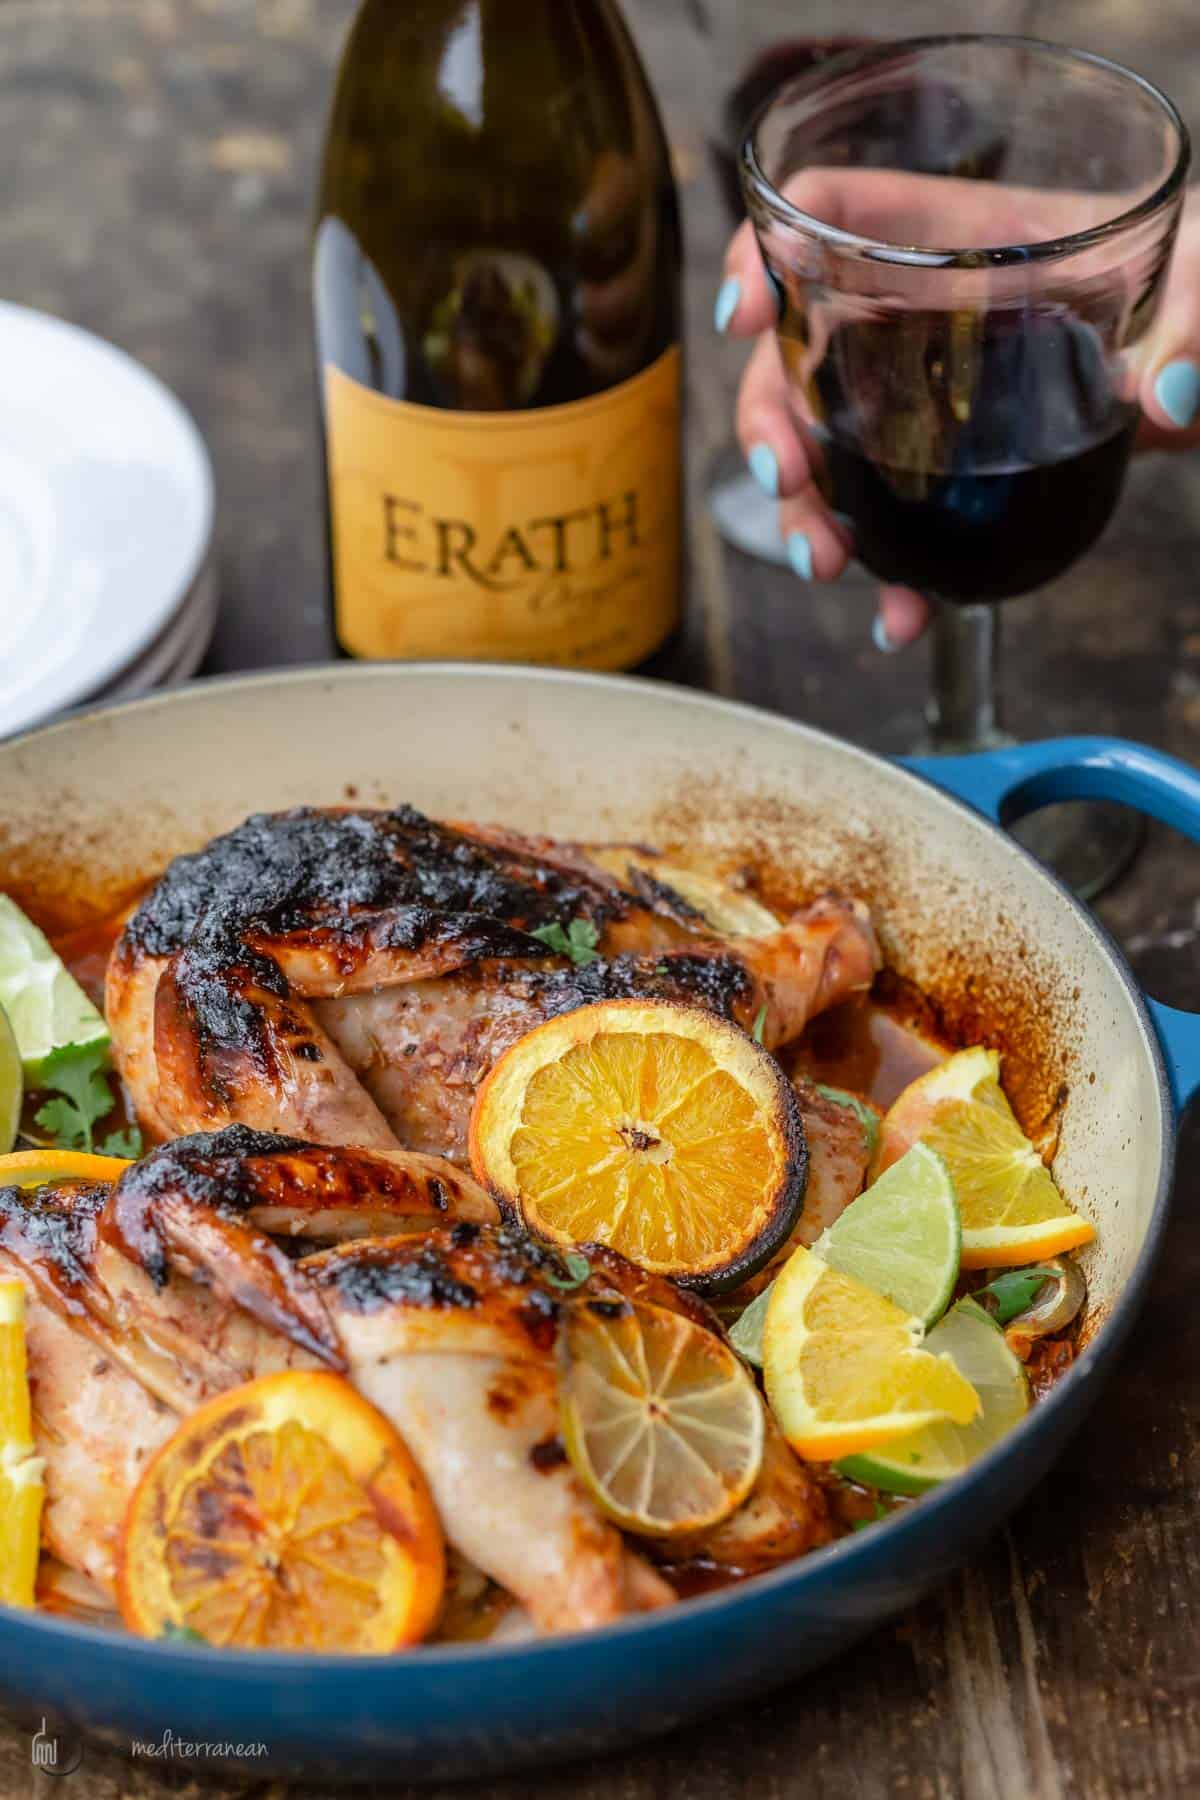 A holiday-worthy rosemary chicken with citrusThis simple twist on roast chicken makes a dish that is at once crisp and succulent, with the perfect balance of savory, tangy, and warm flavors! Delicious and impressive with little work involved. I know turkey is the first thing that comes to mind for a holiday table centerpiece, but if you’re looking for something different—less traditional but equally impressive—this citrus rosemary chicken with garlic and oregano—may just be your ticket! Word to the wise, allow the chicken a little bit of time in the citrus marinade—one to two hours in the fridge, if you can. But if you don’t have the time, even 30 minutes is great. 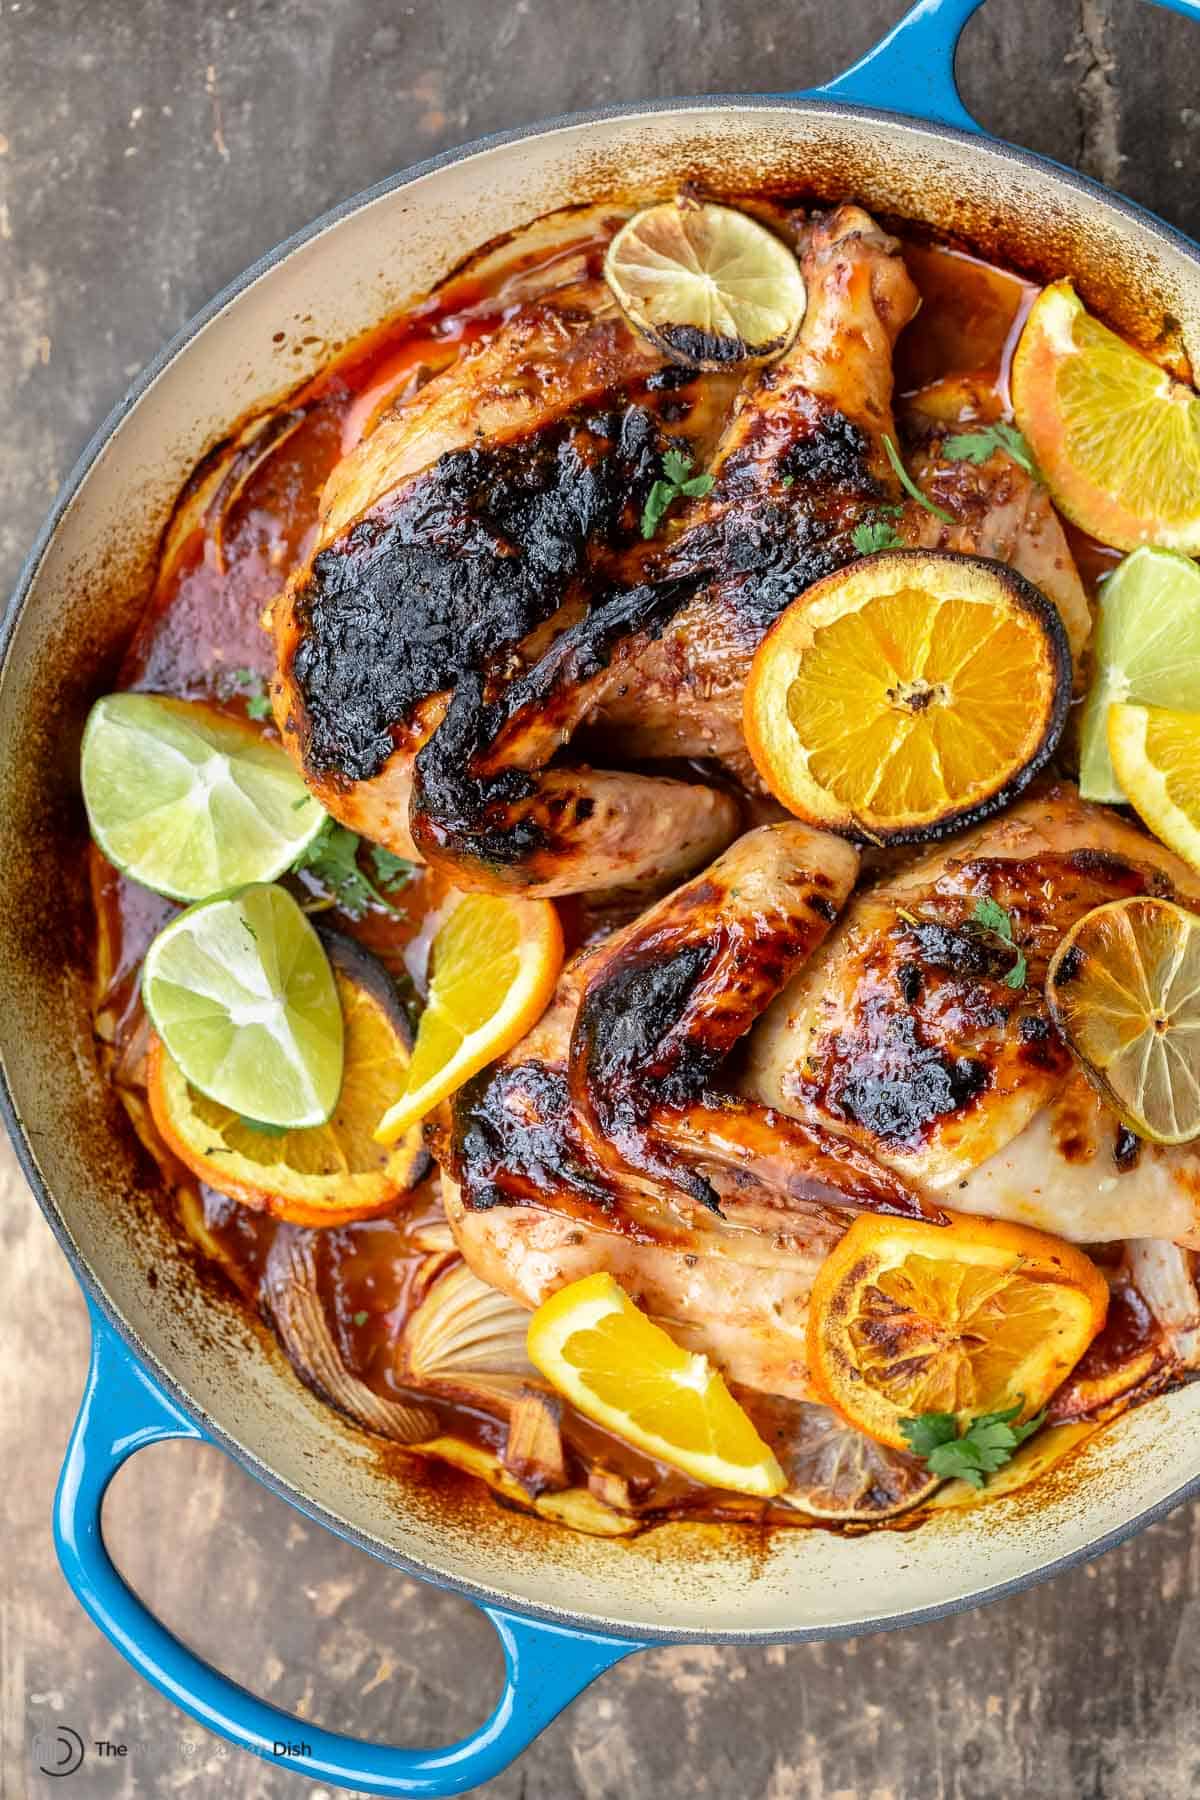 Pair it with Erath 2019 Oregon Pinot Noir!As wine pairings go, many people choose white wine to serve next to chicken dinners. But roast chicken is one of those rustic meals that pairs incredibly well with certain red wines. Which should you choose to serve with this recipe? To me, a glass of Erath 2019 Oregon Pinot Noir is the perfect pairing to this comforting rosemary roast chicken with citrus. If you're not familiar, Oregon Pinot Noir is truly unique. The nature of the climate and soils translates into Pinot noirs that display flavors and aromas reminiscent of pure fresh red fruits like pomegranate, strawberry, and pie cherry. The purity and freshness of Oregon Pinot Noir sets it apart. The beautiful red fruit notes in this Erath Oregon Pinot compliment the rosemary and citrus flavors in the chicken without overwhelming the palate. And the smooth, lengthy finish is just perfection! Pinot as should be! To elevate the flavor even more, I also used a little bit of the wine in the chicken marinade.  The citrus marinadeThe marinade is what makes all the difference in this simple rosemary and citrus chicken recipe. It works to tenderize the chicken and infuse it with flavor. The citrus marinade in this recipe is made of a combination of wine, orange juice, lime juice, olive oil, tomato paste for color and umami, and fresh garlic, onions, rosemary, and other Mediterranean spices. The key to great flavor here is to allow the chicken a good 1 to 2 hours in the marinade (refrigerated), and make sure to lift up the chicken skin to spoon some of the garlicy, citrus marinade underneath. If you only have a few minutes, leave the chicken to marinate at room temperature for 30 minutes or so. 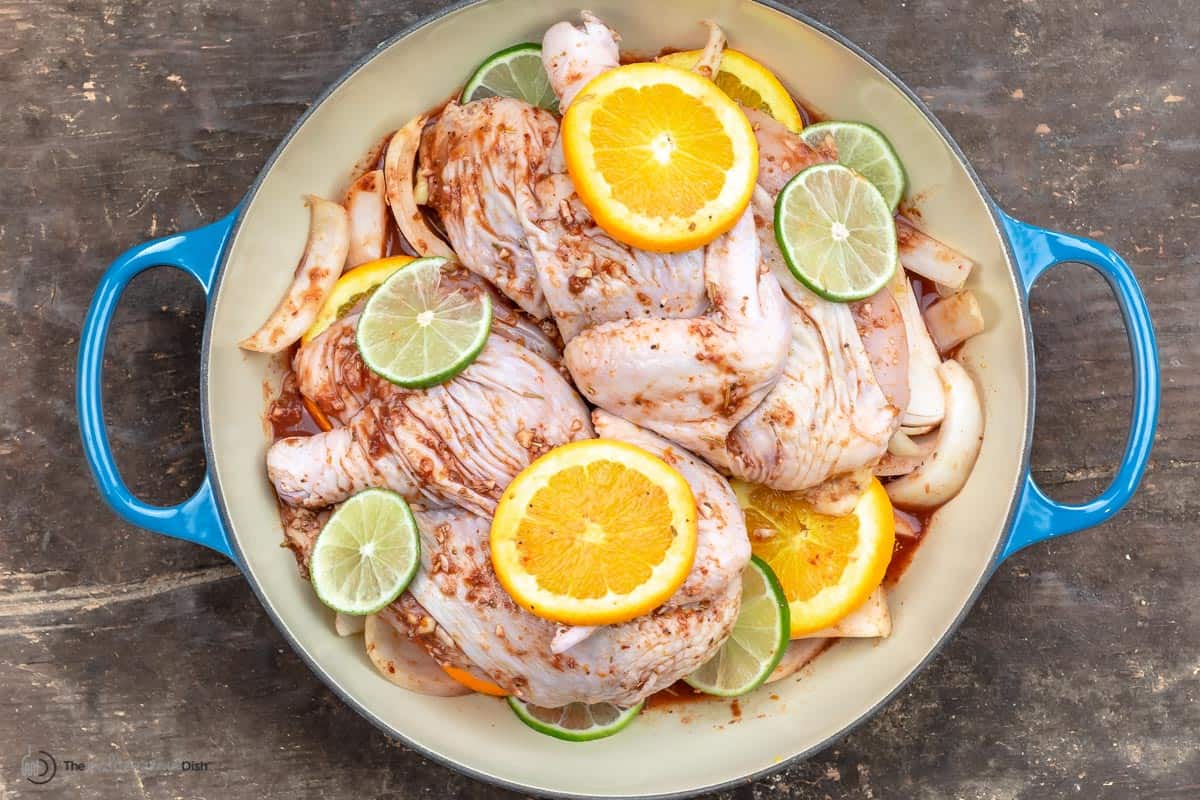 How to make roasted rosemary chicken (a few tips)I used a whole chicken split in half for this recipe, but you can also use chicken breast or thighs, and you may have to adjust the cooking time accordingly. Here’s a quick idea of how this recipe goes with some important tips (scroll down for print-friendly recipe):
 What to serve with roast chicken with rosemary and citrus withServe this citrusy roast chicken with a bottle of Erath 2019 Oregon Pinot Noir and any number of sides. If you're looking for fall or holiday-ish sides, try olive oil fried brussels sprouts, roasted butternut squash, or sweet potatoes. It also works with other bright Mediterranean sides like Italian roasted vegetables; baked zucchini spears; or quick lemon and garlic sauteed asparagus. Other roast chicken recipes to try
Browse all Mediterranean recipes Visit our shop  Citrus Rosemary Chicken Recipe
Crisp, tangy, and succulent citrus rosemary chicken, seasoned Mediterranean-style with garlic, rosemary, and oregano, and covered in a bold wine and orange marinade. Use split chicken or chicken pieces of similar size for even cooking. For best flavor, allow 30 minutes to 2 hours for marinating.
Servings 6 people
Calories 318.7kcal
Ingredients
Instructions
Notes
Nutrition
Calories: 318.7kcal | Carbohydrates: 11.5g | Protein: 24.8g | Saturated Fat: 5.5g | Trans Fat: 0.1g | Cholesterol: 95.2mg | Sodium: 154.4mg | Potassium: 429mg | Fiber: 1.9g | Sugar: 6.9g | Vitamin A: 533.3IU | Vitamin C: 21.1mg | Calcium: 49mg | Iron: 1.8mg
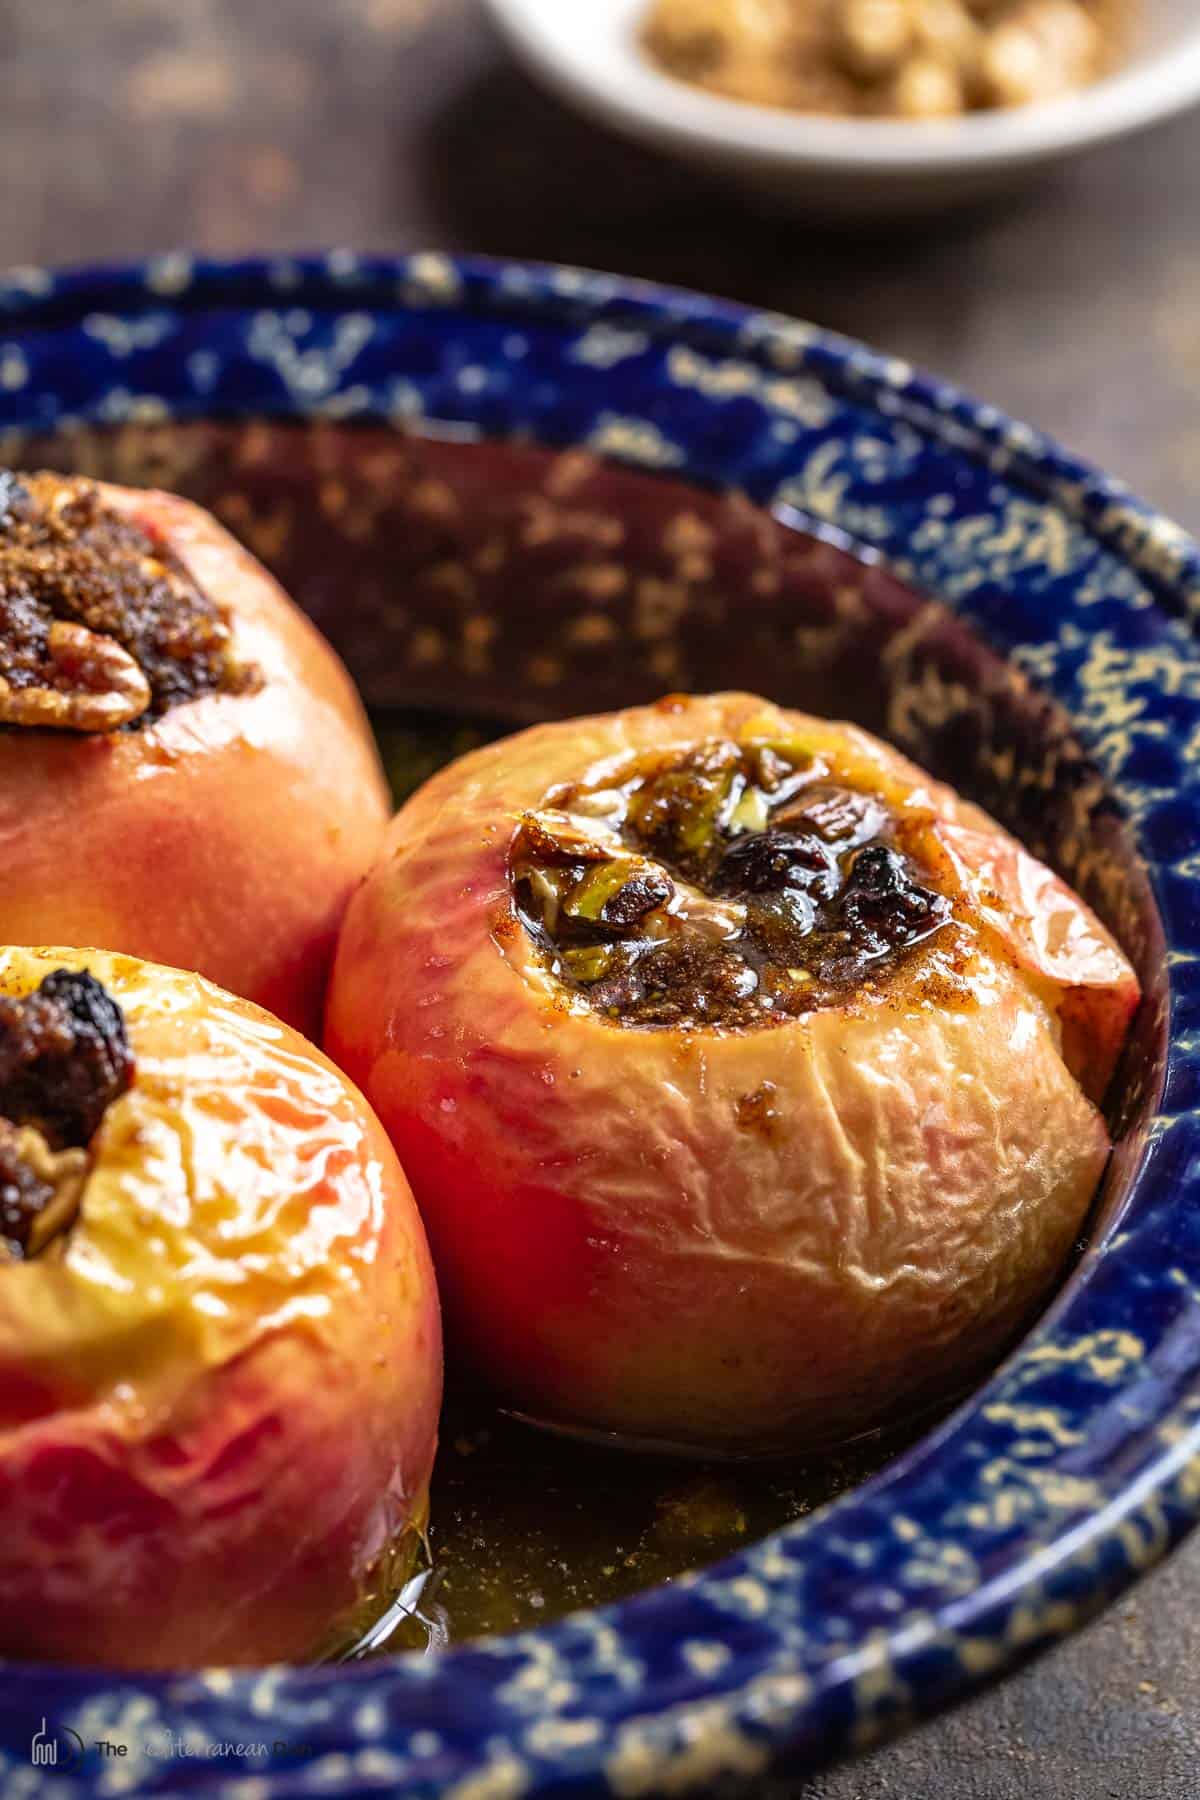
The post Citrus Rosemary Chicken appeared first on The Mediterranean Dish. via The Mediterranean Dish https://www.themediterraneandish.com/citrus-rosemary-chicken/ Stuffed or sliced, this recipe is all you need to make the best Baked Apples with a delicious cinnamon and brown sugar mixture and nuts of your choice. This is the baked apple recipe for when you don't have time for apple pie!  Baked apples for when you don't have time for apple pie!I'm all for good apple pie and warm apple strudel, but if you're looking for something easy that will give you all the apple pie vibes with less work (and fewer calories), I give you: baked apples! Warm and tender baked apples with cinnamon, brown sugar, and any nuts you have will taste and feel as delicious as apple pie. I love that you can make them any night of the week for a simple dessert with very little planning. Serve them as is or add your favorite vanilla ice cream (or even a dollop of homemade labneh). I wrote this recipe for baked apples that you can make two ways--stuffed with the cinnamon and brown sugar mixture, or sliced up and tossed in the same delicious mixture. The stuffed baked apples will take just 10 to 15 minutes longer, but they do deliver on the wow factor in every way! I highly recommend you try the stuffed apple method. 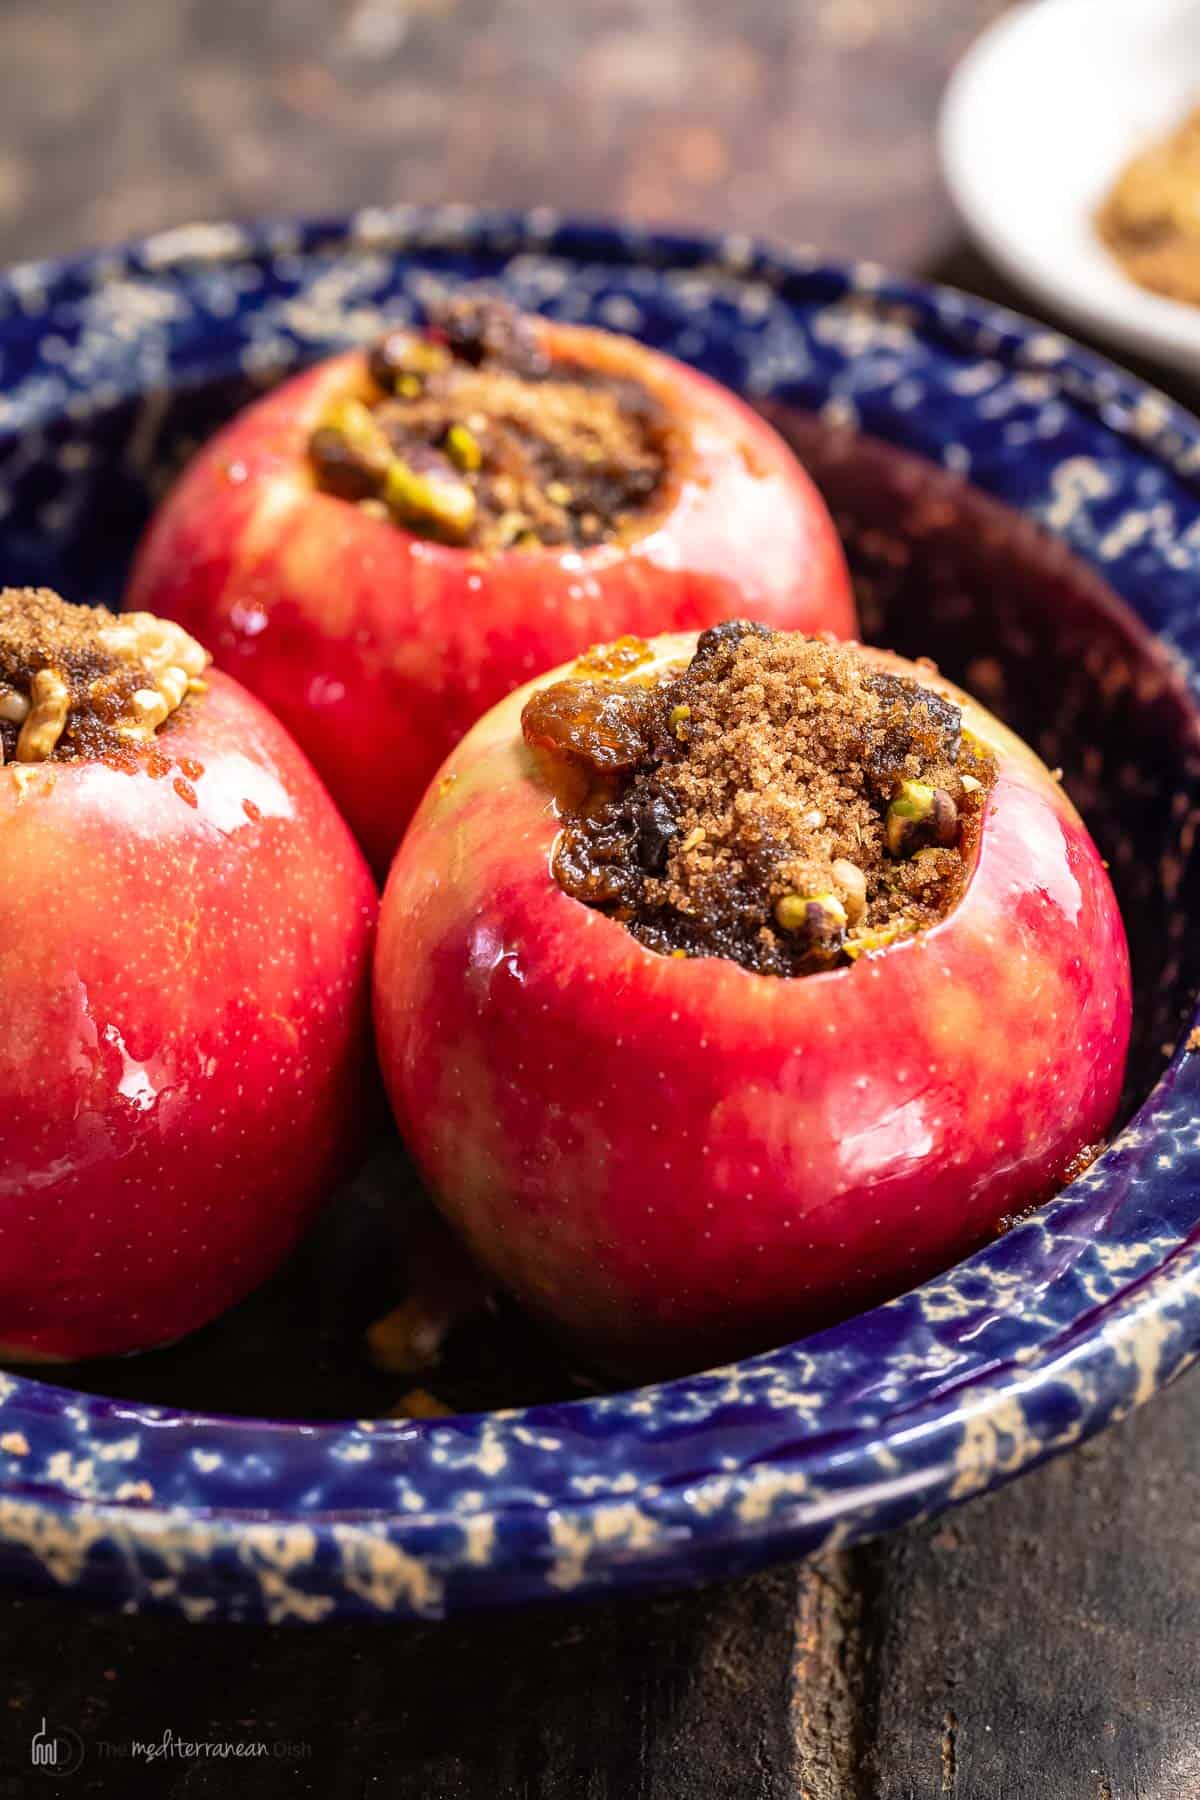 Which apples are best for baked apples?There are many apples to choose from, but when it comes to baking, select ones that are large and firm. The best apples for baking are ones that can hold up under the heat and won't turn mushy when cooked. Depending on how tart or sweet you like your apples, here are a few good options for baking:
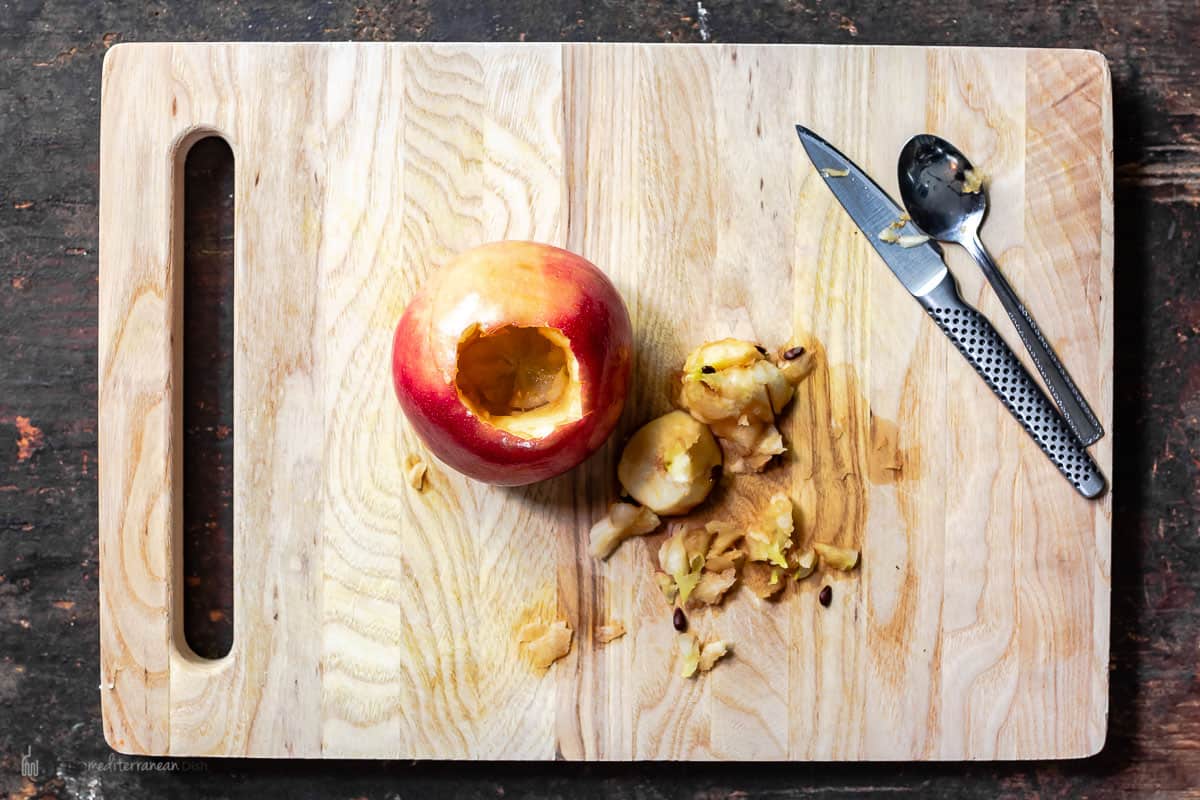 How to core an apple without an apple corer?If you have an apple corer, you can simply stand the apple straight with the stem facing you and push the corer into the center, then carefully pull upward. But for this recipe, I will recommend using a small pairing knife and a spoon instead of a corer, which will allow you to make a wider whole to hold the filling. Here is how to core an apple without a corer:
How long does it take apples to cook in the oven?Cooked apples can be whole or chopped or sliced. You'll need an oven set to 375 degrees F. Sliced apples will take about 25 to 30 minutes, and stuffed baked apples will take about 45 minutes or so. Both methods are listed in detail below. Don't leave them in the oven too long or they become mushy, baked apples are ready when they are tender but still have a little bite to them. To be sure, carefully use a fork to check for doneness. It should slide through easily. How to make baked applesThis easy baked apple recipe uses 3 whole large apples and takes
 Baked sliced apples (option)Here's a variation on this recipe using sliced apples instead:
More apple recipesBrowse more Mediterranean recipes  Baked Apples Recipe (Two Ways)
You can use this recipe to make stuffed baked apples with my delicious cinnamon and brown sugar mixture and nuts of your choice, or you can make baked sliced apples, tossed with the same delicious brown sugar mixture. Either way, serve your baked apples warm. This recipe is vegan and gluten free, but if you like, you can serve the cooked apples with a good scoop of your favorite ice cream!
Servings 6 people
Calories 157.1kcal
Ingredients
Cinnamon and Brown Sugar Mixture
Instructions
Stuffed Baked Apples
Sliced Baked Apples
To Serve
Notes
Nutrition
Serving: 0.5 apple | Calories: 157.1kcal | Carbohydrates: 28.4g | Protein: 2.3g | Fat: 3g | Trans Fat: 0.1g | Sodium: 5.3mg | Potassium: 224.5mg | Fiber: 3.8g | Sugar: 18.7g | Vitamin A: 49.7IU | Vitamin C: 4.5mg | Calcium: 40.5mg | Iron: 0.7mg
The post Easy Baked Apples (Two Ways) appeared first on The Mediterranean Dish. via The Mediterranean Dish https://www.themediterraneandish.com/easy-baked-apples/ Pasta night just got better! Quick and easy, this weeknight Spinach Pasta is tossed in a garlicy olive oil sauce and flavored with lemon, za'atar, red pepper flakes, and a generous sprinkle of parmesan. 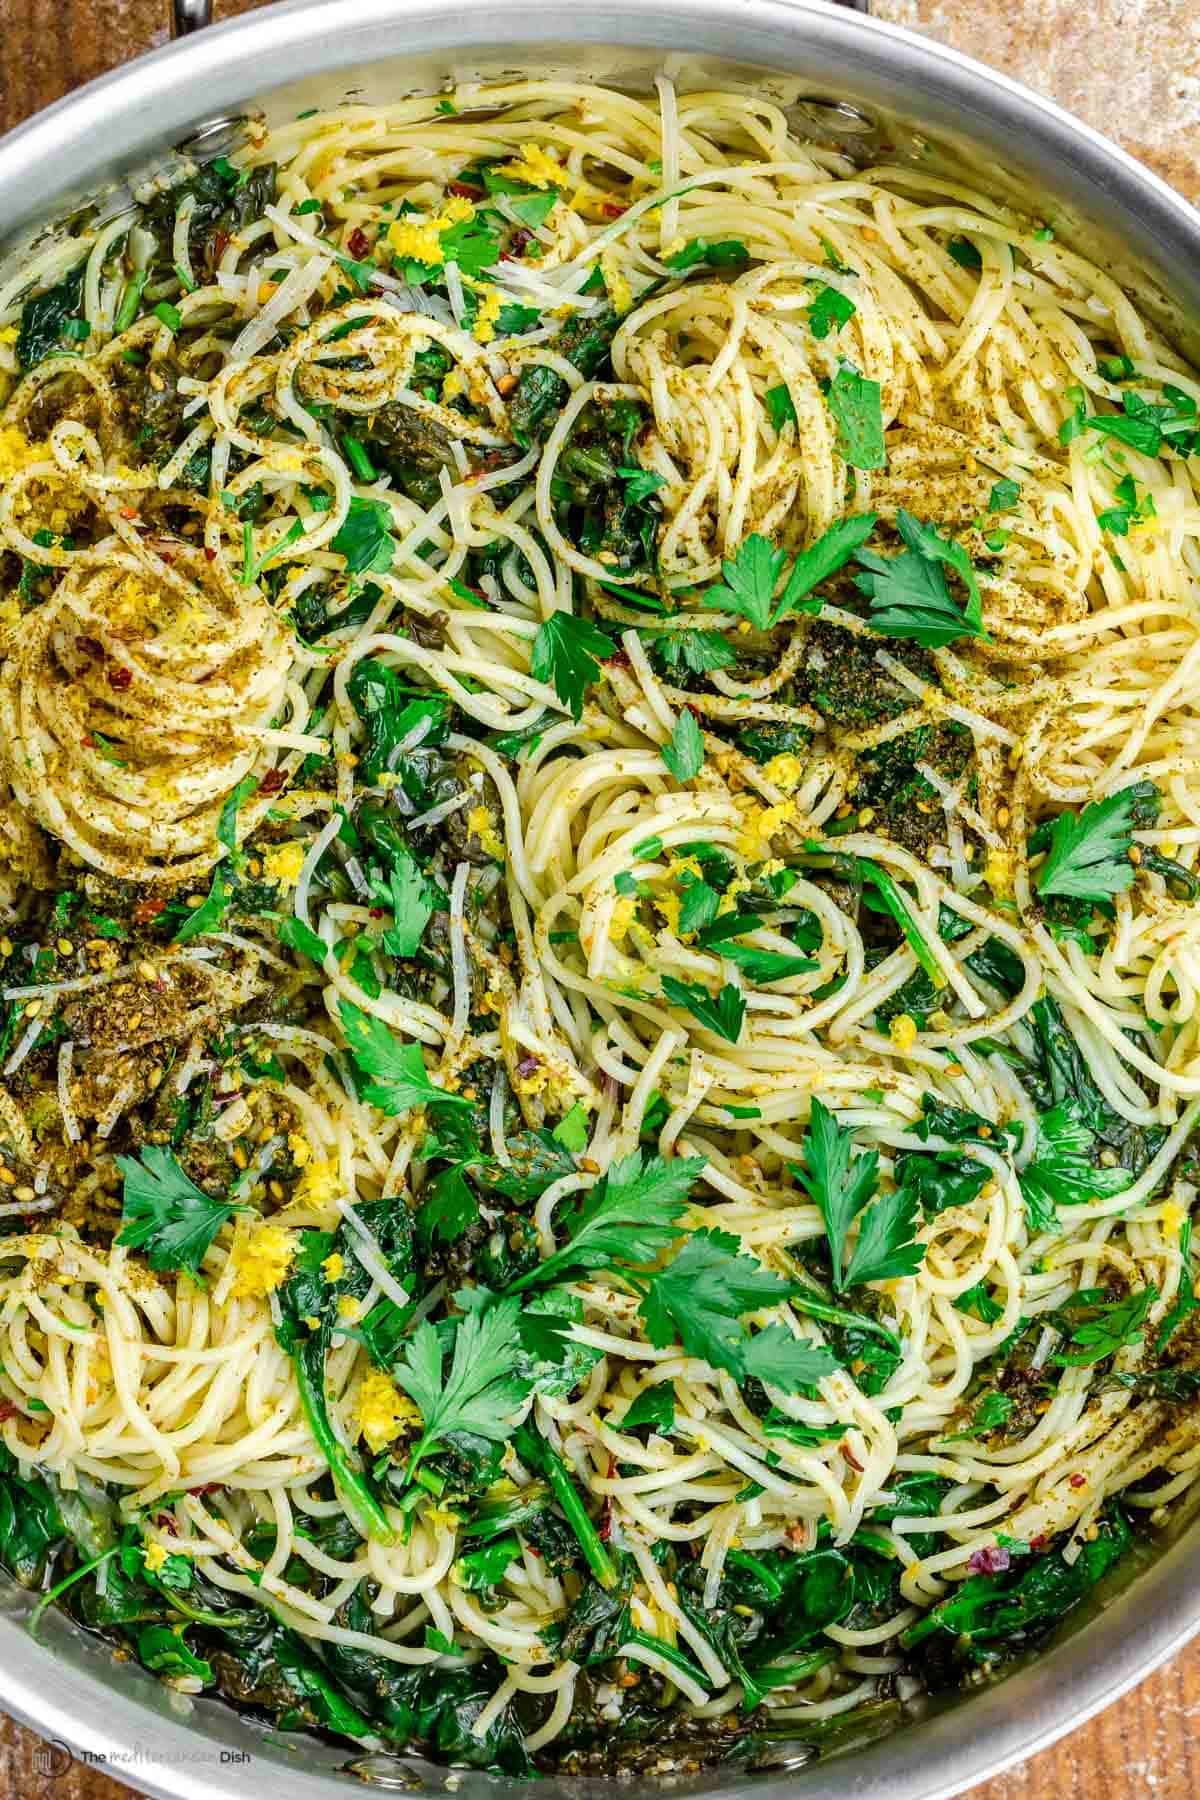 Way better than your typical spinach pasta!I've always been a big fan of olive oil pasta for an easy midweek dinner. In this version, oodles of baby spinach--yes, a good 12 ounces--and spaghetti are tossed in an appropriately garlicy olive oil sauce, and flavored with lemon, za’atar, red pepper flakes, and a sprinkle of shredded Parmesan cheese. This is not your typical spinach spaghetti, and you may not expect use za'atar as a seasoning for pasta, but the heady blend of toasted sesame seeds and wild thyme will add a bright, earthy, and slightly nutty flavor that truly elevates this simple pasta dish. And while most recipes of pasta and spinach use a lot of butter or heavy cream-based sauces, you'll find that good olive oil, coupled with a bit of the starchy cooking water, makes a silky rich sauce to coat the noodles. It is lighter but still comforting. And, yes, you can use whole grain pasta for an even more Mediterranean diet-friendly option!  What you'll need to make itThis spinach pasta is made with just a handful of ingredients. Here is what you'll need:
What kind of pasta to use?There is no right or wrong pasta to use in a simple recipe like this, but with olive oil based sauces, I tend to go with a thin pasta like spaghetti, linguine, or angel hair. I've found these thin pastas are best because the sauce coats them well, without weighing them down. 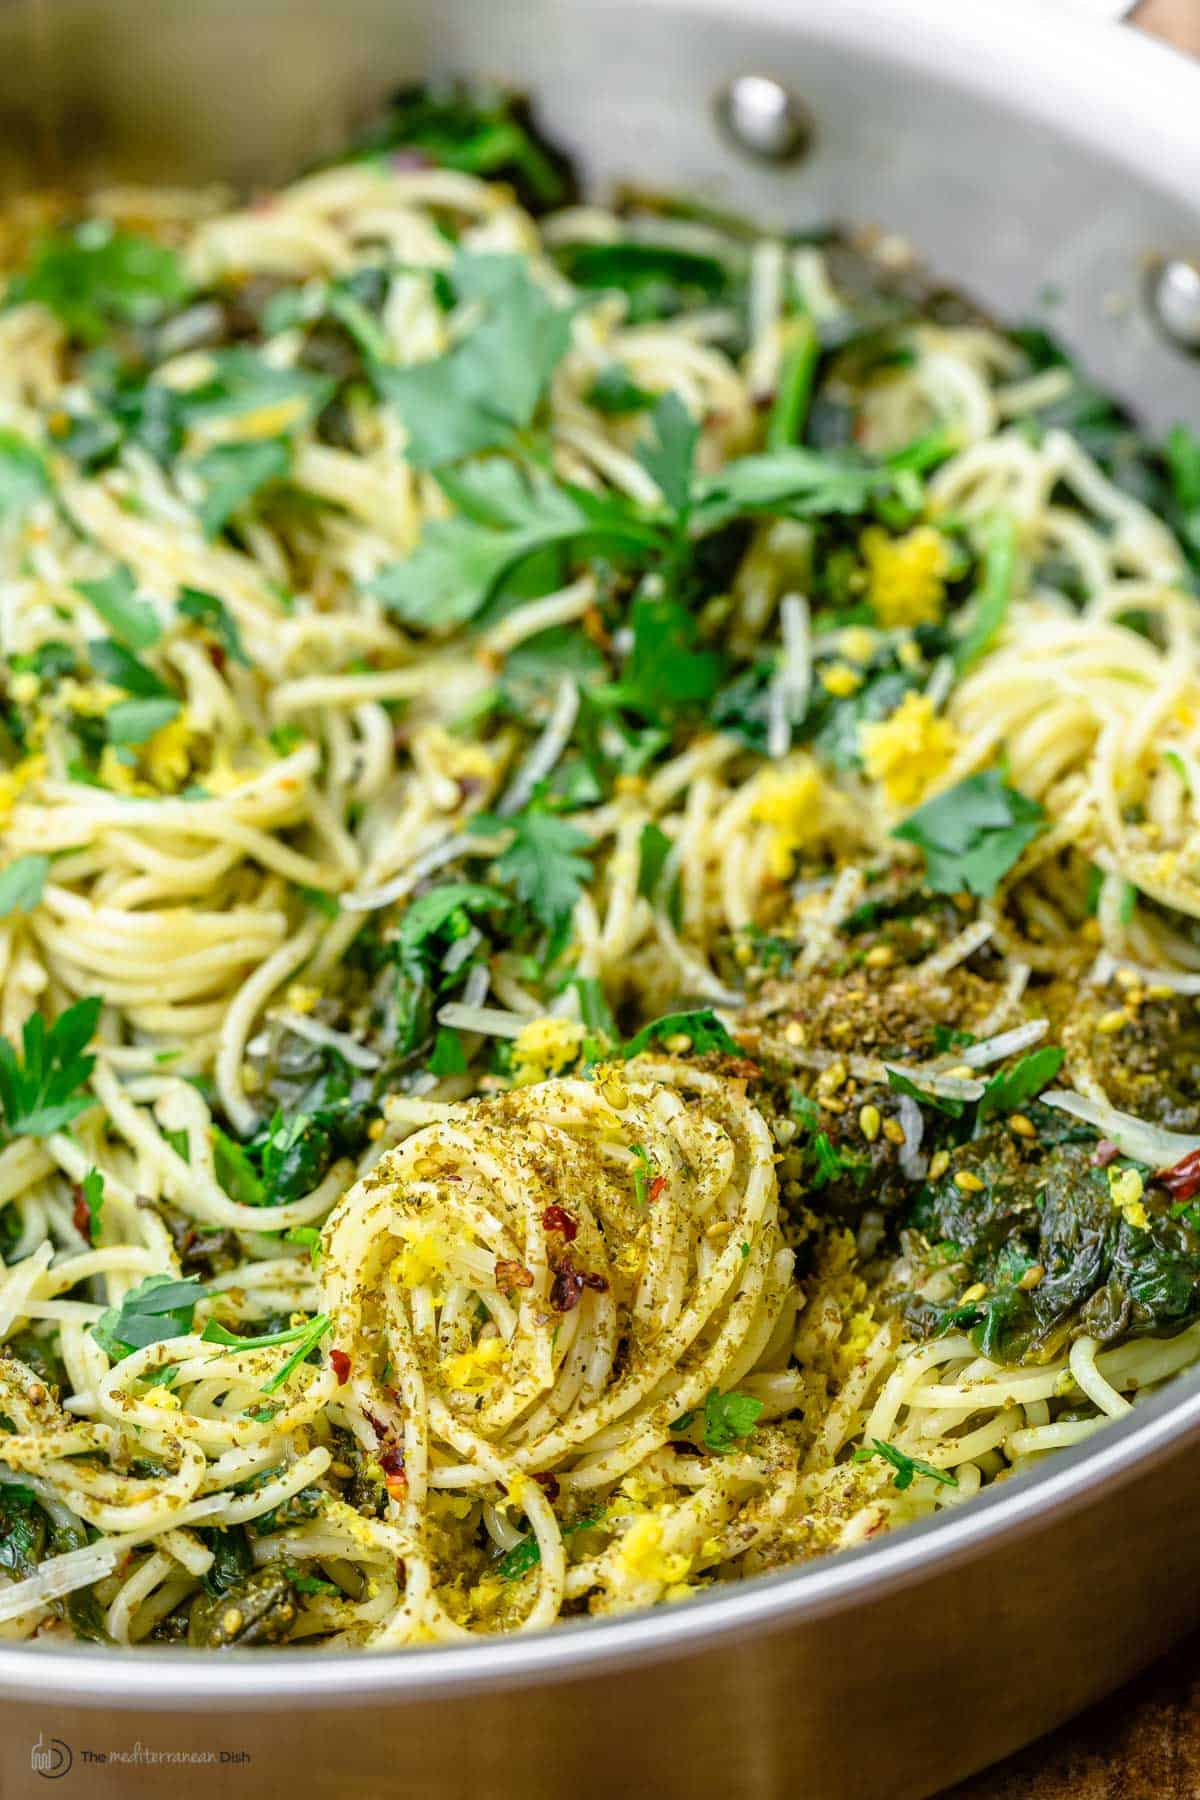 How to cook spinach for pasta?I love this recipe because I am able to use a good bit of spinach. My 12 ounces of spinach looks like a lot to start with, but once cooked, it will You'll need to cook the spinach separately, prior to stirring it into the pasta. Baby spinach is easy to cook in the olive oil with a bit of the pasta water until it wilts and softens nicely. It takes 5 minutes tops, working in batches and adding more as each batch wilts down.  How to make spinach pastaThere's just a few easy steps to making this garlic spinach spaghetti! It all comes together in just 20 minutes. Here's a quick visual of how it goes, but be sure to scroll down for the print-friendly recipe with the full ingredient list:
Tips for successIt's hard to go wrong with this simple garlic spinach spaghetti, but here are a few things to keep in mind
Serving suggestionsI recommend serving this spinach spaghetti with extra parmesan cheese and za'atar on the side. As with most za'atar recipes I make, I always find myself wanting to add more of the citrusy, nutty flavor to my dish! And, who doesn't love a little more cheese?! How to store leftover cooked pasta?Store leftover garlic pasta with spinach in an airtight container in the fridge for up to 3 days. Reheat quickly on the stovetop over medium heat, adding more olive oil or a splash of water as necessary to prevent it from drying out. More easy pasta recipes:
 Za'atar Garlic Spinach Pasta
Quick and easy, this weeknight Spinach Pasta is tossed in a garlicy olive oil sauce and flavored with lemon, za'atar, red pepper flakes, and a generous sprinkle of parmesan.
Servings 5 servings
Calories 493.7kcal
Ingredients
Instructions
VideoNotes
Nutrition
Calories: 493.7kcal | Carbohydrates: 41.8g | Protein: 9g | Fat: 33.8g | Saturated Fat: 4.8g | Cholesterol: 0.1mg | Sodium: 75.1mg | Potassium: 616.9mg | Fiber: 5g | Sugar: 2.2g | Vitamin A: 7606.9IU | Vitamin C: 48.7mg | Calcium: 153.3mg | Iron: 6.6mg
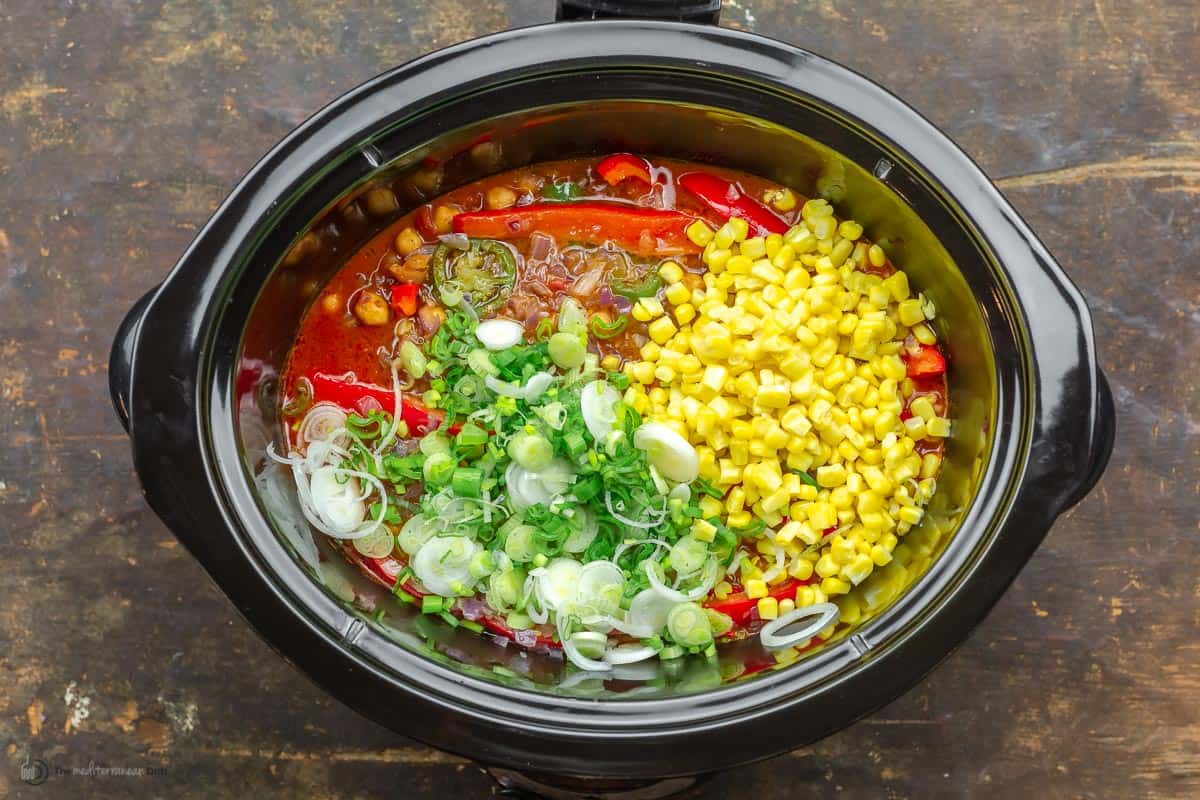
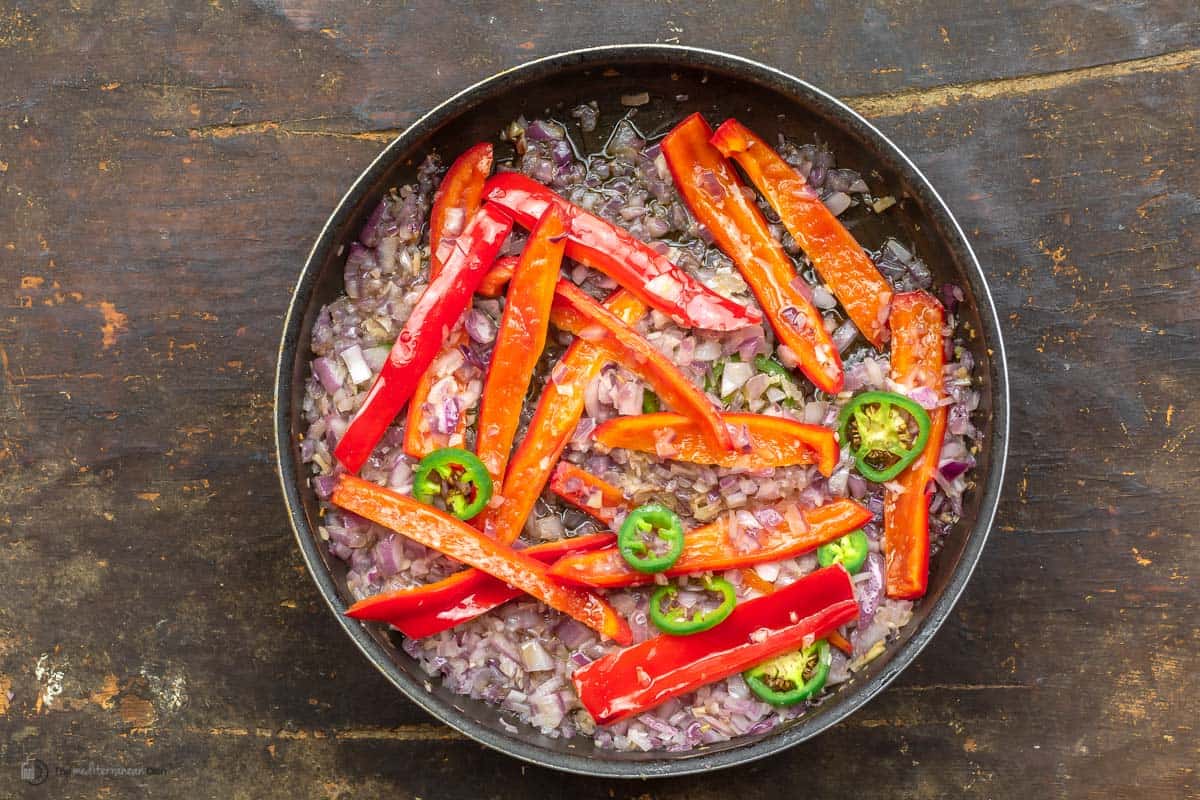
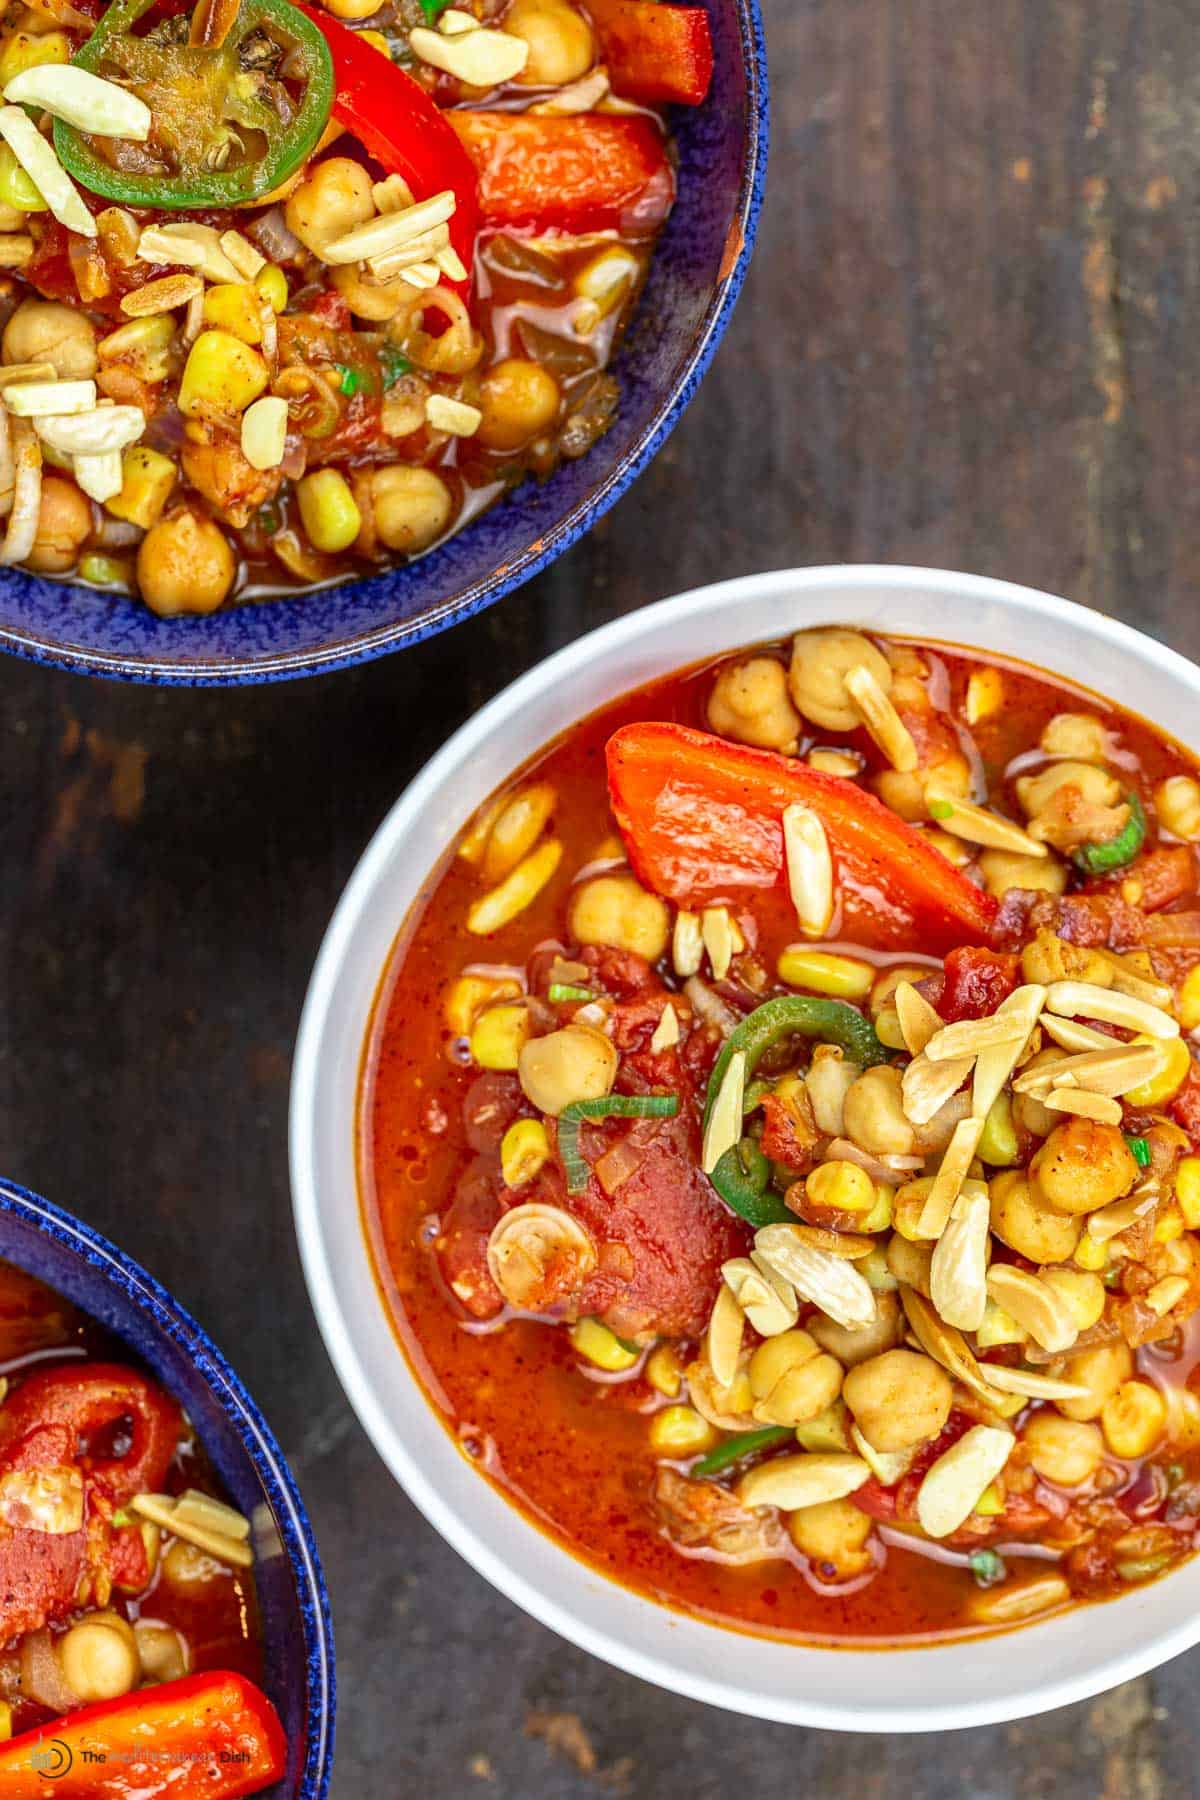
The post Za'atar Garlic Spinach Pasta appeared first on The Mediterranean Dish. via The Mediterranean Dish https://www.themediterraneandish.com/garlic-spinach-pasta/ Warm, hearty, and flavorful Tomato and Chickpea Chili! Make it in the slow cooker for best flavor and for a hands-off dinner, or try the stovetop method in the recipe notes! This recipe is from chef Alex Guarnaschelli's new cookbook Cook with Me, be sure to enter the giveaway below for a chance to win a copy! 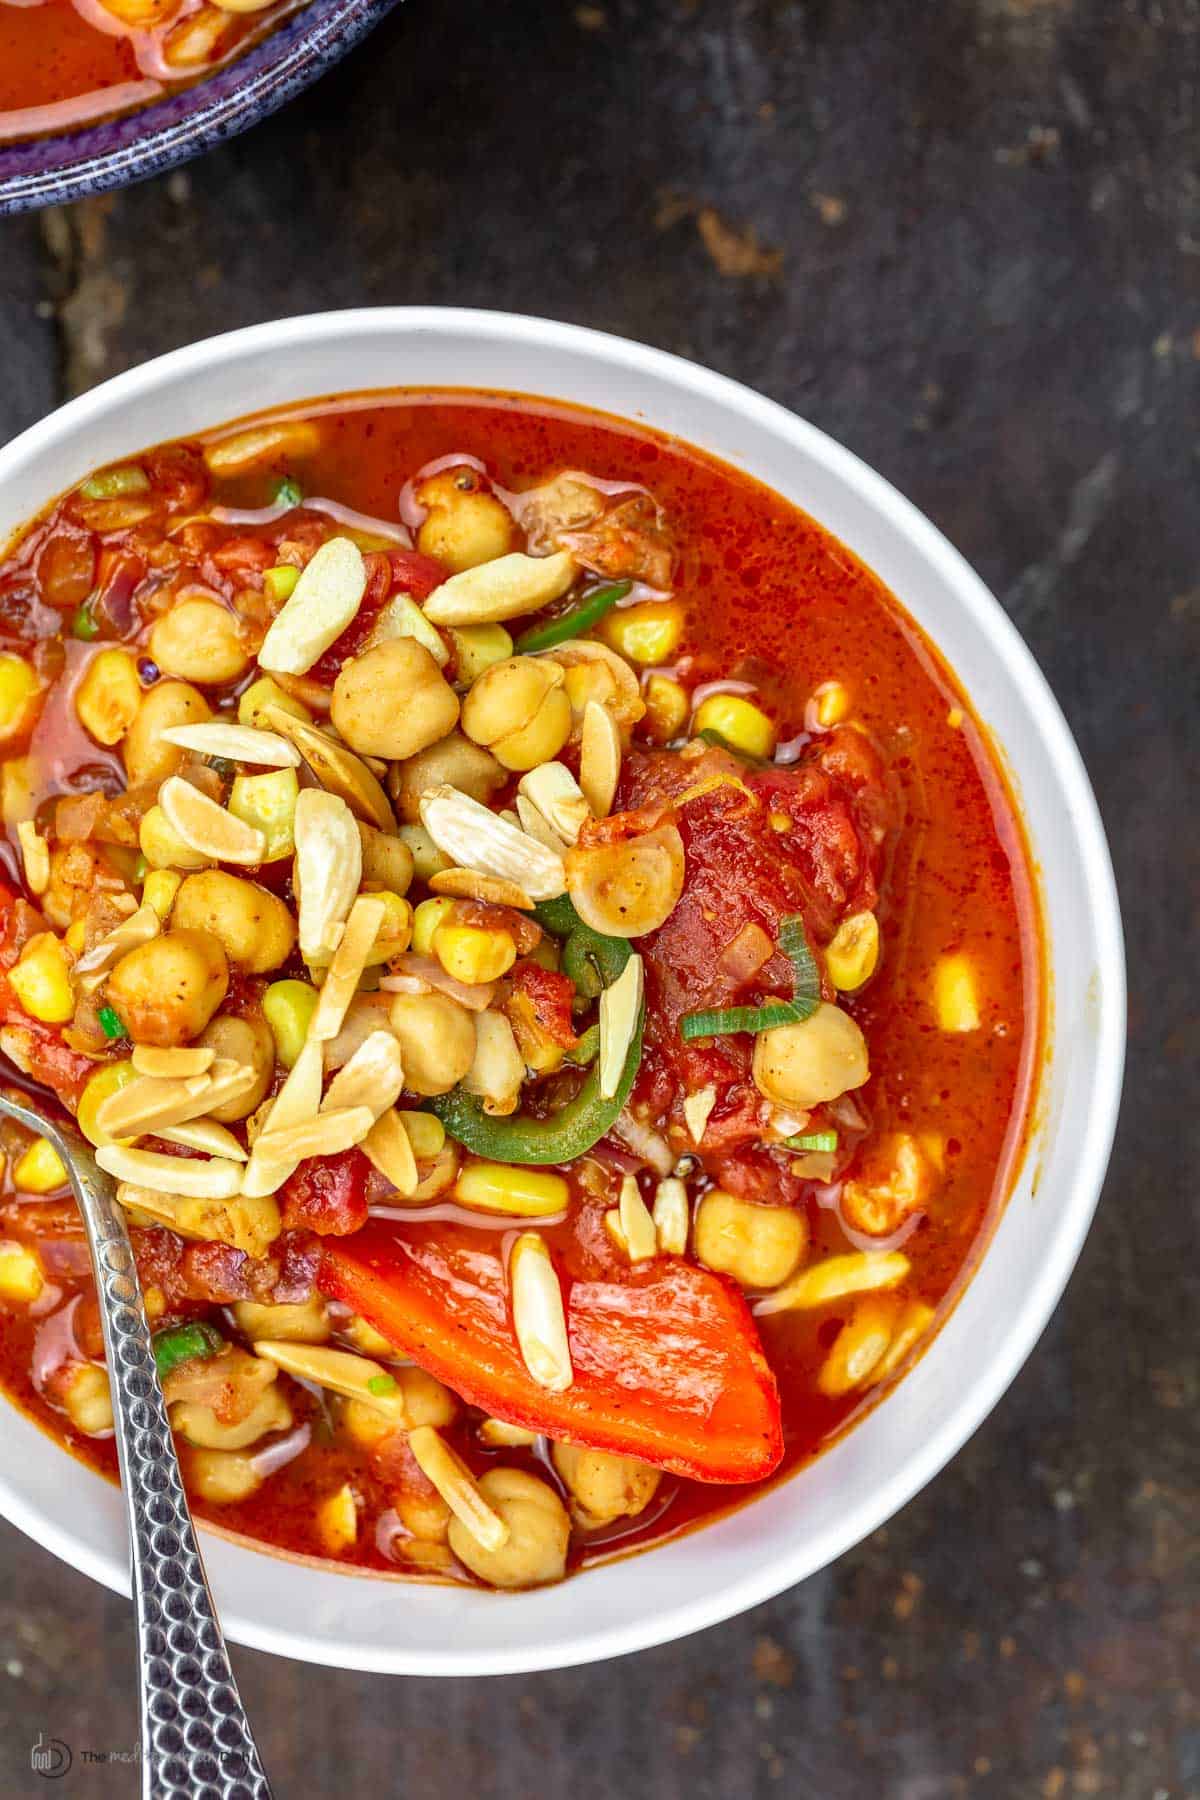 Every so often, I get a chance to share a recipe from a new cookbook that I love and cherish. This chickpea chili recipe is from Alex Guarnaschelli's new cookbook Cook with Me, with some very slight adaptations. And as only the Food Network icon can do, she gave us 150 delicious, tried-n-true recipes for the home cook. You'll love her personal touch and family stories that have shaped her as a chef today. For a chance to win a copy of this cookbook, be sure to enter the giveaway toward the bottom of this post. Easy slow cooker chiliIt was hard to choose just one recipe to share from the many delicious options in Cook with Me, but something about this comforting vegan chickpea chili resonates with me. Chef Alex believes that while meaty chili is dynamite, so are all of the flavors that build in this vegan version! I whole-heartedly agree! And I'm always up for a slow cooker meal that fills the air with delicious, cozy flavors. This chili is made with a chickpea base, which is a fun digression from the usual black or kidney beans. I also love the layers of veggies--onions, peppers, scallions, jalapeno--and seasonings that infuse flavor in every bite! Now, this is easy to make in just 30 minutes or so on the stovetop, but the slow cooker provides 6 hours or so of time for the flavors to meld and concentrate into rich, luscious goodness. For weeknights, I like to do the prep work for this chickpea chili ahead of time, so I can just dump everything in the slow cooker in the morning. In the evening, there's just 10 minutes or so of sautéing vegetables and then dinner is served. Are you in?! 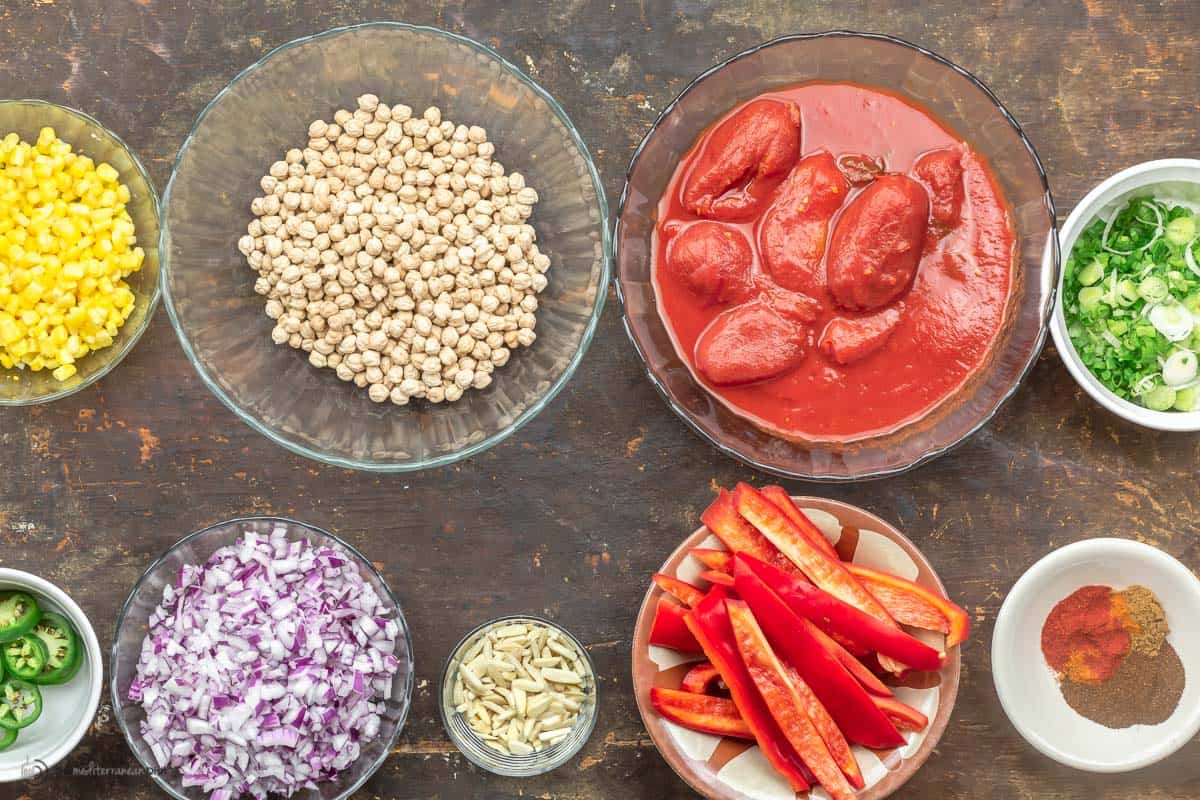 What is vegan chili made of?The great thing about chili is that it's so versatile, and you can easily make it your own. are so many ways to make vegan chili! It usually consists of beans, and occasionally a grain to give heft in place of meat, like this vegan quinoa chili I shared before. This tomato and chickpea chili recipe is obviously heavy on chickpeas, with layers of veggies and a fun finish of toasted nuts. Here's what you'll need to make it:
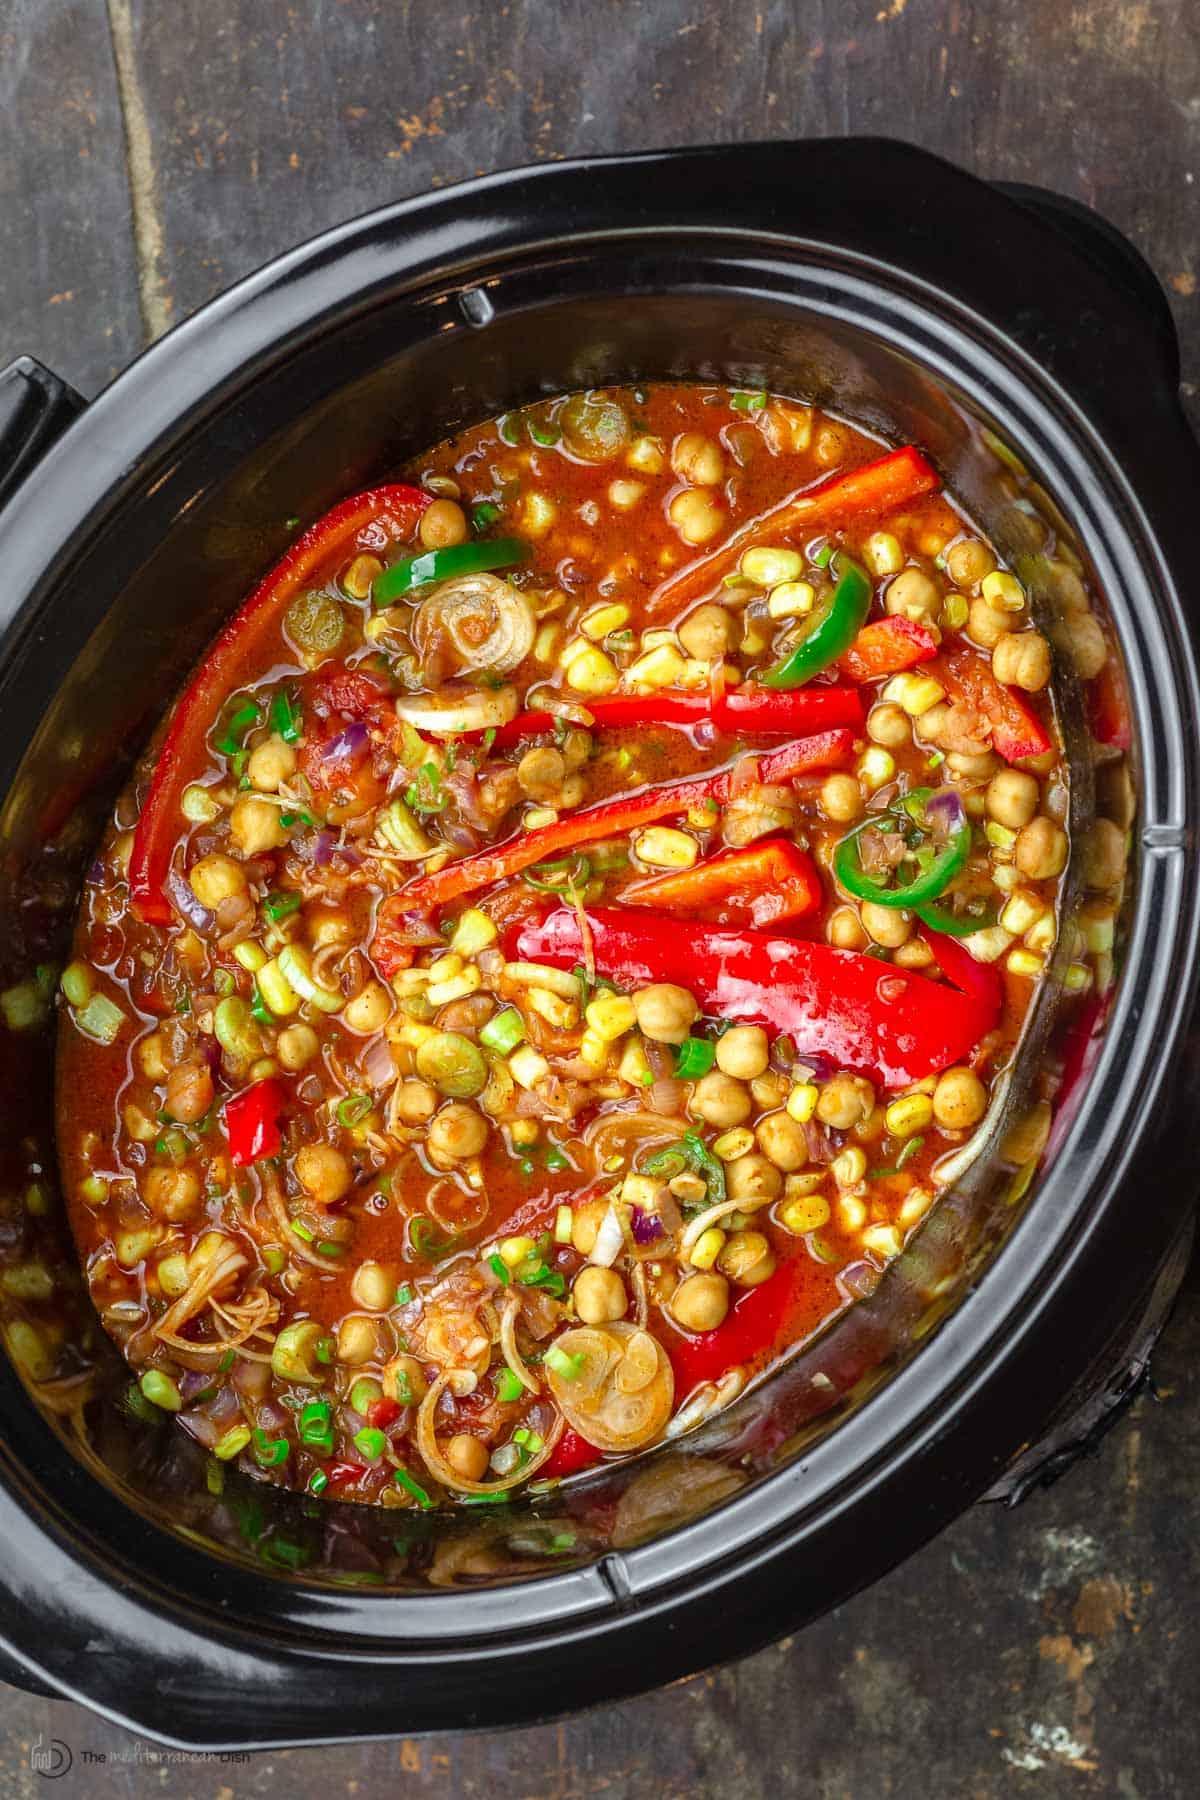 How to make slow cooker vegan chickpea chiliThis vegan chili is super easy to make and, thanks to the slow cooker, most of the cook time is hands-off! This is a great dish to throw together in the morning when you want to come home to an almost-ready dinner! Here's a quick rundown of how it goes (check out the full printable recipe with ingredient list below).
 How to make stovetop chickpea chiliIf you have 30 minutes, and want to make this chili on the stovetop, here's what you need to do:
 Vegan chili toppingsIt's always fun to add toppings to your chili to make it your own! Here are a few easy vegan chili toppings:
 VariationsFor the best chickpea chili, keep these things in mind:
How to store leftoversOne of the great things about chili is that it tastes even better the next day. Allow your chickpea chili to cool completely then transfer to a tight-lid container and refrigerate. I like to store individual servings to pull out and reheat as lunch throughout the week. Can I freeze chili?This vegan chili also freezes very well. Once completely cooled, transfer to freezer ziploc bags or other containers. I like the ziploc bags as they can lay flat in the freezer. Vegan chili will last for up to 5 months in the freezer (although I like to keep the corn and scallions out to add later). Thaw overnight in the fridge then reheat on the stovetop. You may need to add some extra liquid if the chili is too thick. Enter Cookbook GiveawayFor a chance to win a free copy of Cook With Me by Alex Guarnaschelli, enter below! USA residents 18 or older may enter this giveaway contest. Void where prohibited. Related recipes to try: Vegan Chickpea Chili (Slow Cooker or Stovetop)
Warm, hearty, and flavorful Tomato and Chickpea Chili! Make it in the slow cooker for best flavor and for a hands-off dinner, or try the stovetop method in the recipe notes!
Servings 8 servings
Calories 362.7kcal
Ingredients
InstructionsPrepare the Chickpeas
Vegan Chili in Slow Cooker
Vegan Chili Stovetop Method
Notes
Nutrition
Calories: 362.7kcal | Carbohydrates: 51.8g | Protein: 15g | Fat: 10.1g | Saturated Fat: 1.5g | Trans Fat: 0.1g | Sodium: 251.9mg | Potassium: 894.8mg | Fiber: 13.8g | Sugar: 11.5g | Vitamin A: 809IU | Vitamin C: 16.5mg | Calcium: 132.8mg | Iron: 5.7mg
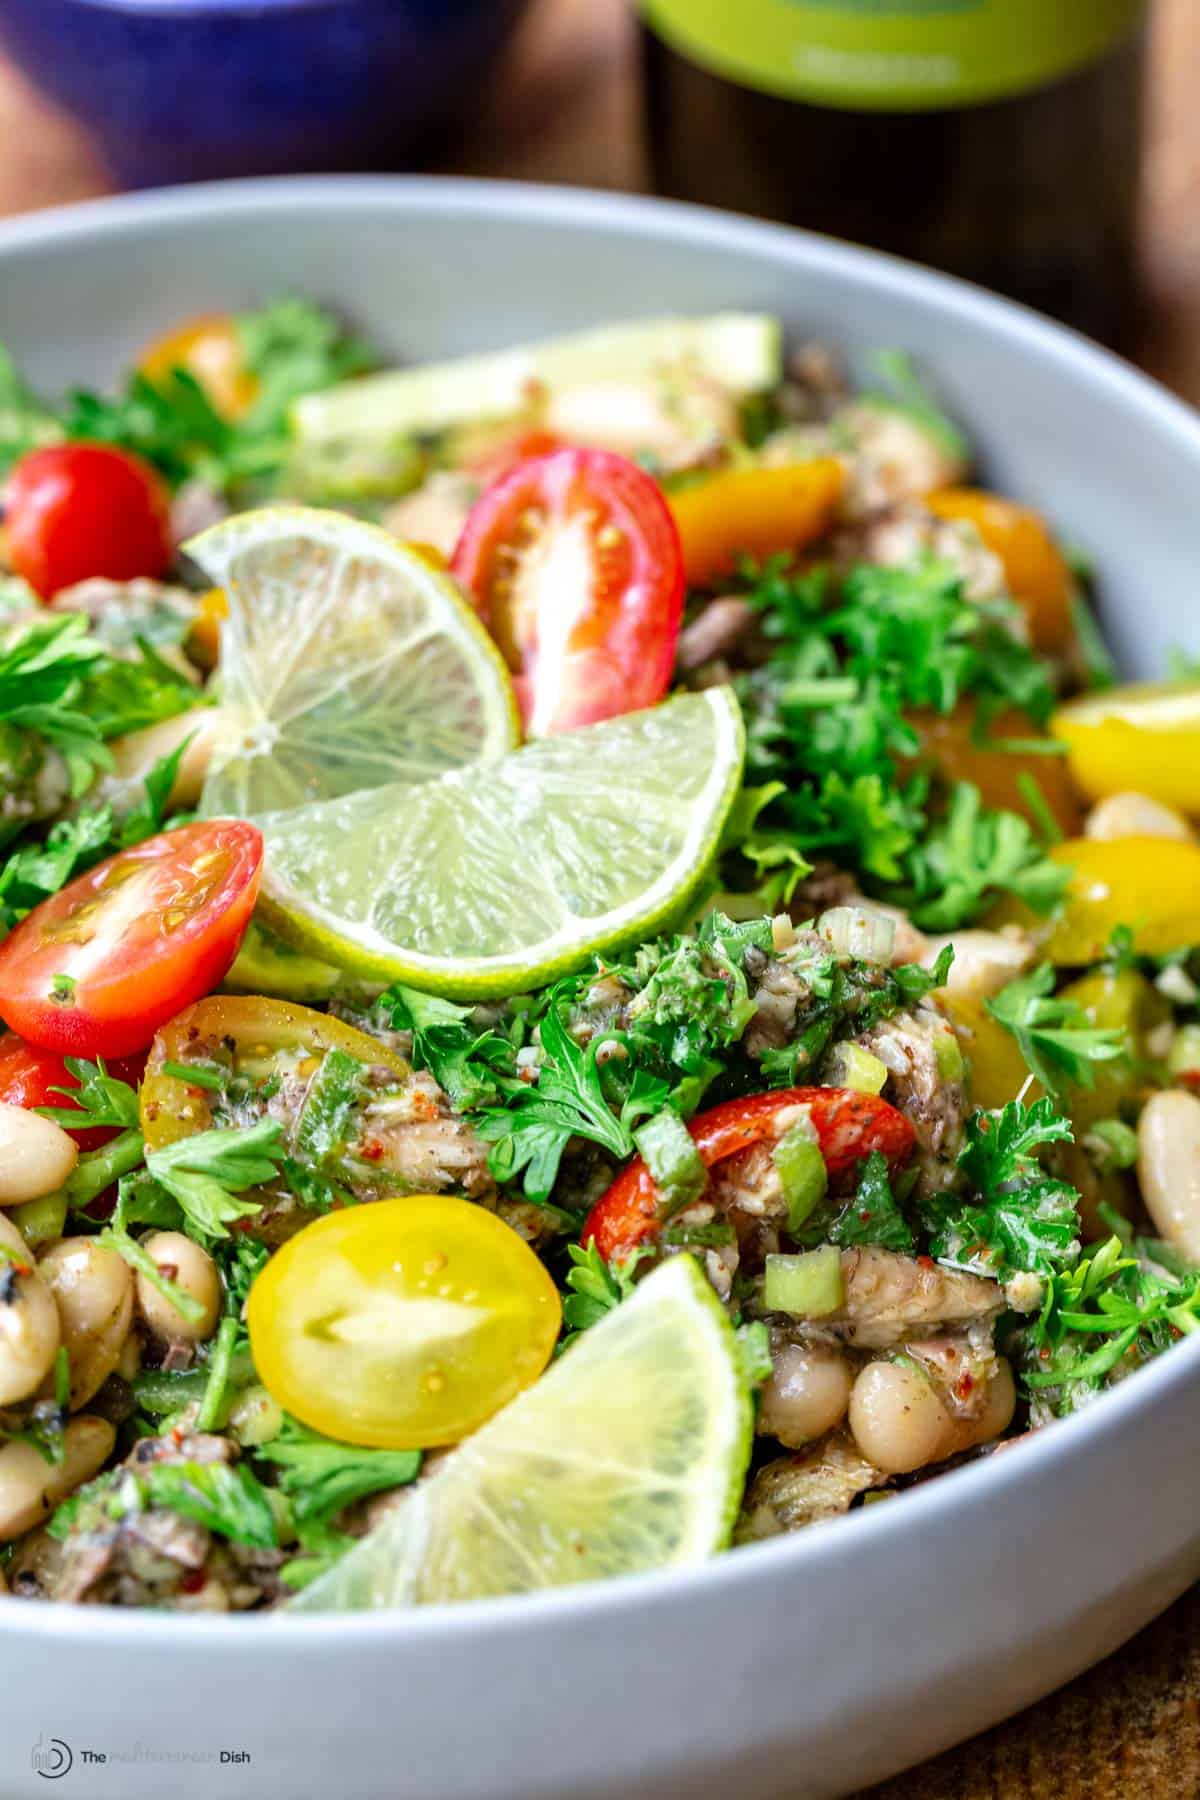
The post Tomato and Chickpea Chili (Two Ways) appeared first on The Mediterranean Dish. via The Mediterranean Dish https://www.themediterraneandish.com/vegan-chickpea-chili/ Made with simple, whole ingredients and topped with a bright homemade Dijon dressing, this Mediterranean White Bean and Sardine Salad is a quick and delicious meal in 15 minutes! Serve it with crusty bread for a satisfying meal any day. 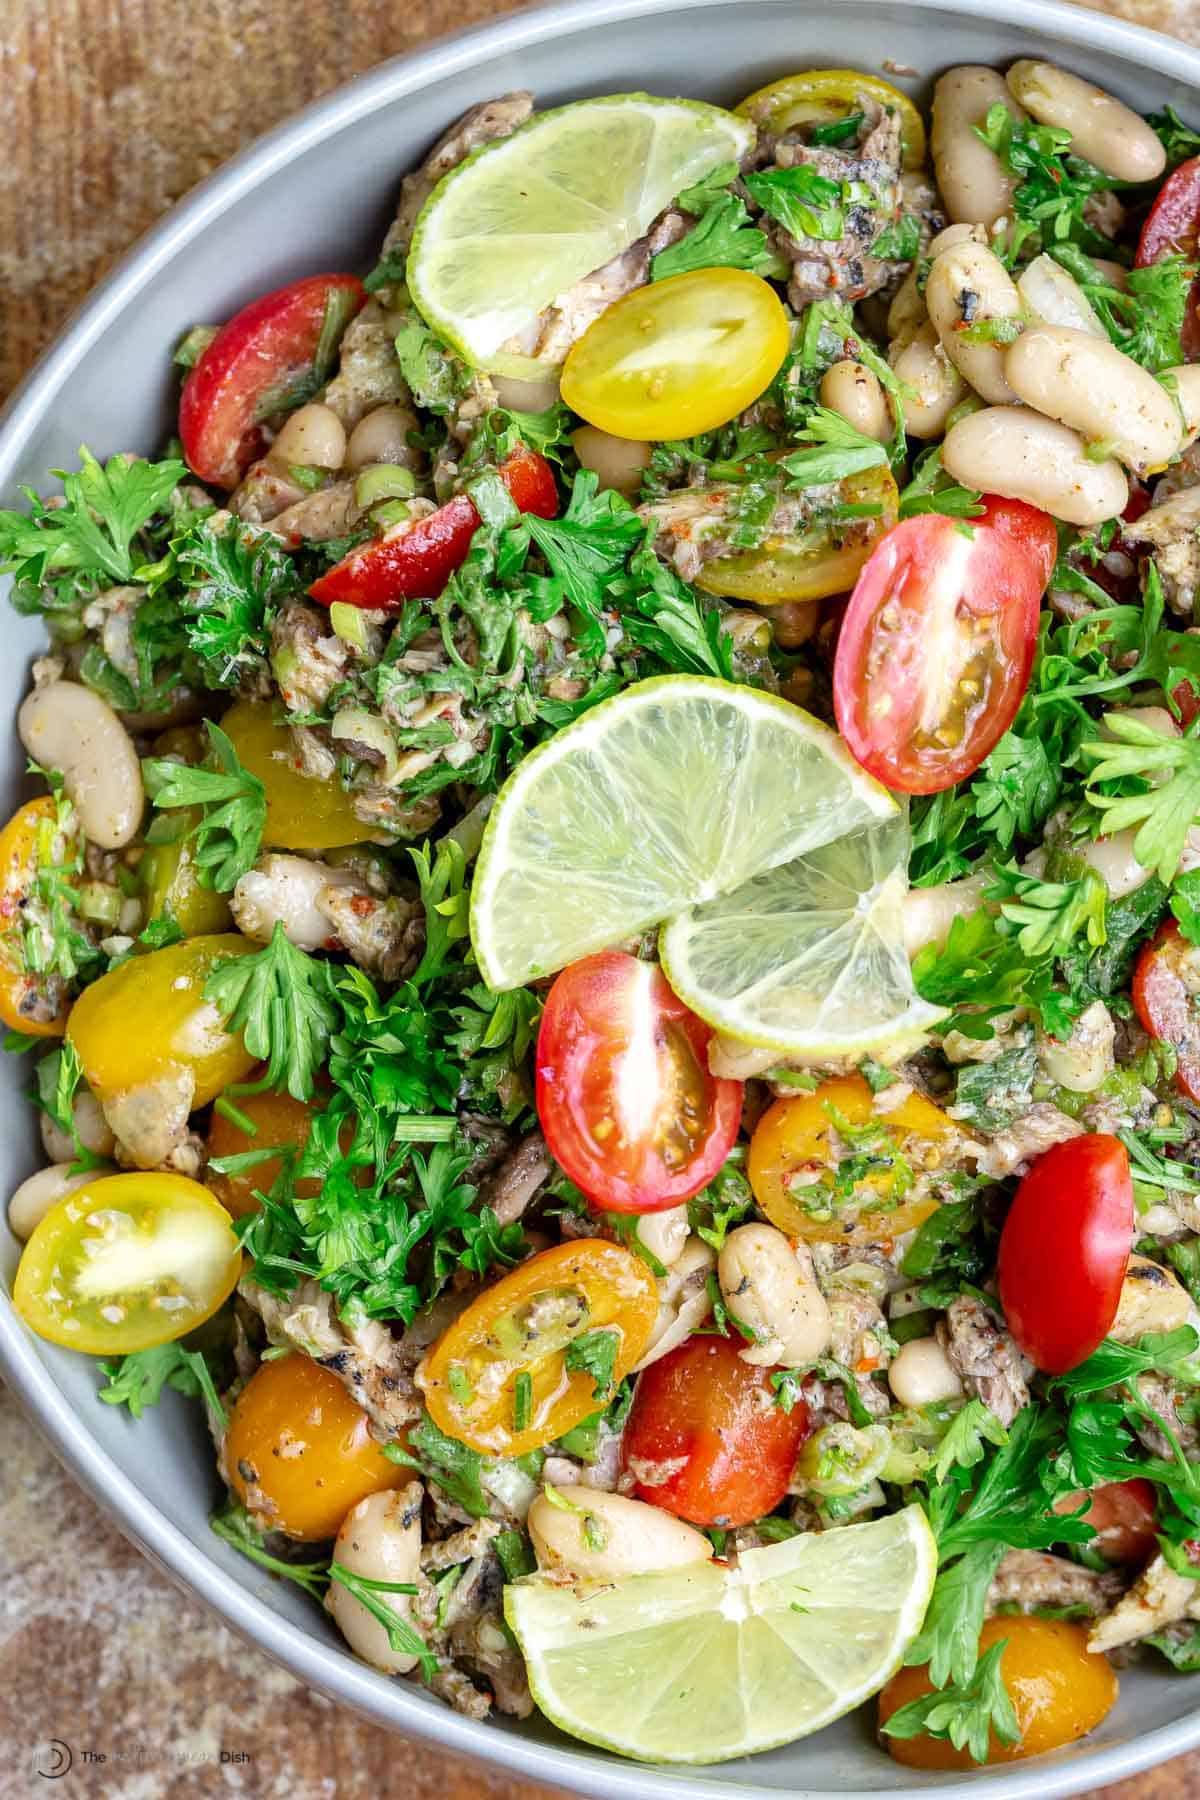 An easy sardine saladCanned sardines may not be the first ingredient that comes to mind when you're thinking about lunch or dinner, but they're a tasty little fish that is high protein, vitamins, and minerals, and with lower mercury levels than other fish. And for this busy mamma, I appreciate that you can turn sardines into a quick meal in 15 minutes! This Mediterranean sardine salad with white beans, tomatoes, green onions, and fresh herbs is a prime example of how you can put a couple cans of sardines to good use on short notice. It is a simple combination of powerful flavors, pulled together with an easy Dijon dressing and Mediterranean favorites like sumac and Aleppo pepper (but you can change seasonings up to your liking). And between the sardines and white beans, this salad is a satisfying dish that makes a great lunch or light dinner with your favorite crusty bread. 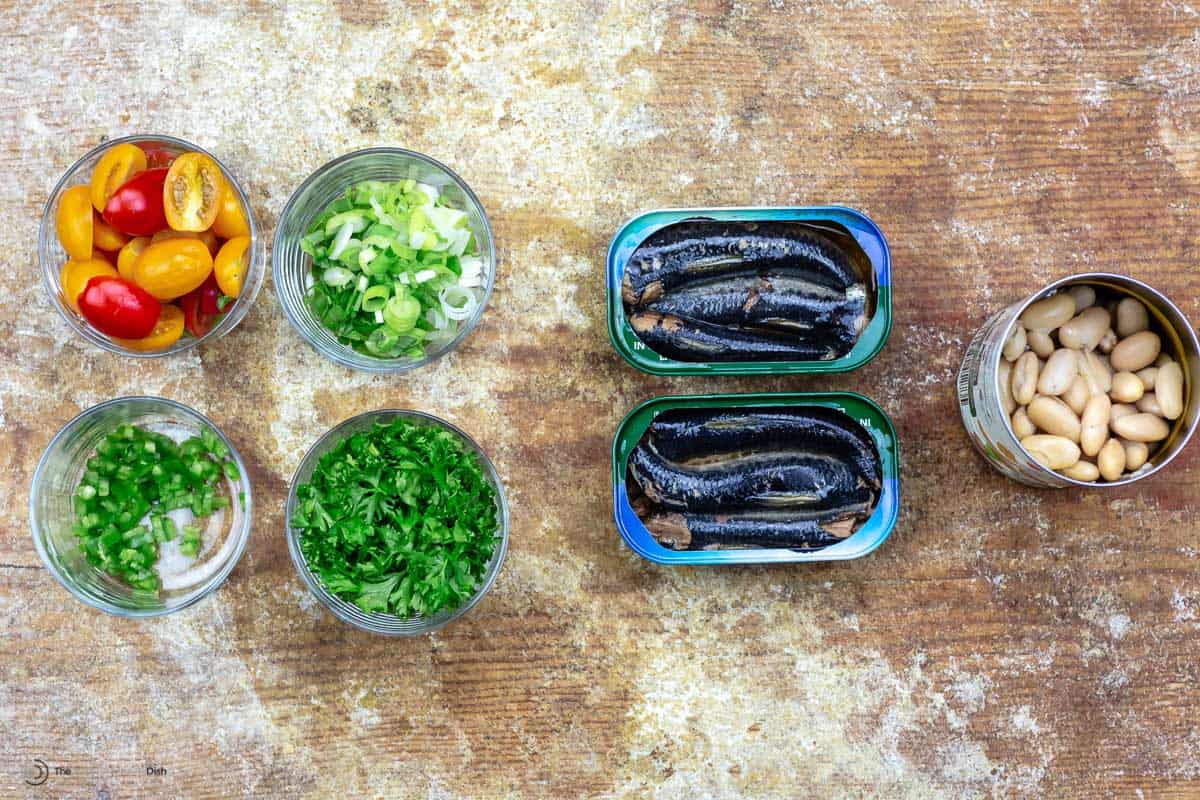 What to look for when buying canned sardines?Canned sardines do come in different options--some packed whole or chopped, and the canning liquid will differ from water to olive oil, or sauce. Generally, canned sardines are accessible and relatively affordable, but this is one case where I would advice to pay a little bit more for quality, wild-caught sardines for better flavor and less preservatives (always compare labels). I prefer whole canned sardines that are packed in olive oil. I have used Wild Planet sardines which are caught using sustainable methods and well-cleaned and scale-free. And I like their smokey taste. King Oscar sources smaller sardines that are caught near the Norwegian shore, they have a milder taste and good texture as well. There are many other great options, those two are just what I have used. What you'll need to make this sardine salad recipeThis salad is made with simple ingredients - sardines, white beans, a few vegetables, and seasonings - that create a fresh, flavorful dish! Here is a quick list of ingredients:
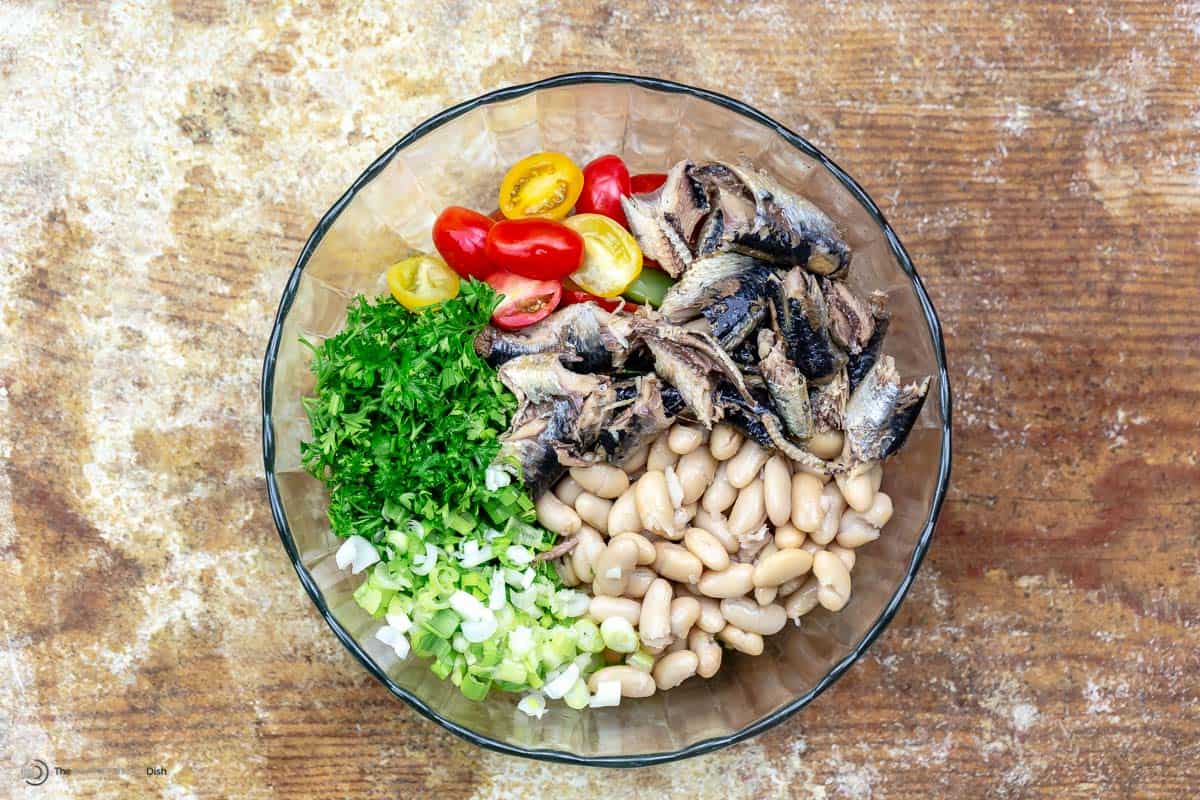 How to make this sardine saladThese easy white bean salad comes together with just a few minutes prep!
 Recipe variationsIf you want to make this recipe with a little twist, go for it! Here are a few ideas and suggestions to get you started:
Tips for the best white bean and sardine saladFor perfectly flavored sardine salad, keep these few key tips in mind.
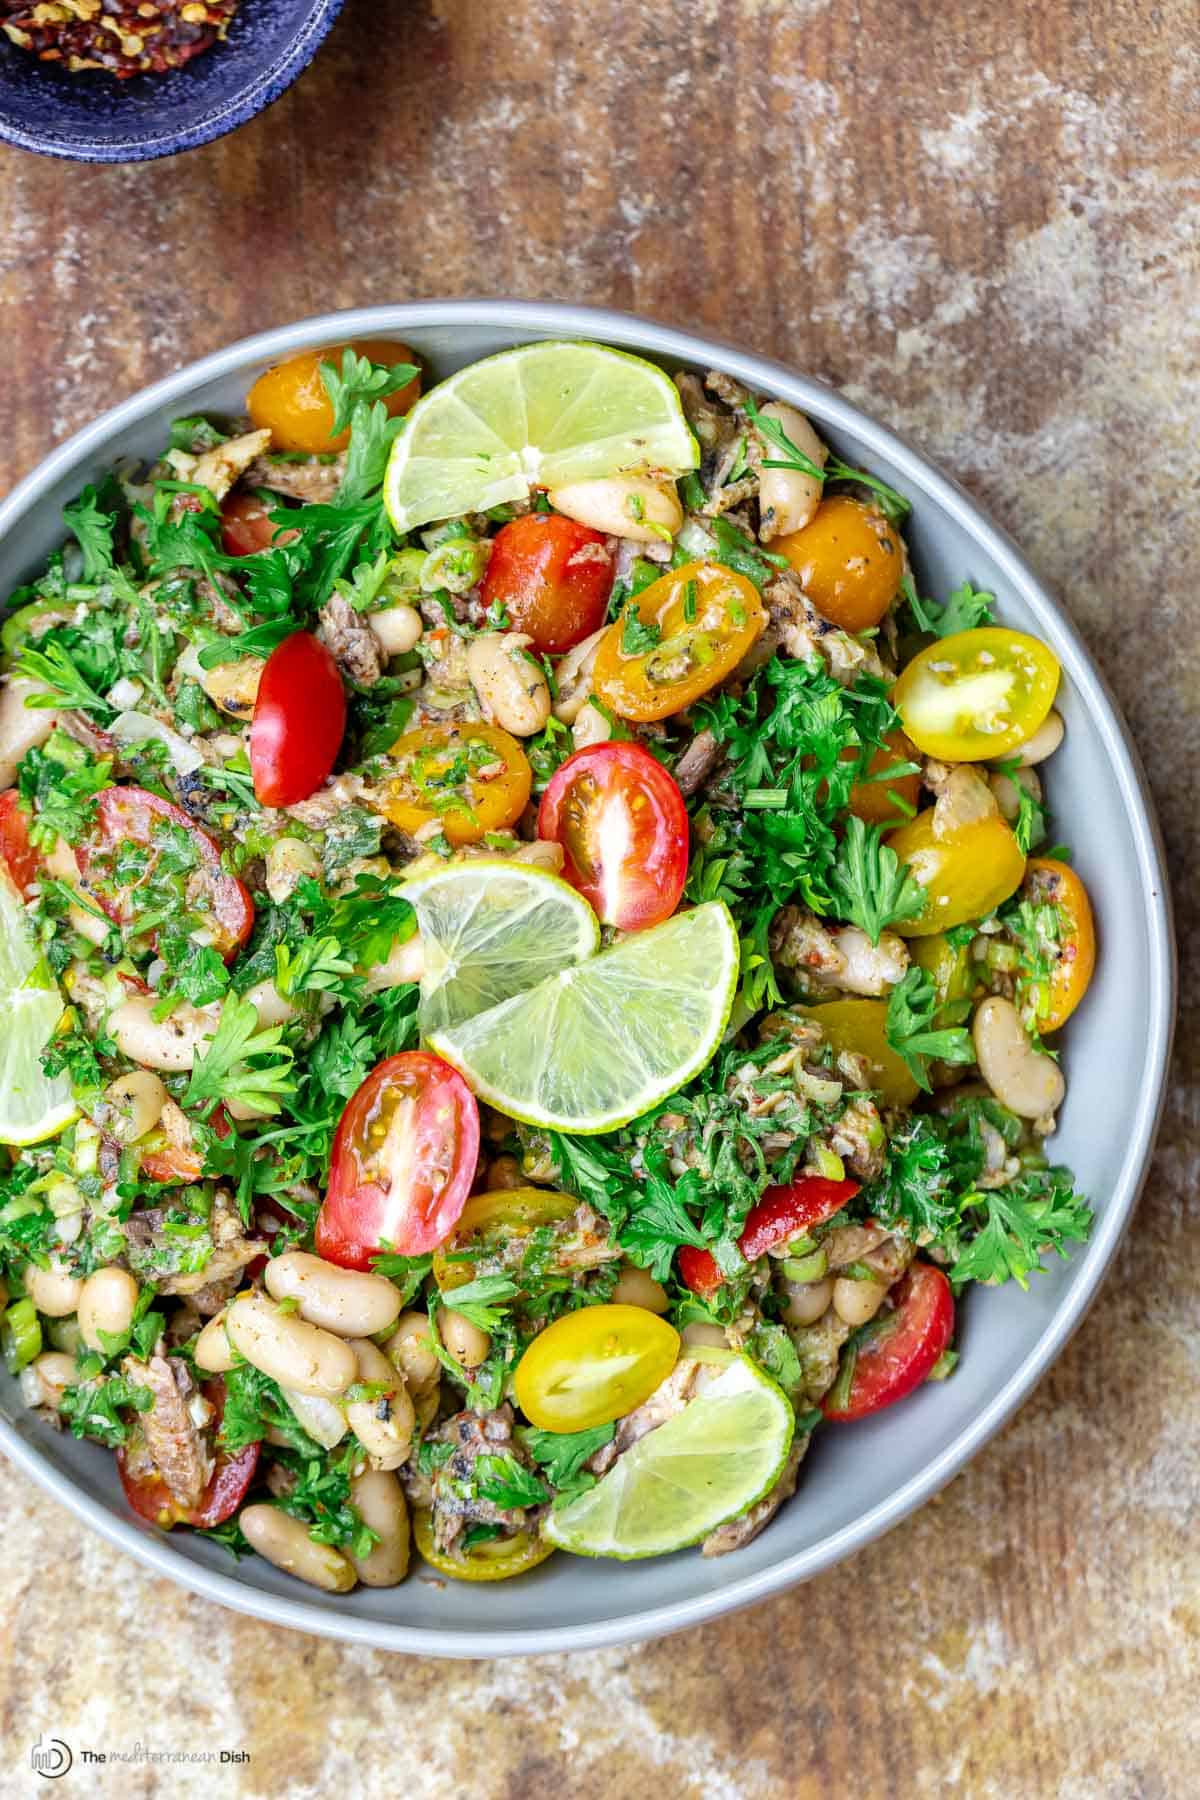 Serving suggestionsMediterranean sardine salad works as an appetizer or main entree and makes a particularly easy and healthy lunch. Serve with your favorite crusty bread - day old bread is great here - to soak up every last minute of dressing. Simple and satisfying! How to store leftoversAny leftover white bean and sardine salad should be stored in an airtight container in the fridge. It will last for up to 3 days. If serving with greens, I recommend storing the greens separately. More salad recipes:
 Mediterranean White Bean and Sardine Salad
Made with simple, whole ingredients and topped with a homemade Dijon mustard and aleppo pepper dressing, this Mediterranean White Bean and Sardine Salad is a quick and easy lunch. Serve with crusty bread for a satisfying meal any day.
Servings 4 people
Calories 239.7kcal
IngredientsFor the Salad
For the Dressing
Instructions
Notes
Nutrition
Calories: 239.7kcal | Carbohydrates: 20.9g | Protein: 22.7g | Fat: 7.7g | Saturated Fat: 1g | Cholesterol: 88.8mg | Sodium: 361.8mg | Potassium: 811.8mg | Fiber: 5.5g | Sugar: 1.9g | Vitamin A: 1621IU | Vitamin C: 38.9mg | Calcium: 332.9mg | Iron: 5.6mg
The post 15-Minute Mediterranean Sardine Salad appeared first on The Mediterranean Dish. via The Mediterranean Dish https://www.themediterraneandish.com/mediterranean-sardine-salad/ A simple and authentic Middle Eastern Tahini Salad with cucumbers, tomatoes, and fresh herbs swimming in a homemade tahini sauce! Serve it with some pita wedges, or use it to dress up your falafels, chicken skewers, fish dishes, and more! 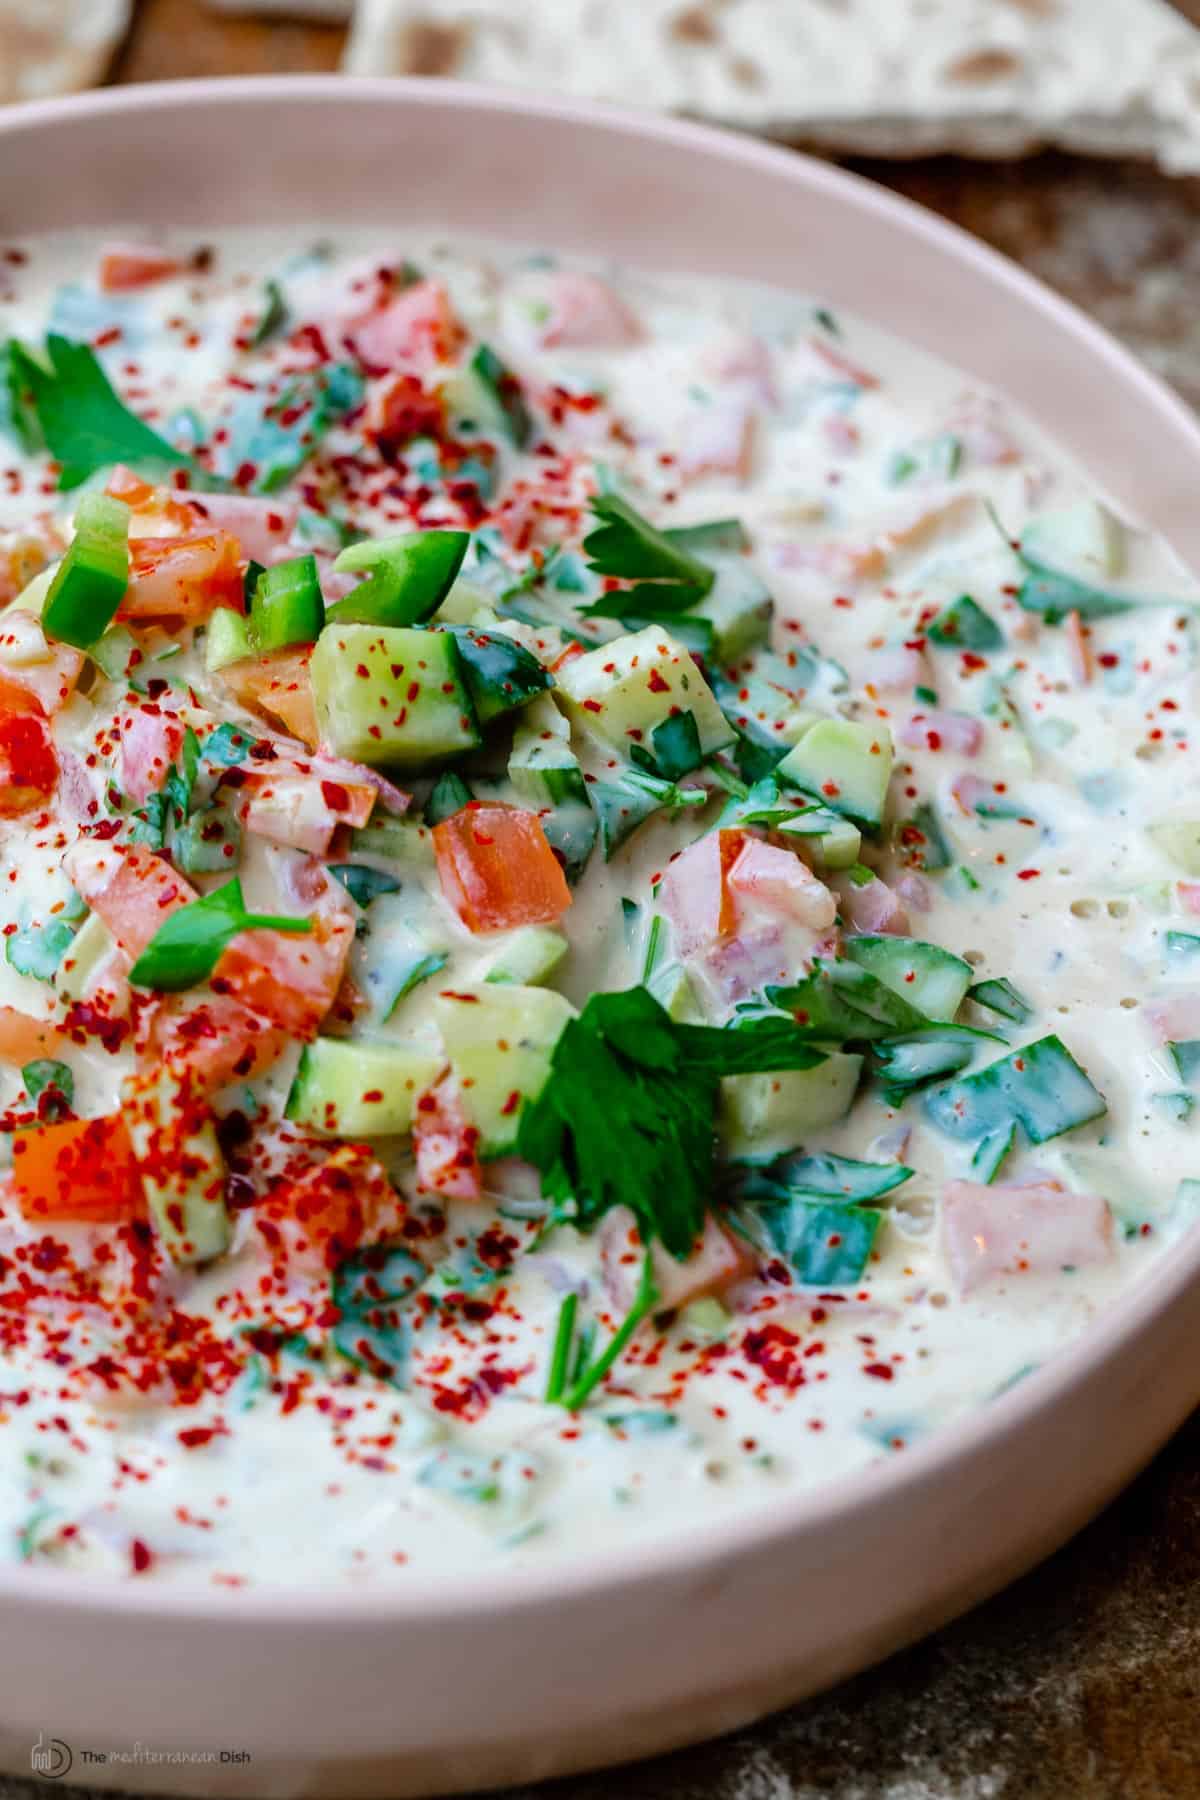 Like hummus, foul mudammas and baba ganoush, this cucumber and tomato tahini salad is another popular dish in restaurants all over the Middle East and Egypt, where I grew up. It is often used to compliment many dishes from kabobs to shawarma sandwiches, grilled fish, and everything in between (I've included some specific ideas below). Let's be clear about one thing, when we say tahini salad, we don't just mean chopped vegetables dressed with a drizzle of tahini sauce--that's what I do with my grilled lettuce salad, but this is different. An authentic Middle Eastern tahini salad is made of small diced cucumbers, tomatoes, chopped fresh herbs, and, if you like, a hot peppers, all swimming in lime tahini sauce! The tahini here is key, and the sauce is made first, then the veggies and herbs are mixed in. 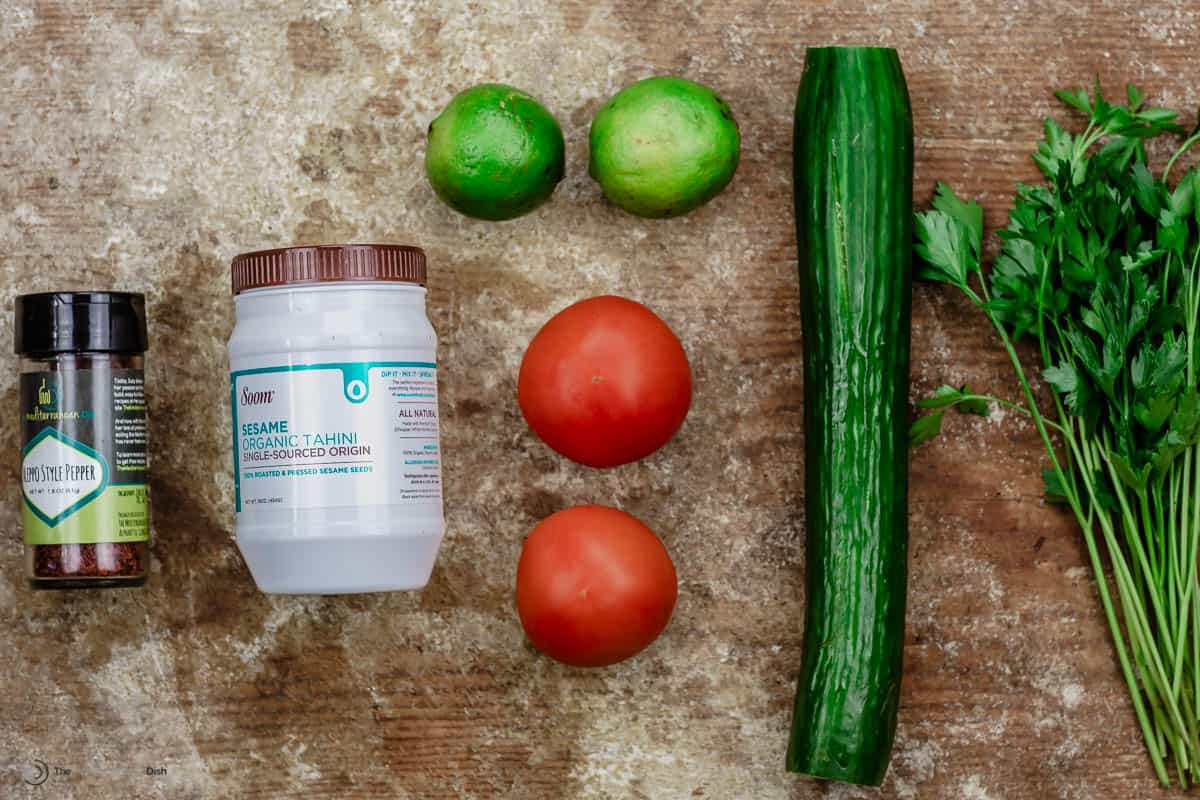 What you'll need to make this tahini salad recipeMiddle Eastern tahini salad is made using a few specific vegetables and an easy, homemade tahini sauce.
What is tahini? And what does it taste like?Tahini is a paste made of ground sesame seeds. It is rich and creamy and tastes mildly nutty and savory. Tahini has been compared to nut butters, though it's made from seeds instead of nuts. Not all tahini is created equally and if you grab the wrong brand, you could end up with tahini that tastes bitter and chalky. For that reason, I always use and recommend this tahini. I use it in many things from hummus, to salads, dressings, and even desserts like my extra chewy tahini brownies. 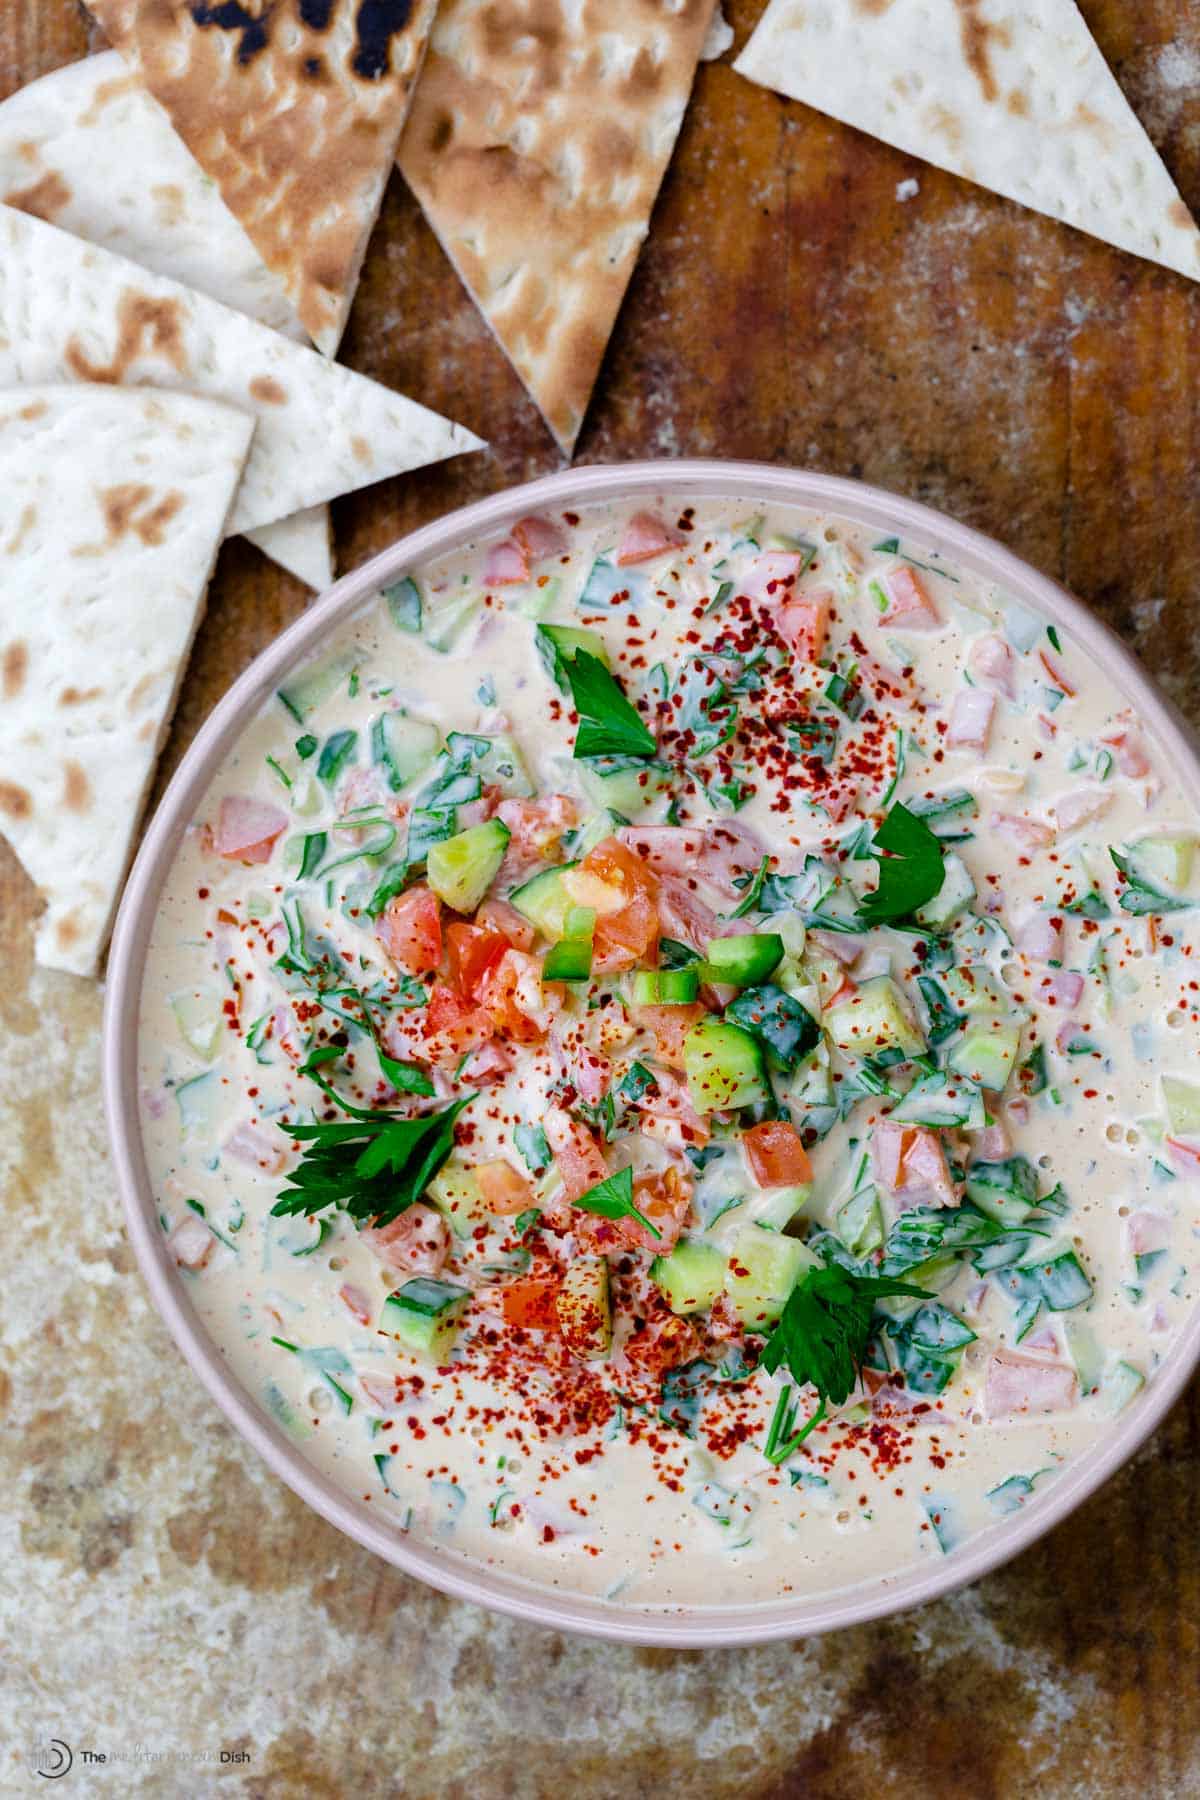 Tahini dressingIn this tahini salad, my lime tahini sauce is used as the dressing. To make it, you simply blend tahini paste, garlic, lime juice, a dash of kosher salt and a little bit of water together. I also add fresh parsley for additional flavor. How to make tahini saladMaking this cucumber and tomato tahini salad recipe could not be easier!
Tips for successTo make authentic Middle Eastern tahini salad, keep these tips and suggestions in mind:
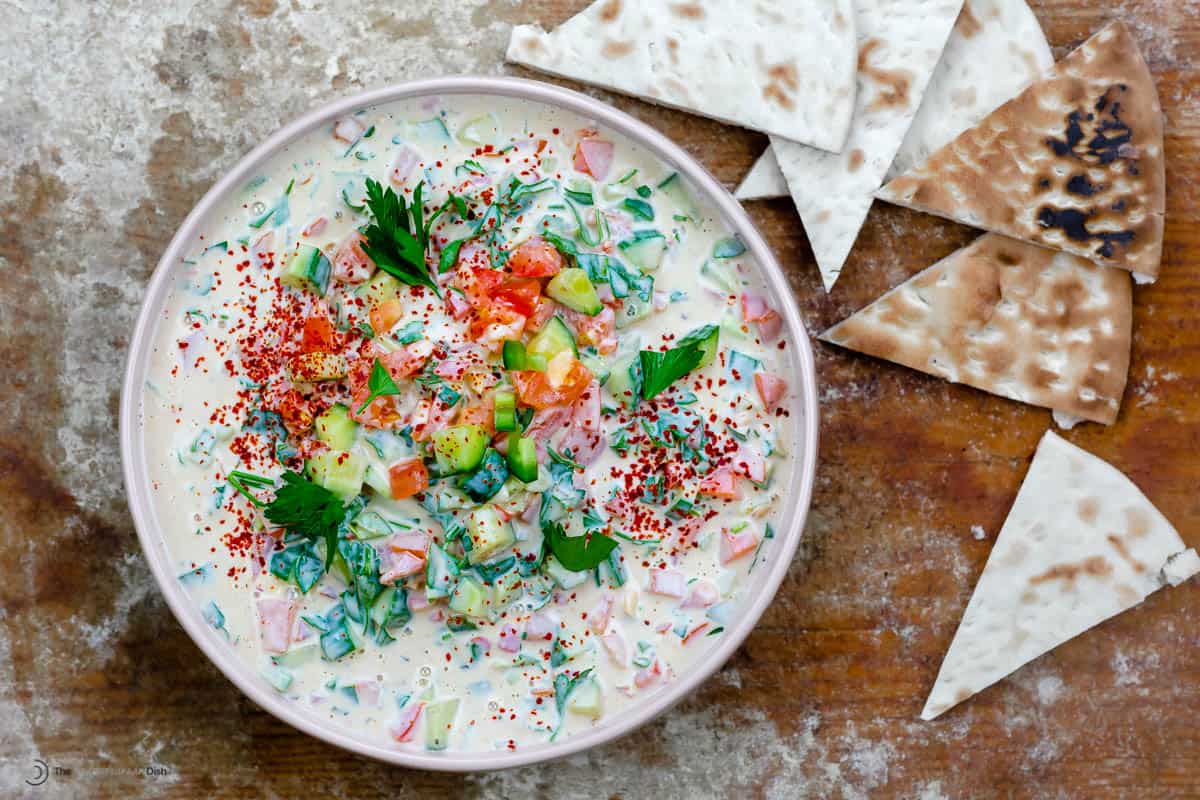 Serve it withThere are so many ways to serve this cucumber and tomato tahini salad recipe! Here are a few of my favorites:
However you choose the serve it, tahini salad is a light side dish that adds loads of flavor to your meal! How to store leftoversYou can keep leftover tahini salad in the fridge for 3 to 4 days. Be sure to store it in a tight-lid container and just give it a stir before serving. 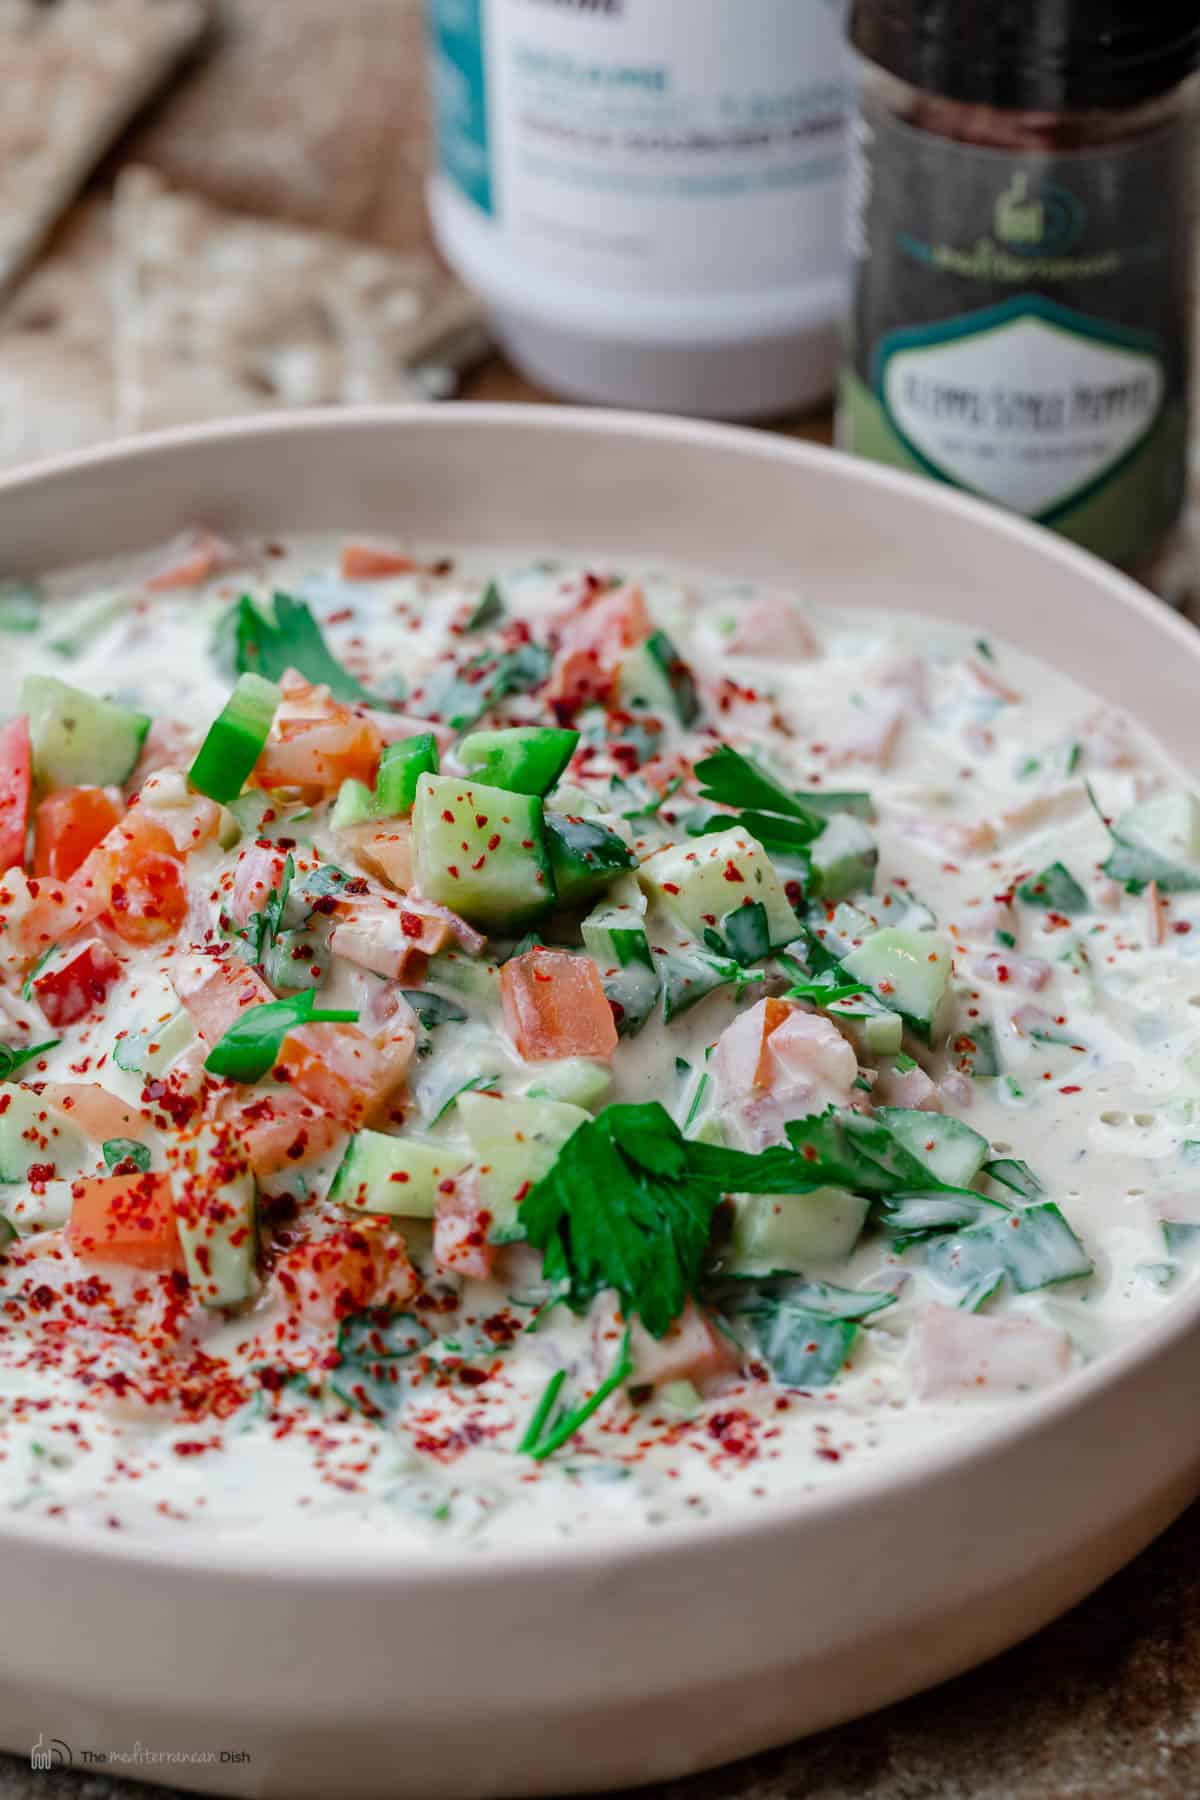 Can I make this in advance?Yes. As I mentioned, you can make the tahini dressing itself a day in advance. The salad will also stay fresh in the fridge for up to 3 days so you can easily prepare it the day before it's needed if necessary. More easy Middle Eastern salad recipes:Hungry for more? Browse my 50+ Top Mediterranean Diet Recipes or all Mediterranean recipes. Visit Our Shop.  Cucumber Tomato Tahini Salad
A simple and authentic Middle Eastern Tahini Salad made with cucumbers, tomatoes, and fresh herbs swimming in a homemade tahini dressing. Serve with falafel, kabobs, or as an appetizer with pita wedges.
Servings 6 or more servings
Calories 135kcal
IngredientsFor the dressing
For the salad
Instructions
VideoNotes
Nutrition
Calories: 135kcal | Carbohydrates: 1.2g | Protein: 5.6g | Saturated Fat: 2.2g | Sodium: 14.8mg | Potassium: 226.3mg | Fiber: 1.8g | Sugar: 1g | Vitamin A: 266.5IU | Vitamin C: 4.8mg | Calcium: 48.9mg | Iron: 1.5mg
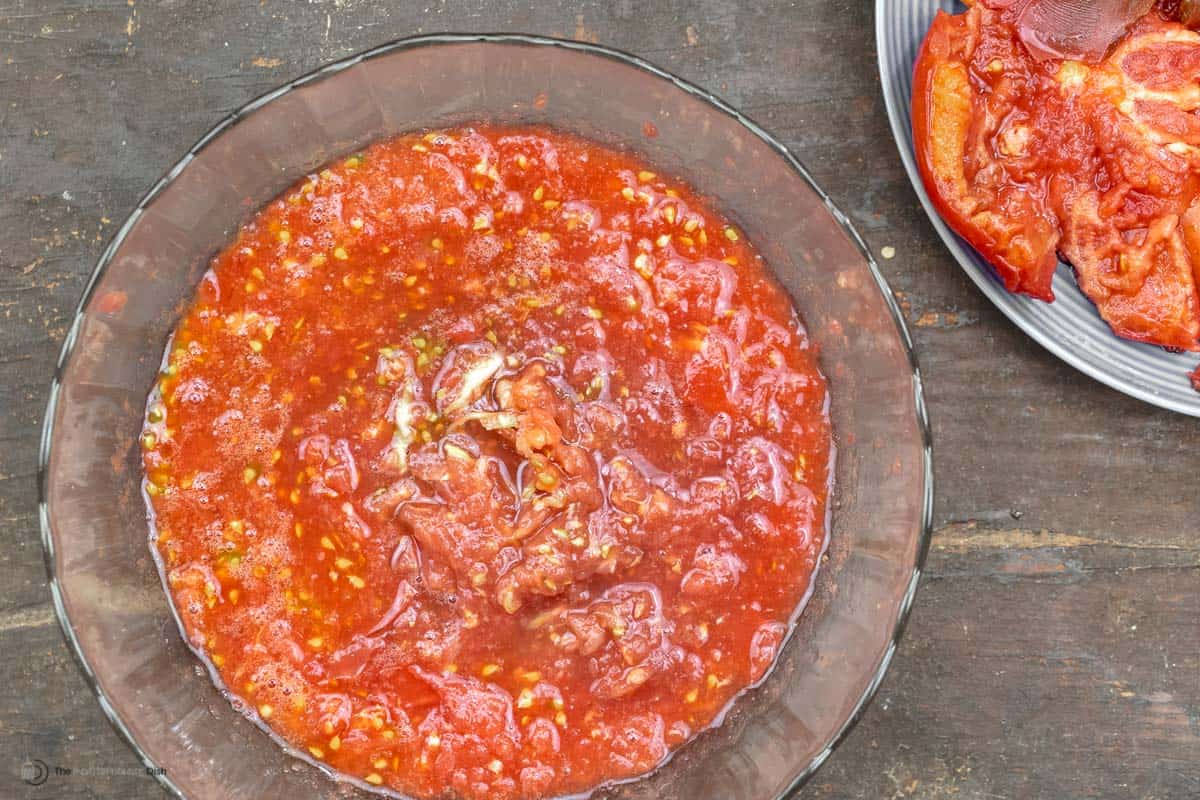
The post Cucumber Tomato Tahini Salad appeared first on The Mediterranean Dish. via The Mediterranean Dish https://www.themediterraneandish.com/tahini-salad/ Pan con Tomate (Spanish Tomato Bread) is a popular Catalan tapa made with simple ingredients including fresh tomatoes, hearty bread, garlic, and olive oil! A few tips make all the difference... 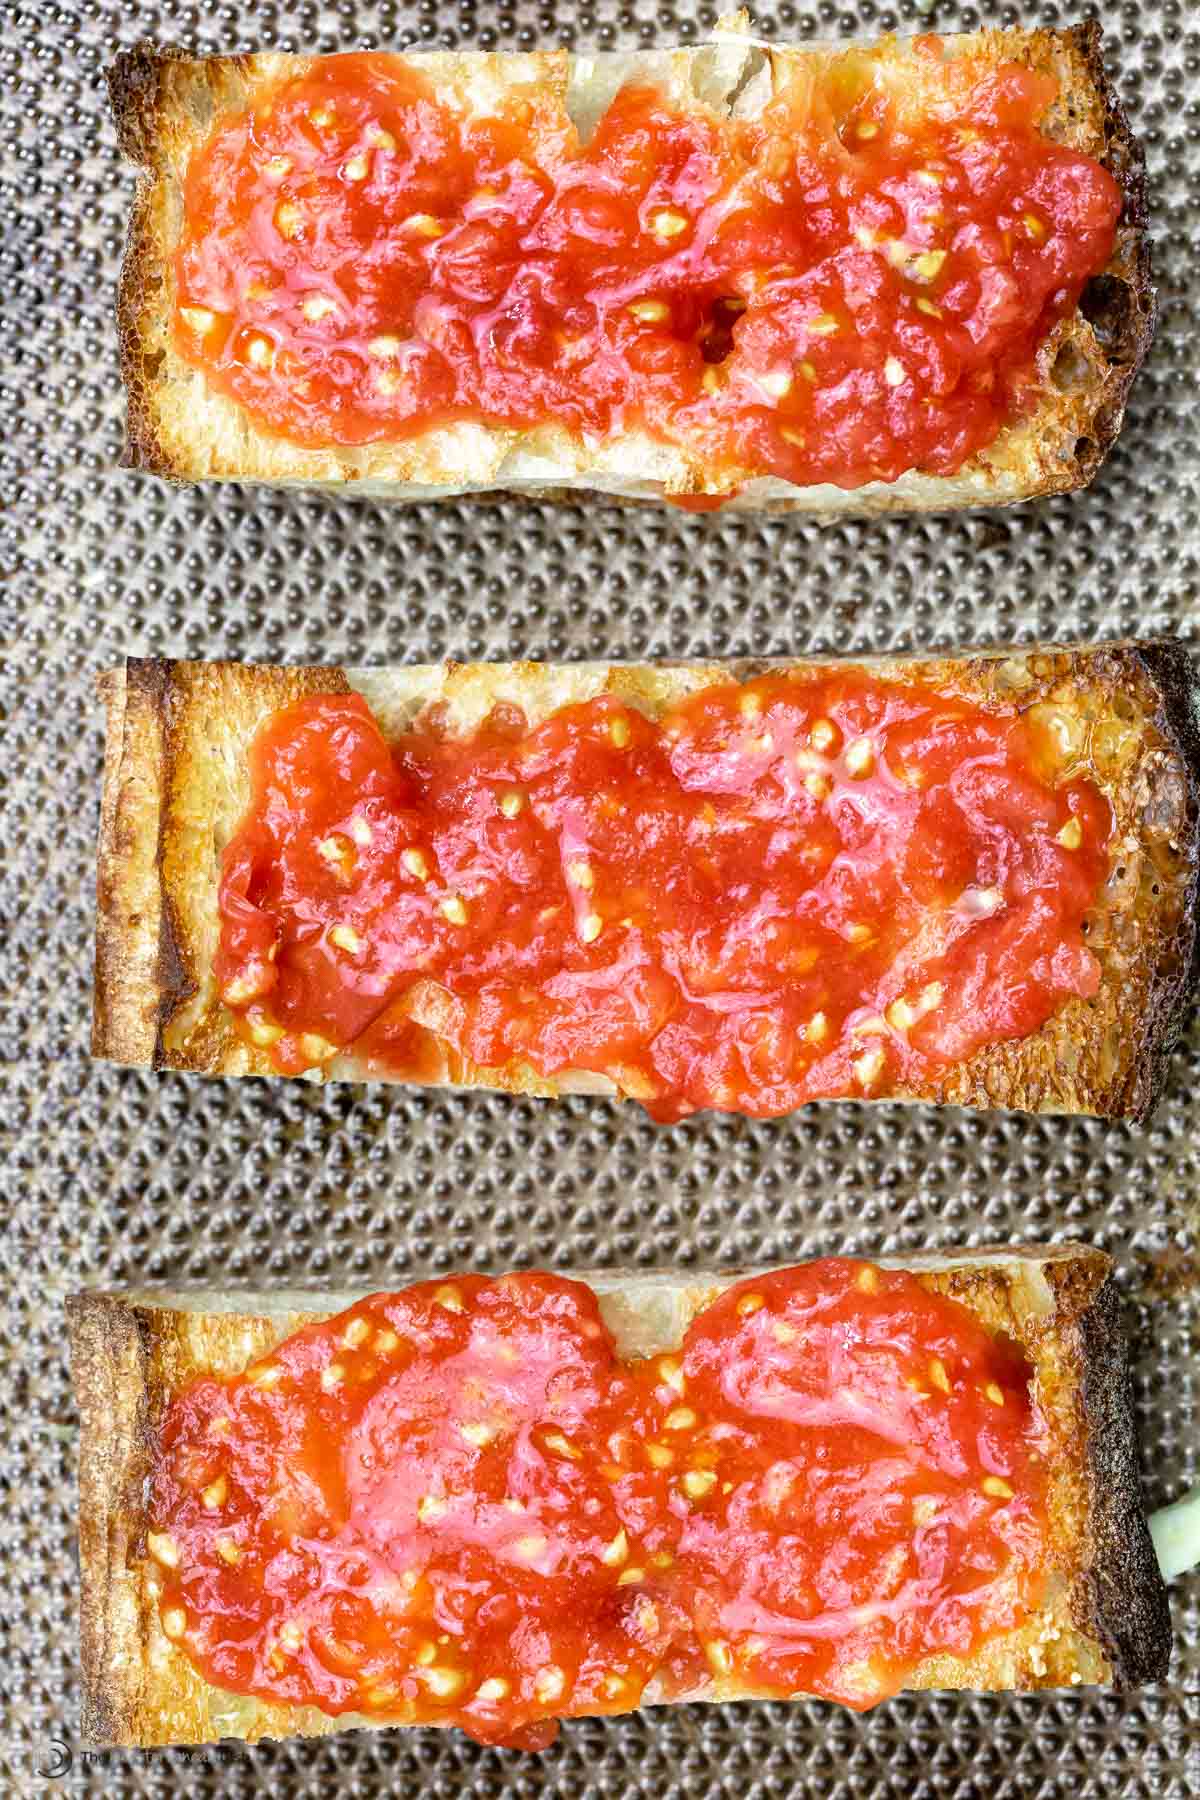 Tomato bread the Spanish way!Also known as pan tumaca or pa amb tomaquet, pan con tomate literally translates to "bread with tomato." It is made with a few simple ingredients: fresh ripe tomatoes, garlic, good extra virgin olive oil, and a dash of salt. This tomato bread is a prime example of turning a few humble fresh ingredients into something that is far more than the sum of its parts. So good, you'll be hard-pressed to find a tapas bar in Catalonia where several tables are not enjoying this dish! Next to my heirloom tomato salad, this is one of my favorite ways to use up summer tomatoes, especially when they get too ripe in my basket. Pan con tomate vs bruschettaWhat's the difference between Spanish tomato bread and bruschetta? Both are ways of serving tomato atop slices of bread, but they are slightly different. Bruschetta is served with small chopped tomatoes, often mixed with other herbs and ingredients, atop of crostini or small pieces of crusty bread. Pan de tomate is even simpler and is made by rubbing fresh garlic and ripe tomatoes directly over warmed rustic bread. 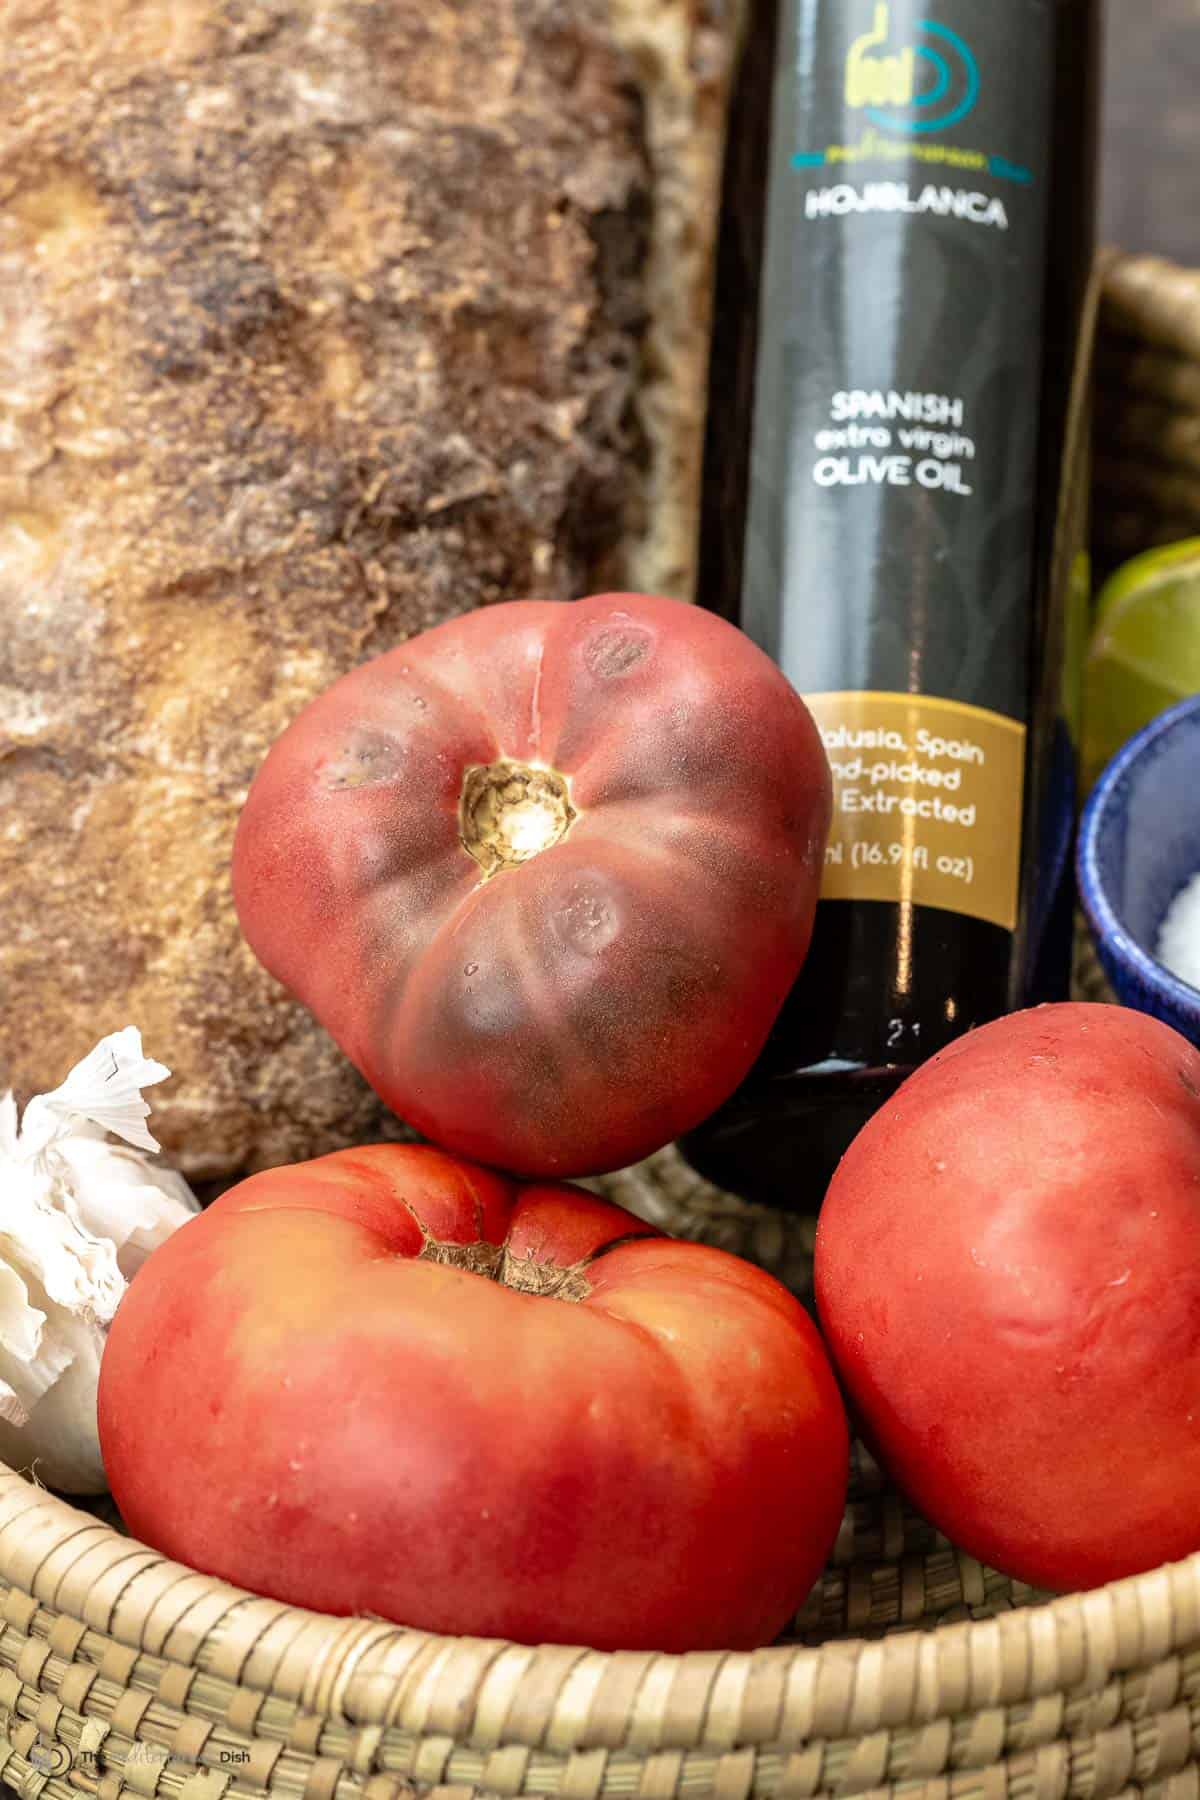 A twist on the traditional Spanish pan con tomateWhile the list of ingredients in today's pan con tomate recipe stays pretty true to tradition, the preparation is slightly different. Traditionally, you would be served bread, tomatoes, and garlic at the table and you would proceed to make your own tomato bread by simply rubbing your sliver of garlic and your tomato directly over the bread and eating it. But in today's recipe, to make things easier, I choose to serve the tomato bread already assembled. Using an old fashioned box grater is the easiest way to get rid of the tomato skins and turn your fresh, extra ripe tomatoes into a bit of a puree to spread over some lightly oiled and toasted bread slices. 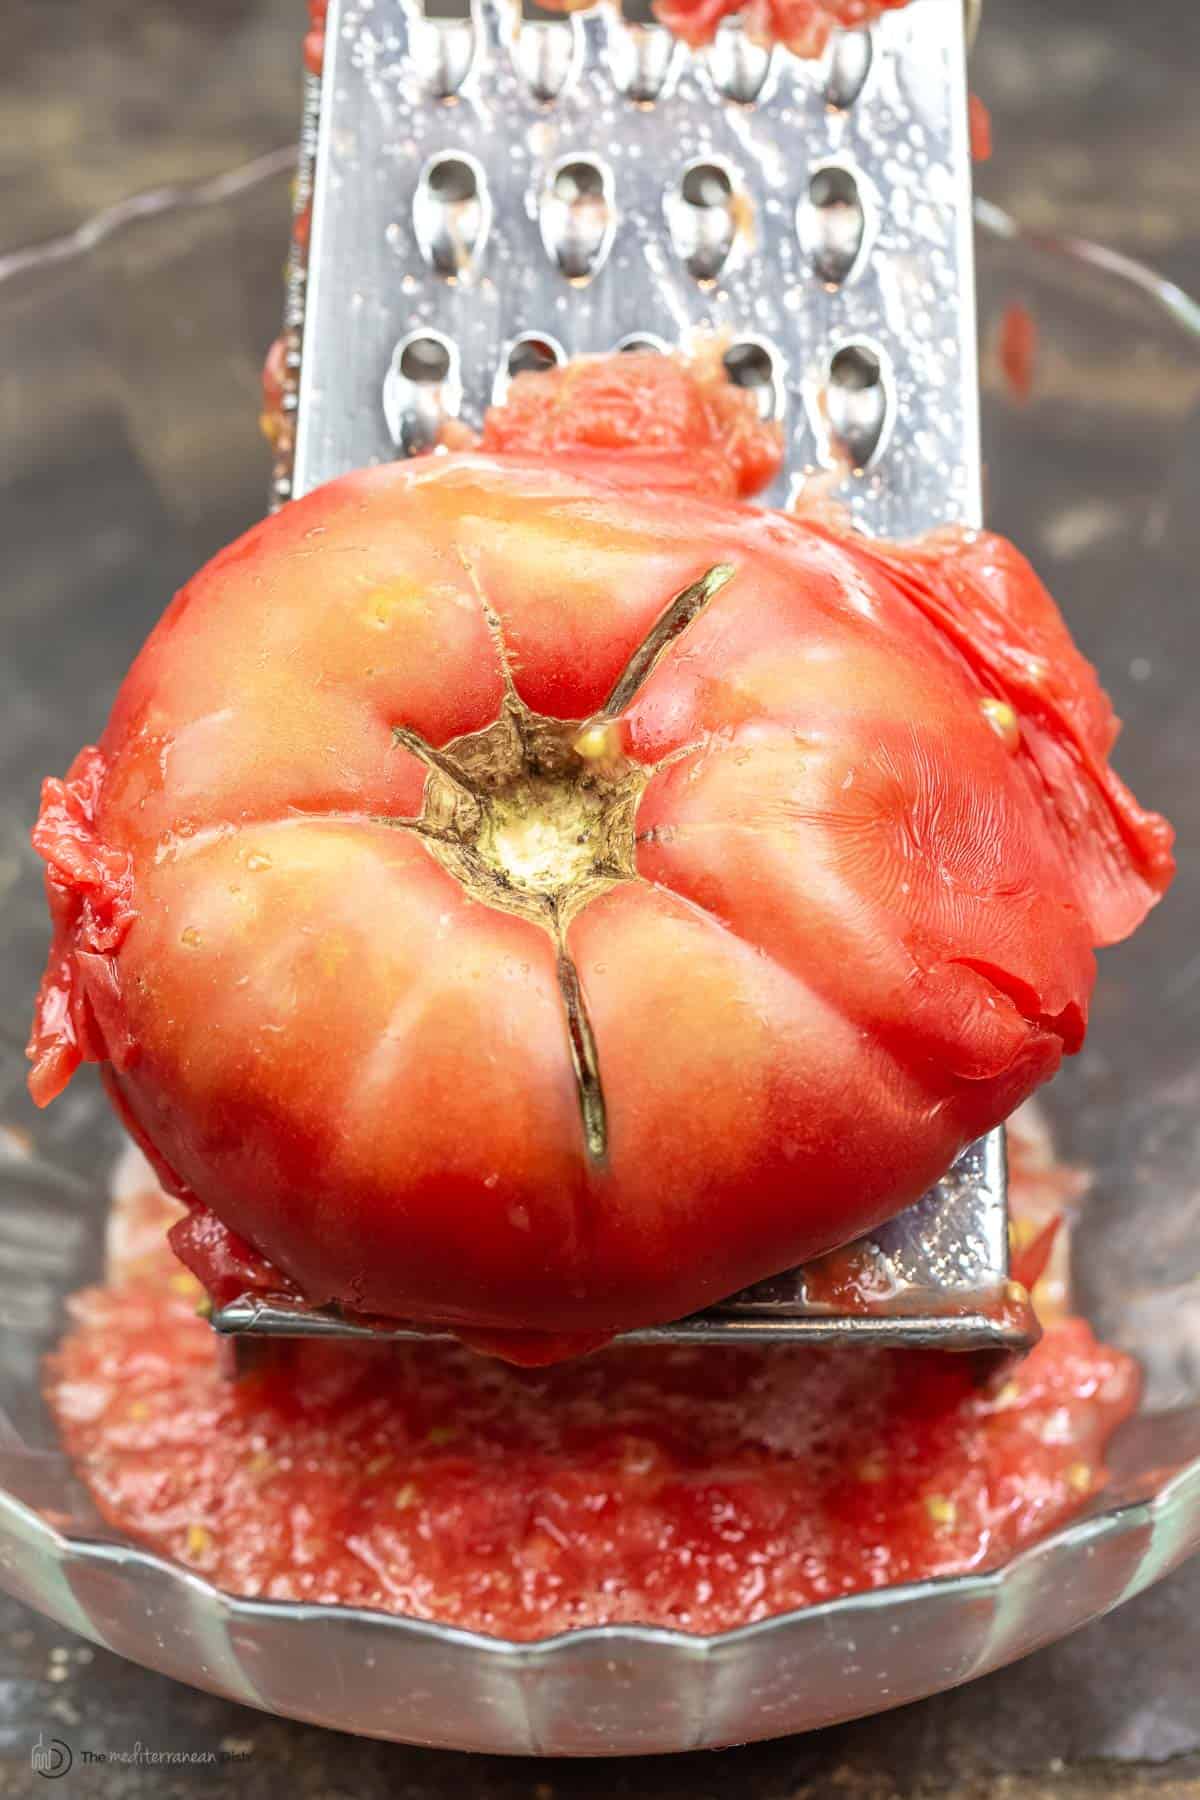 Ingredients you needThis Catalan tomato bread is made with just a few basic ingredients. But it's important to start with quality ingredients from good hearty bread, to fresh tomatoes, and delicious olive oil. Here is what you'll need to make this pan con tomate recipe
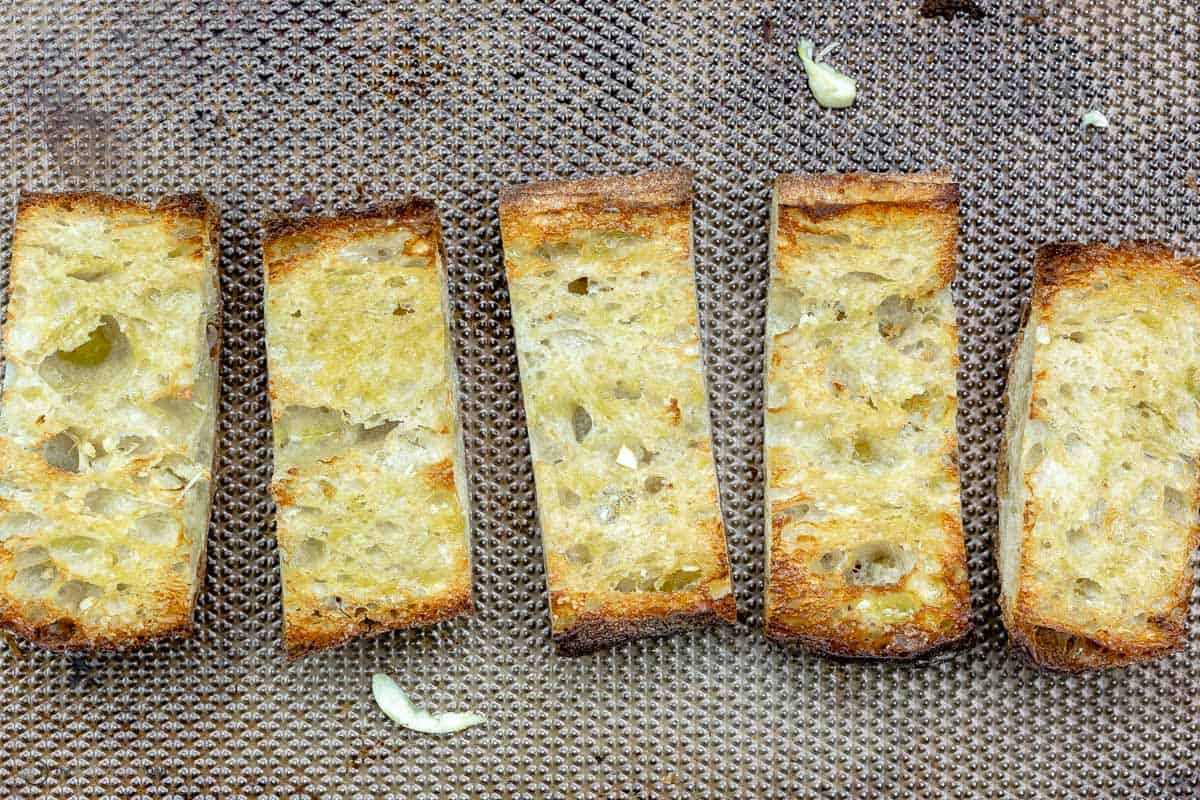 How to make pan con tomateThis easy tapa recipe comes together in under 10 minutes, making it a quick and easy appetizer, snack or side dish!
 Tips for successWith such simple ingredients and so few steps, there's little you can do wrong when making pan de tomate! Just keep these few in mind for the best-tasting tomato bread possible:
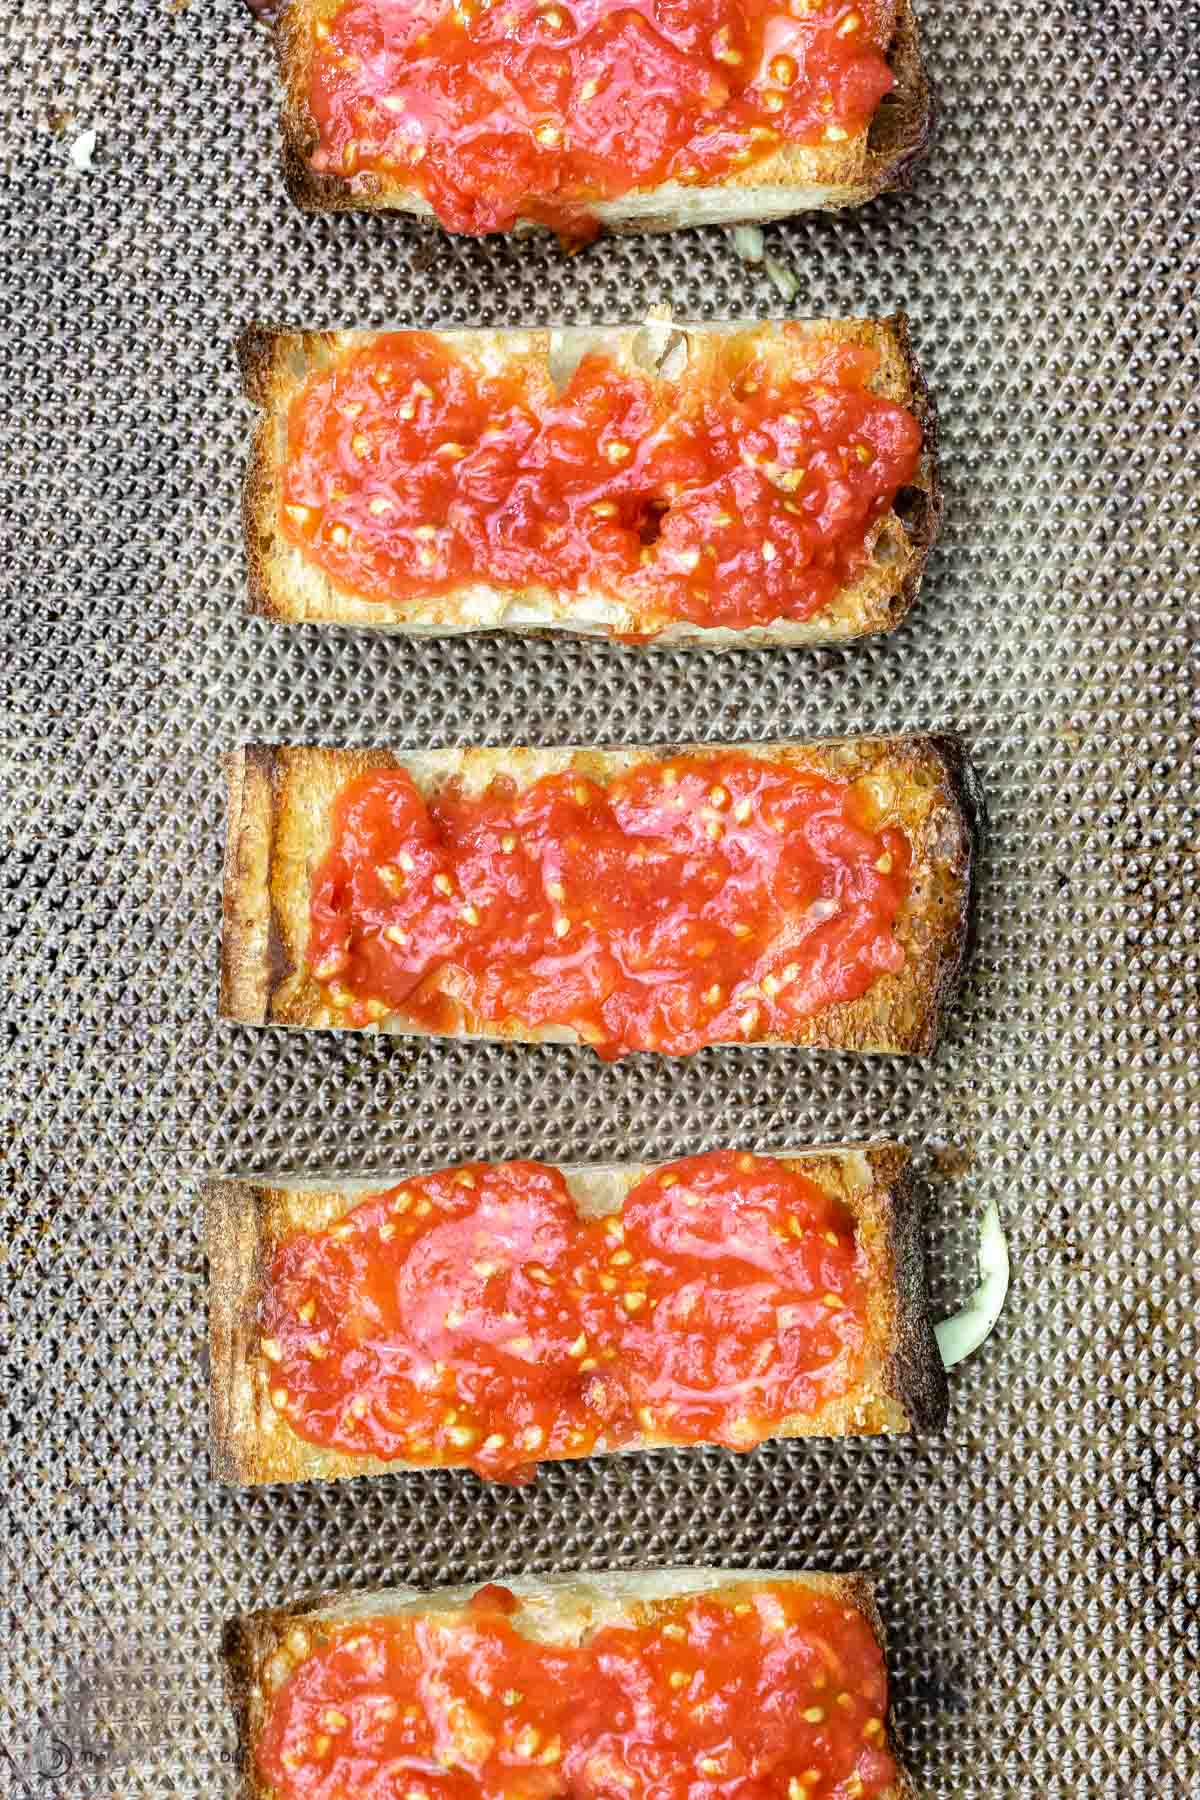 Serving ideas and suggestionWhile this Spanish tomato bread is most often served very simply, with just the ingredients described above, you can also serve it with toppings. Some common, popular toppings are Spanish serrano ham, Manchego cheese, roasted mushrooms and olives. Serve pan con tomate tapas-style or as an appetizer or side dish to any meal. Just be sure to serve and enjoy within a few minutes of preparing, as the tomato puree juices can make the bread soggy if it sits for too long. More easy tomato dishes:
Browse 30+ Mediterranean Fresh Tomato Recipes or top Mediterranean diet recipes.  Pan Con Tomate (Spanish Tomato Bread)
A perfect use of ripe summer tomatoes and day-old bread, Pan con Tomate (Spanish Tomato Bread) is an easy Catalan tapa, made with just 5 ingredients: bread, tomatoes, garlic, salt, and a splash of lime juice. Use hearty artisan bread and cut it thick so that it can serve as good, sturdy base for your grated tomatoes.
Servings 10 Slices
Calories 110.1kcal
Ingredients
Instructions
Notes
Nutrition
Calories: 110.1kcal | Carbohydrates: 22.6g | Protein: 4.2g | Fat: 0.4g | Saturated Fat: 0.2g | Sodium: 222.4mg | Potassium: 88.7mg | Fiber: 0.9g | Sugar: 1g | Vitamin A: 307.4IU | Vitamin C: 5.1mg | Calcium: 4.2mg | Iron: 0.1mg
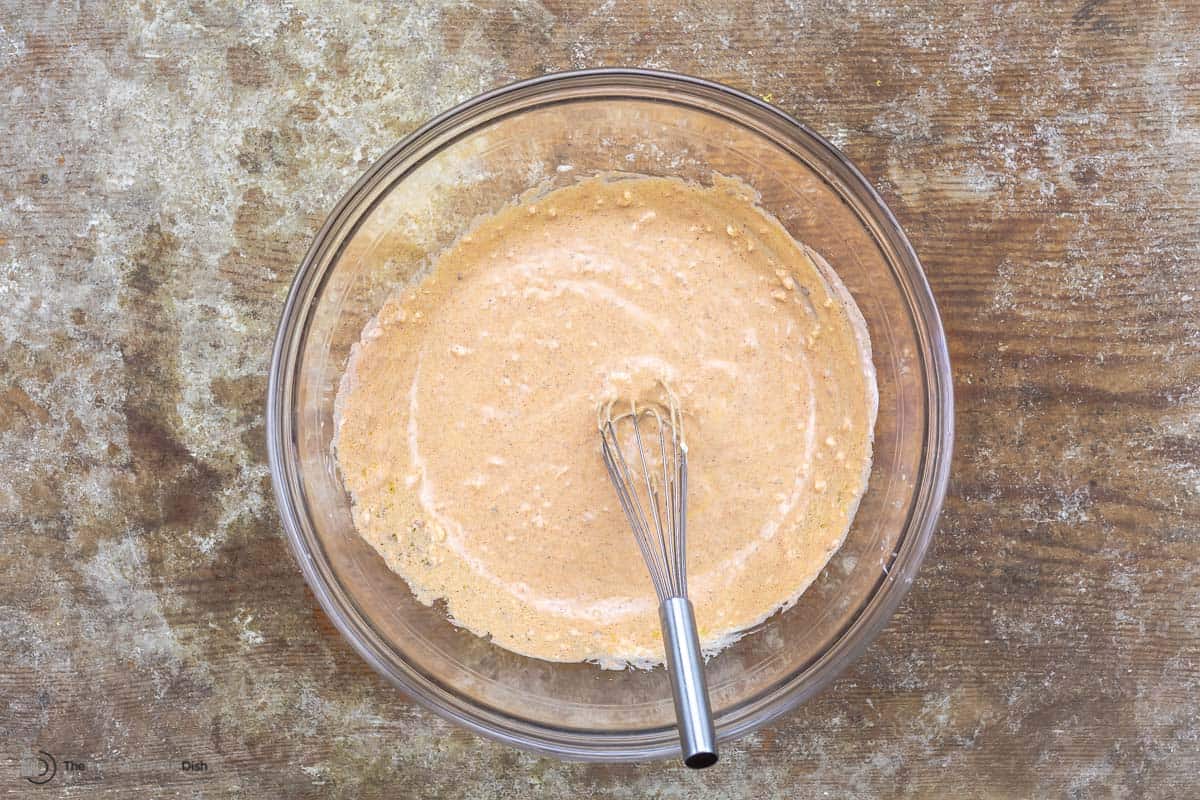
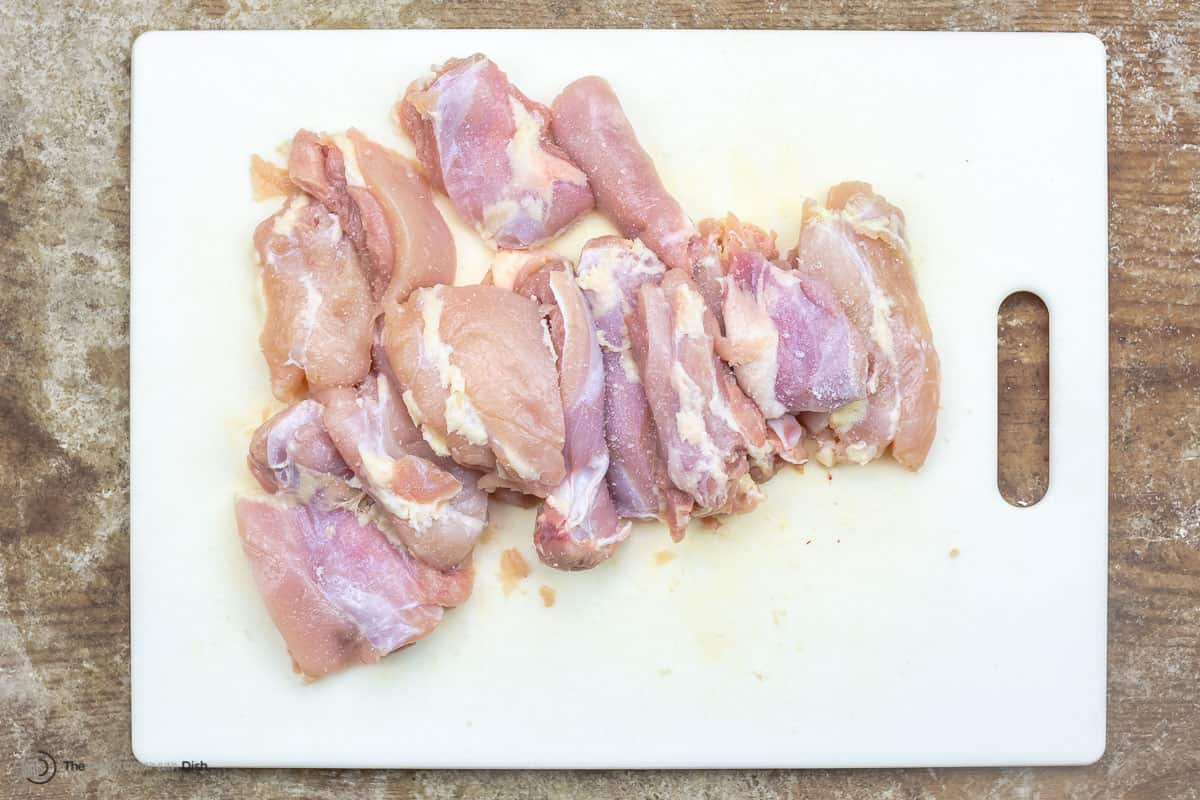
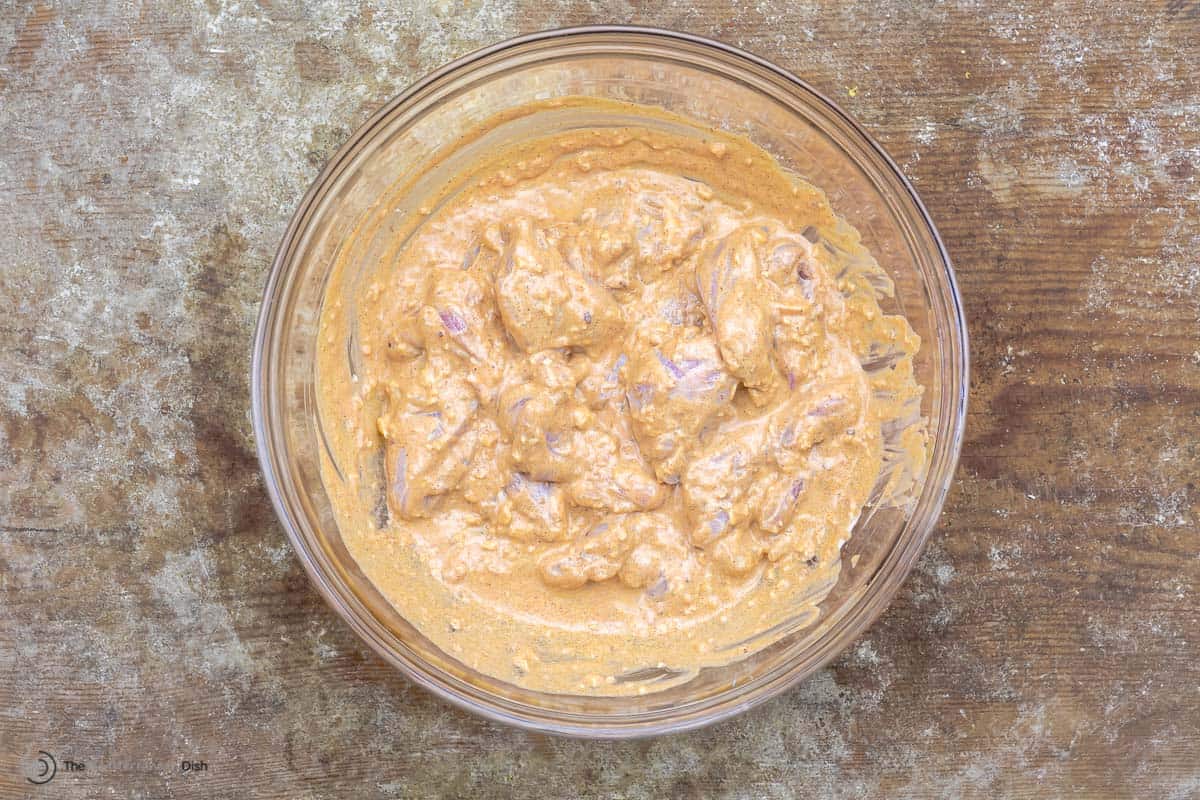
The post Pan Con Tomate (Spanish Tomato Bread) appeared first on The Mediterranean Dish. via The Mediterranean Dish https://www.themediterraneandish.com/pan-con-tomate/ With a bold yogurt-based marinade infused with lemon, garlic and warm spices, this authentic Shish Tawook (Middle Eastern chicken skewers) is next level delicious. Serve in a pita with some whipped garlic sauce or plated with a bright salad and some creamy hummus for an easy, healthy meal. 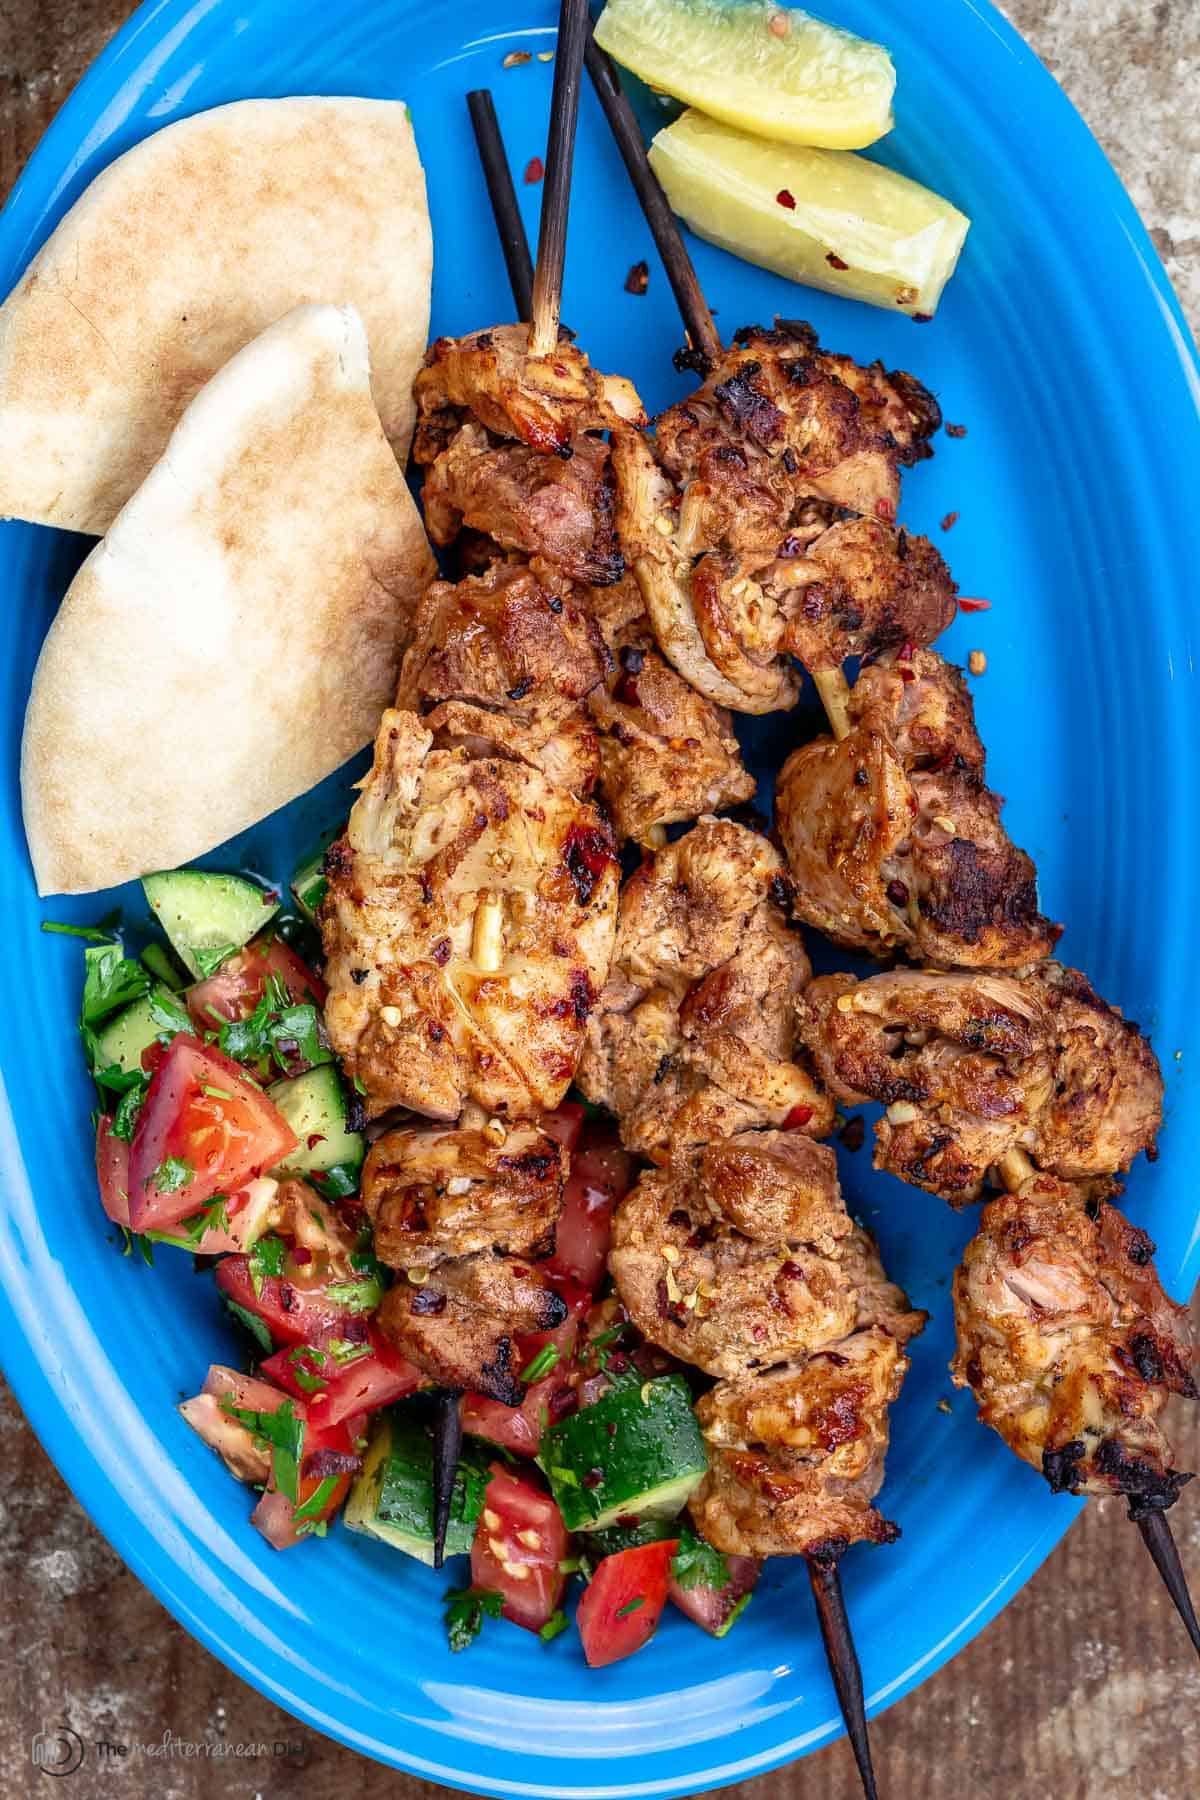 What is shish tawook?In Turkish, the word "shish" means skewer, and "tawook," also spelled taouk, means chicken. Shish tawook is basically Middle Eastern chicken skewers or chicken kebabs, bathed in a bold yogurt-based marinade with citrus, garlic, and lots of warm spices. Originally, this dish was a part of Ottoman Cuisine, shish tawook became a popular dish in many parts of the Middle East, including Egypt and the Levant during the Ottoman's rule starting 1516 and through 1918, in the case of Lebanon. To make this dish at home, you'll start by marinating the chicken in the yogurt-based marinade, then, the marinated chicken is then laced onto skewers and grilled to juicy perfection! You can go wrong serving this dish at your next BBQ with your favorite Mediterranean salads and sides like Greek oven fries, and dips like toum, tzatziki, or hummus! What's the difference between tawook and shawarma?While similar, chicken tawook and chicken shawarma are not the same. Yes, both are made of boneless skinless chicken and are loaded with Middle Eastern flavors, but there is a difference in the marinade and in the way each dish is prepared. The key difference in the marinade is the use of yogurt, and there is also a difference in the flavor profile. Tawook uses a creamy yogurt-based marinade infused with lemon, garlic, seasonings--like oregano, allspice, and ginger--and a couple tablespoons of tomato paste which give the grilled chicken a beautiful red hue. Shawarma, on the other hand, skips the yogurt and the tomato past, relying more on olive oil and citrus for the base, onions, garlic, and a longer list of spices that lean warmer and slightly spicier, including turmeric, cumin, coriander, and cayenne. The method of preparation and cooking is also different. Shish tawook is grilled on skewers, while shawarma is traditionally slow-roasted on a vertical spit for hours, though to make it at home, I bake my chicken shawarma in the oven for an easy option (you can also make it in the skillet like I do in this shawarma salad recipe)  Why the yogurt-based marinade worksBy now you know that the yogurt-based tawook marinade makes all the difference! With both meat and chicken, the job of the marinade is to tenderize, while adding flavor. Creamy, tangy yogurt acts as a great flavor carrier, but, more importantly, because yogurt has lactic acid and calcium, it work to gently break down proteins so that the meat is super tender and juicy. With a yogurt marinade, as opposed to a highly acidic or vinegar-based marinade, you can allow the chicken to marinate in the fridge for hours or overnight without worrying about it getting tough or rubbery. (I wrote a long ode to the best chicken marinade earlier). What you'll need for the shish tawook marinadeThe marinade for these chicken skewers is bold and filled with flavor, and if you have the time, you'll want to give the chicken a couple hours in the fridge to soak in the marinade flavors! Here's what you need to make the marinade:
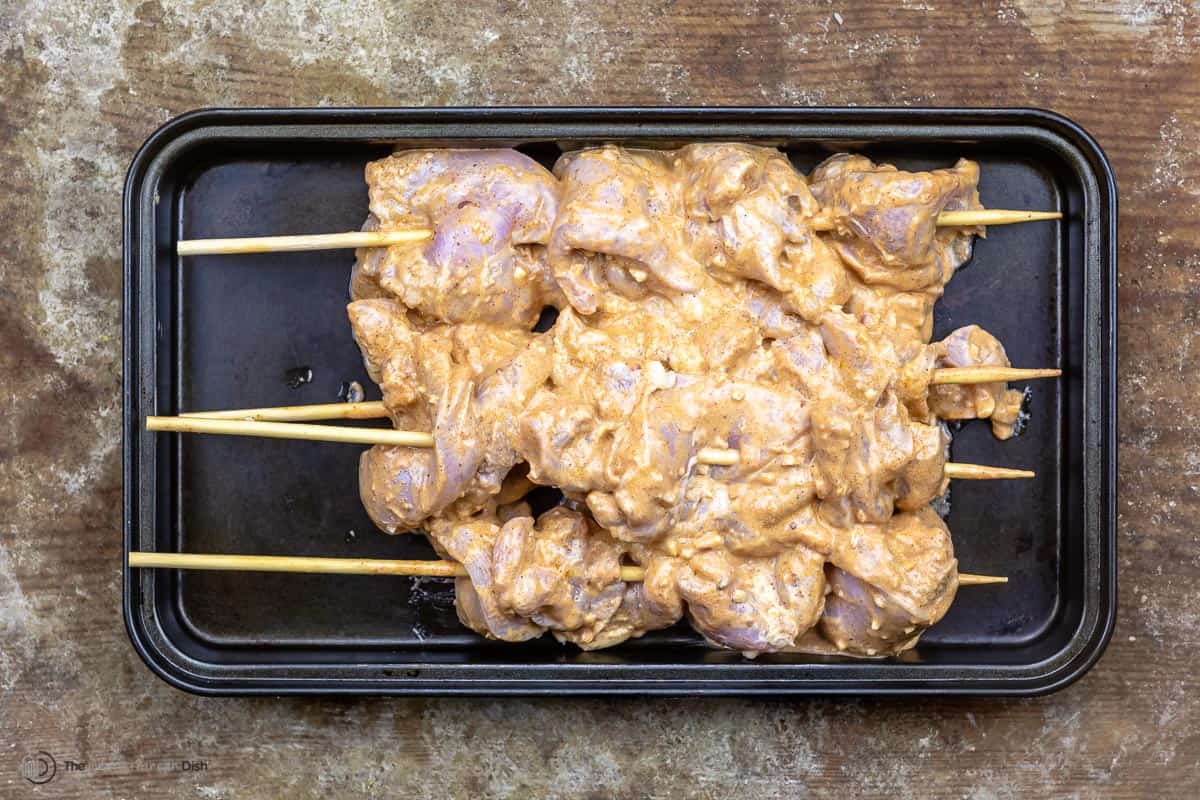
How to make shish tawookThese Middle Eastern Chicken Skewers are super easy to make - you can easily throw the marinade together in the morning and come home to chicken ready to be grilled! The grill time is just 15 to 20 minutes, so these are great for busy nights!
Tips for the best grilled chicken skewers!Follow these simple tips for best results:
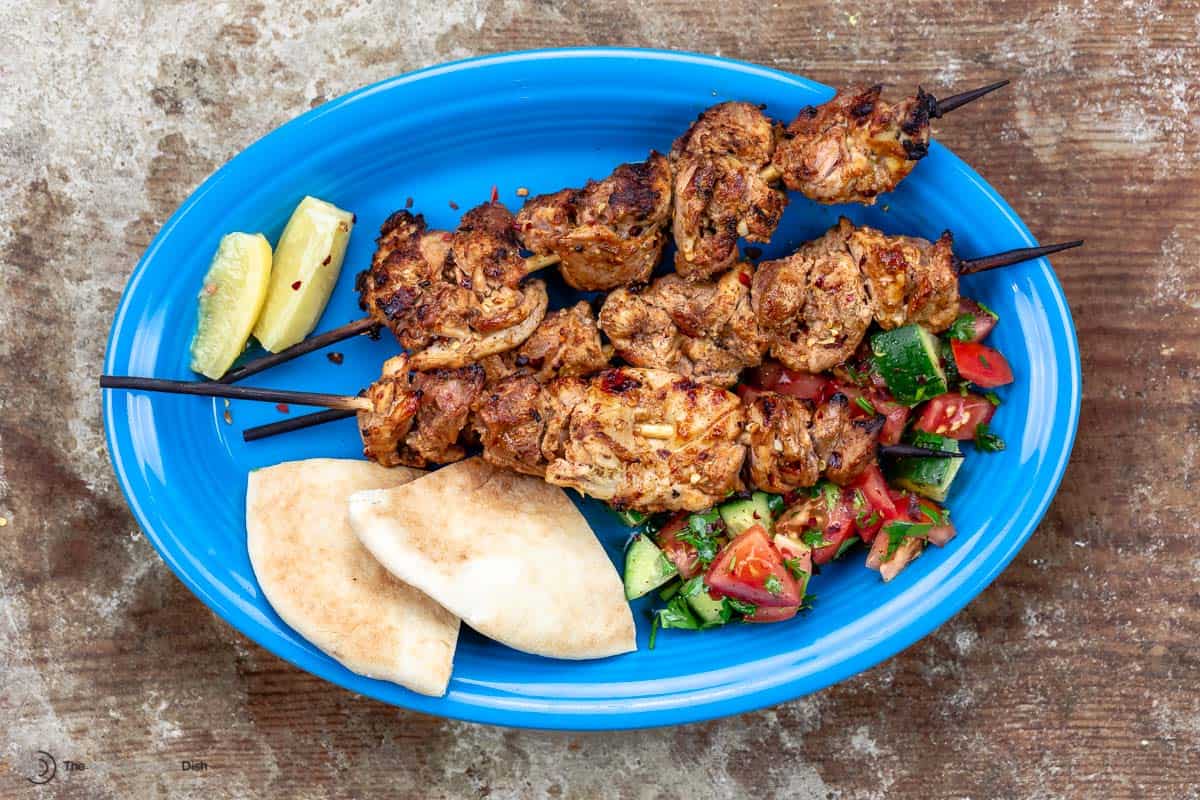 What to serve with tawook?The sky is the limit for what to serve along your shish tawook! It's a kebab party, after all! I always like to include a couple of fresh salads such as my 3-ingredient salad, fattoush or a simple tomato salad. A heftier black bean and corn salad is fine too! For dips, I love tzatziki, hummus, or baba ghanoush with tawook; my Lebanese friends say whipped toum is a must though! And if I have pickled cucumbers or preserved lemons, I throw those in the mix too! You can also ditch the skewers and turn your shish into a loaded pita sandwich! Just unthread the grilled chicken into a pita pocket and add a drizzle of tahini and some fresh chopped veggies. How to store leftoversWhile I definitely recommend eating these juicy, flavorful chicken skewers straight from the grill, you can store them in the fridge for up to 4 days. Reheat once on the stovetop or grill or enjoy cold in wraps or atop salads! More chicken recipes:
Browse more Middle Eastern recipes or all Mediterranean recipes.  Grilled Shish Tawook
The best AUTHENTIC Shish Tawook (Middle Eastern chicken skewers) recipe you'll find. You'll love the amazing yogurt-based marinade that's loaded with garlic, spices and amazing flavors! If you can, budget some time to allow the chicken to marinate in the fridge for a few hours
Servings 6 servings
Calories 298.4kcal
IngredientsFor the chicken
For the marinade
Instructions
VideoNotes
Nutrition
Calories: 298.4kcal | Carbohydrates: 5.2g | Protein: 32.6g | Fat: 16g | Saturated Fat: 3.2g | Cholesterol: 145.3mg | Sodium: 189.9mg | Potassium: 472.2mg | Fiber: 0.8g | Sugar: 2.2g | Vitamin A: 375.3IU | Vitamin C: 6.6mg | Calcium: 65.9mg | Iron: 1.7mg
The post Grilled Shish Tawook appeared first on The Mediterranean Dish. via The Mediterranean Dish https://www.themediterraneandish.com/shish-tawook/ |
ABOUT MEHi, I am Daniel Jones from Overland Park, MO. I am a chef by profession, & also publish my recipe tips online on blogs and social media. Archives
April 2023
Categories |
 RSS Feed
