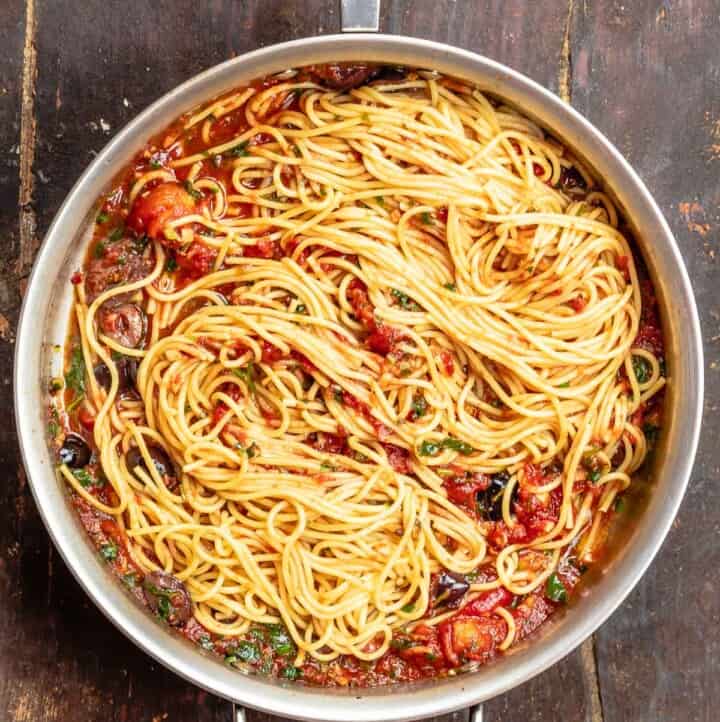
|
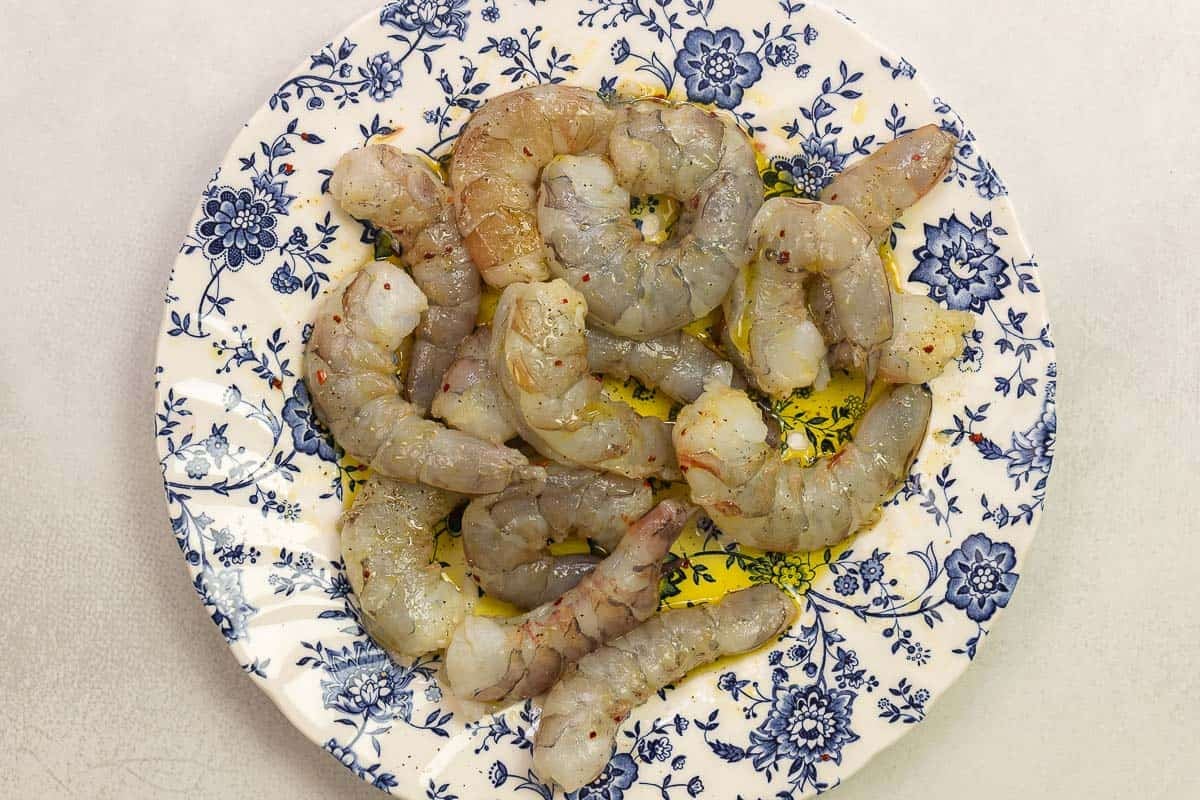
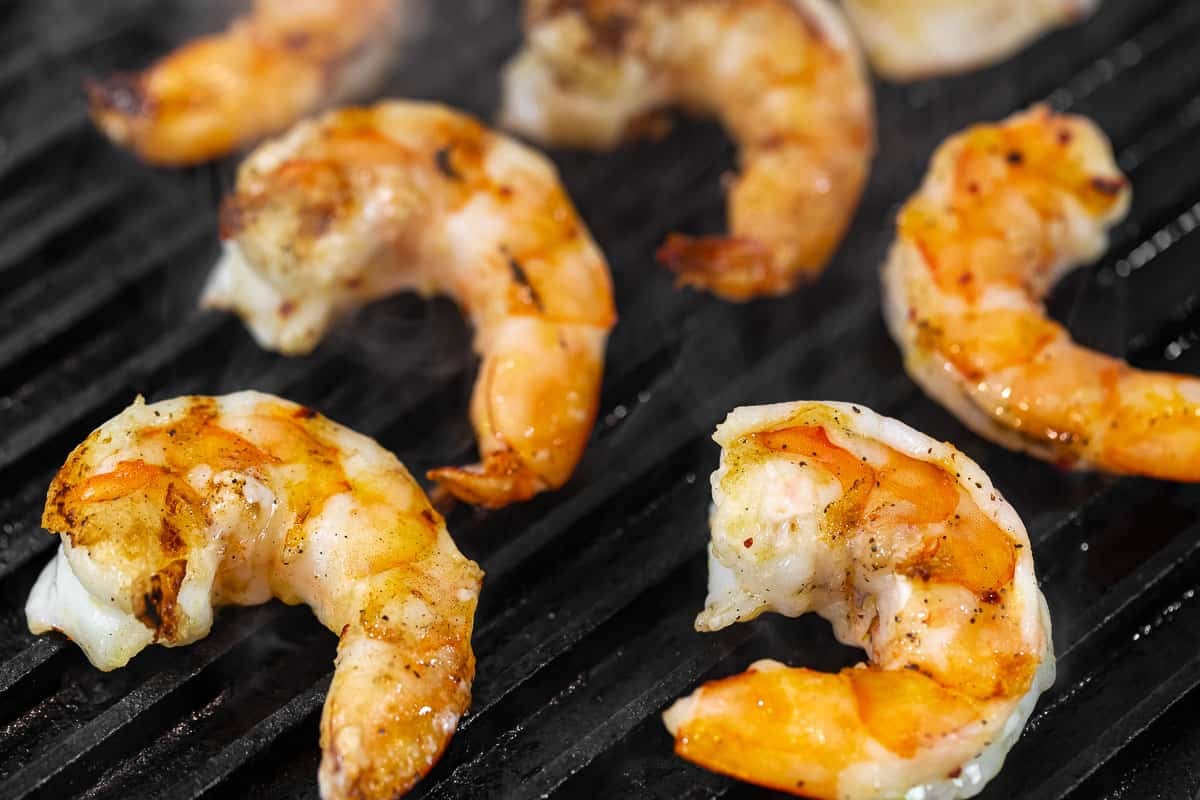
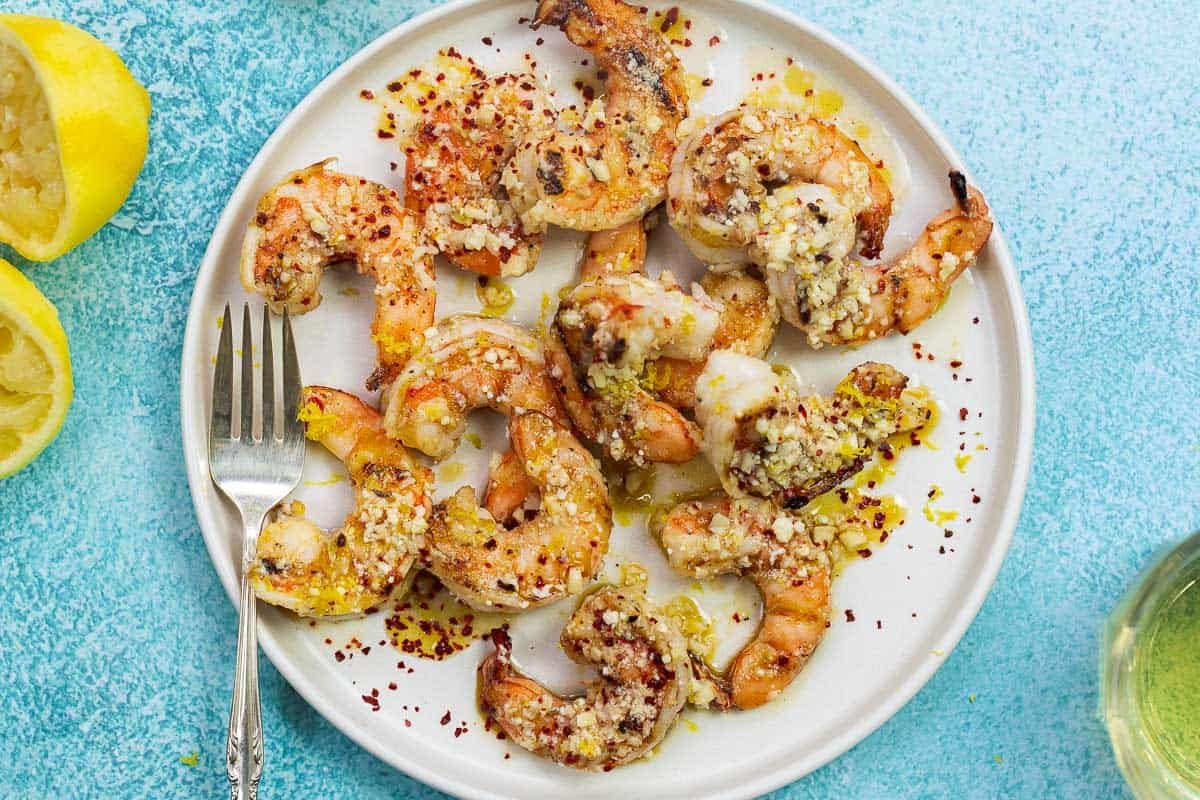
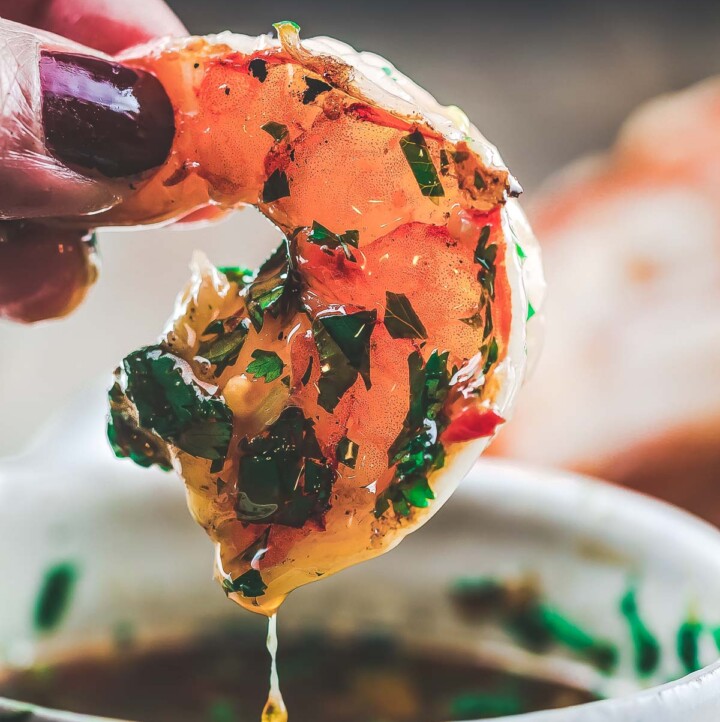
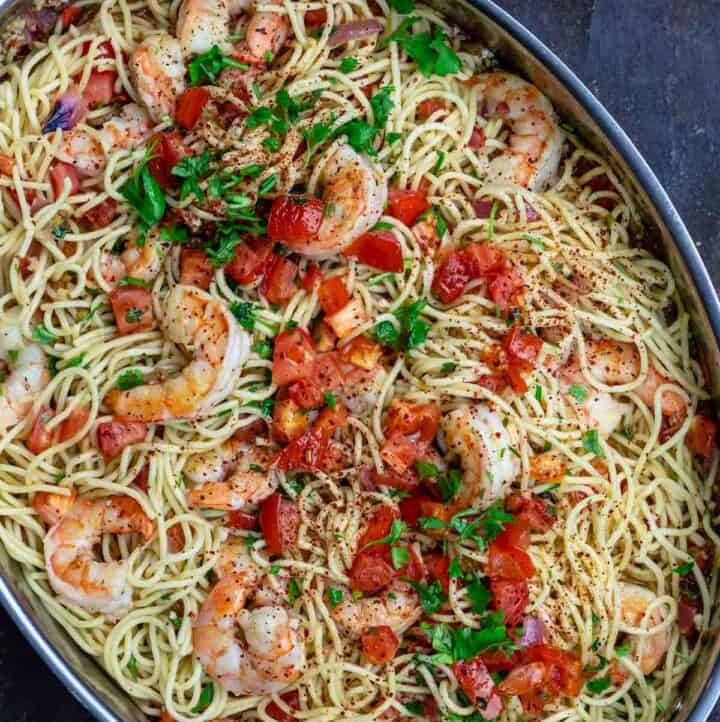
Grilled shrimp with lemon and parmesan cheese ready in 10 minutes or less! Easy garlic parmesan shrimp is a great sharing appetizer or light dinner tossed with your favorite pasta or vegetables. Cook it on a grill or indoor griddle! 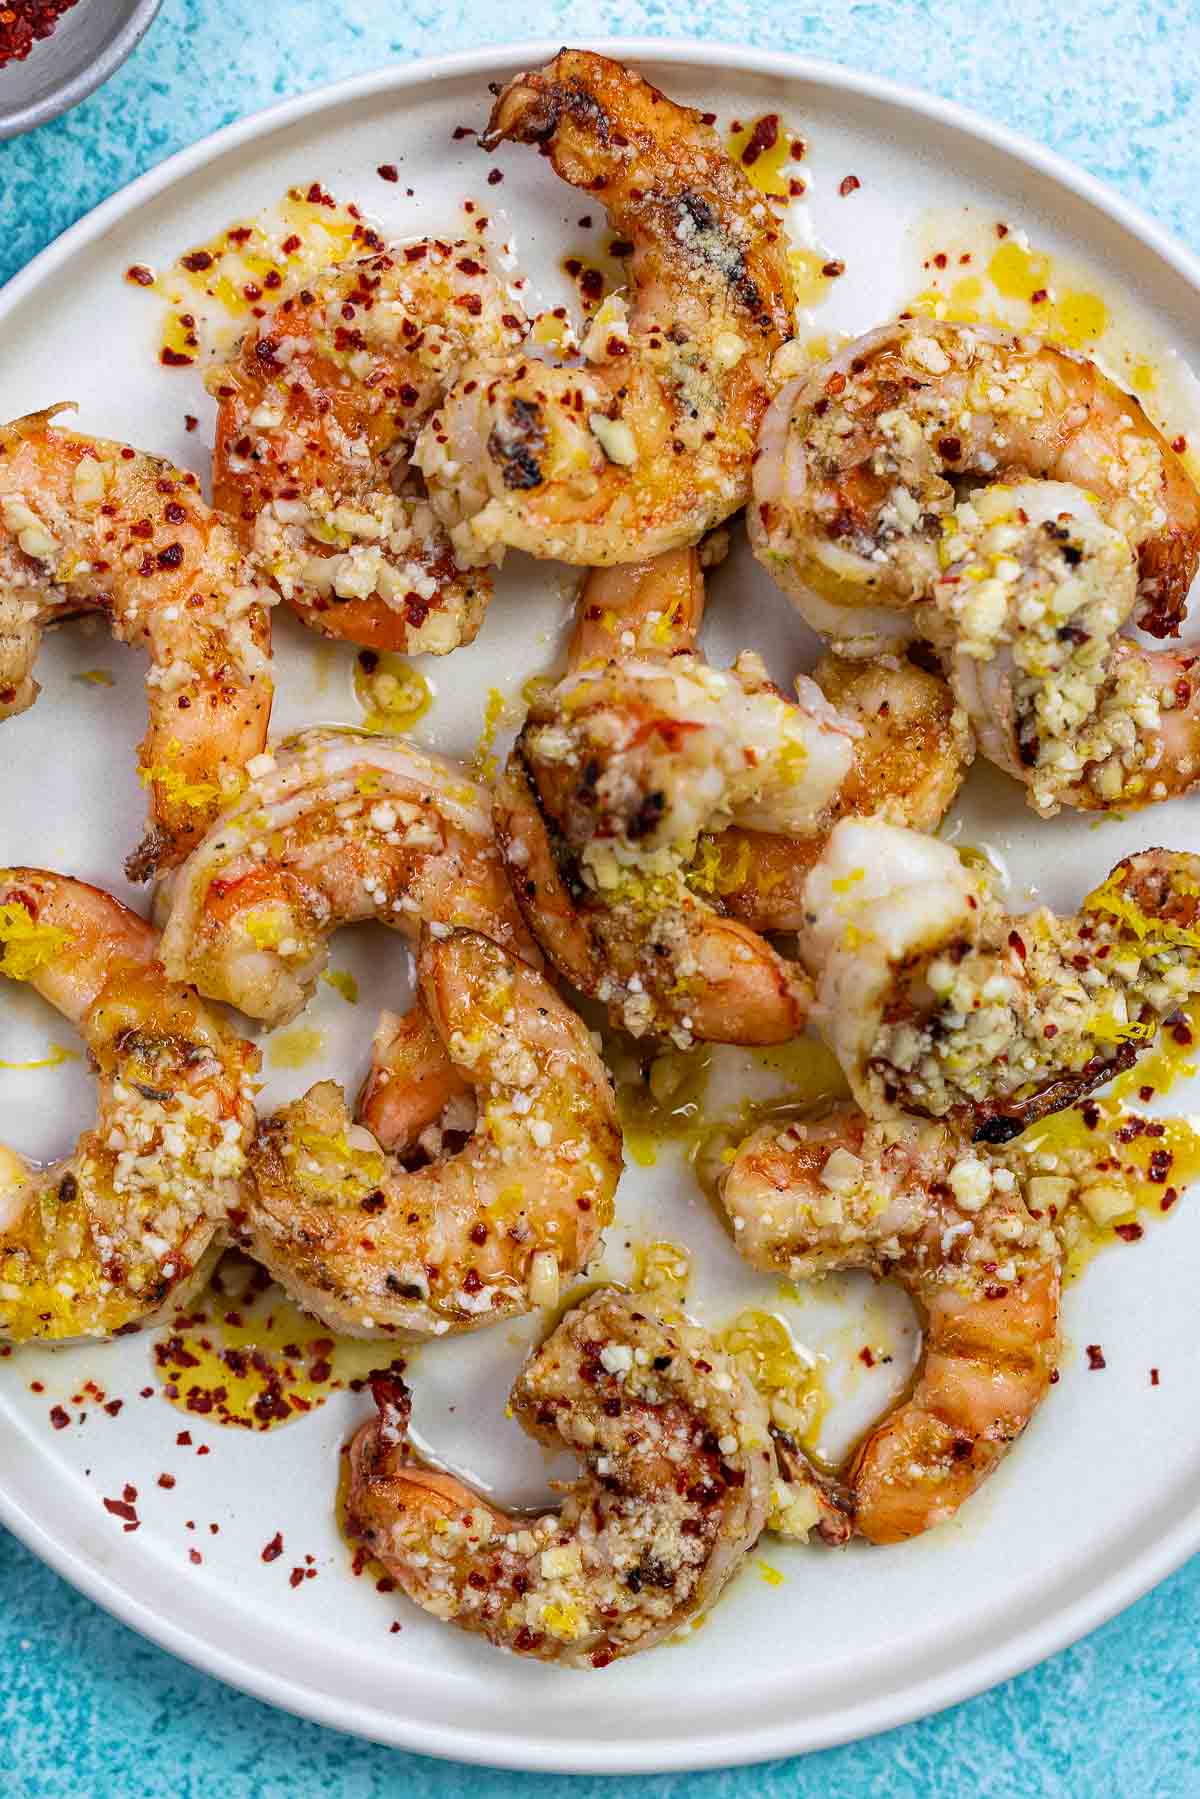 Perfect grilled shrimp that is juicy and just enough charred is an impressive dish to share, and thankfully, it is a snap to make! But it’s even better bathed in an herby sauce or tossed with garlic and nutty grated Parmesan as in today’s recipe. You’ll want to use large shrimp for this easy parmesan shrimp recipe, and make sure they’re well-dried before seasoning and grilling them. As soon as they are off the grill, dunk the shrimp in a sauce made of extra virgin olive oil, lemon juice, garlic, herbs, red pepper flakes, and a generous sprinkle of Parmesan to coat the shrimp (¼ cup or more). This grilled garlic shrimp recipe comes together in 10 minutes or less. It’s a new favorite over here, rivaled by shrimp skewers, which you should try sometime when you throw your next kebab party! In this post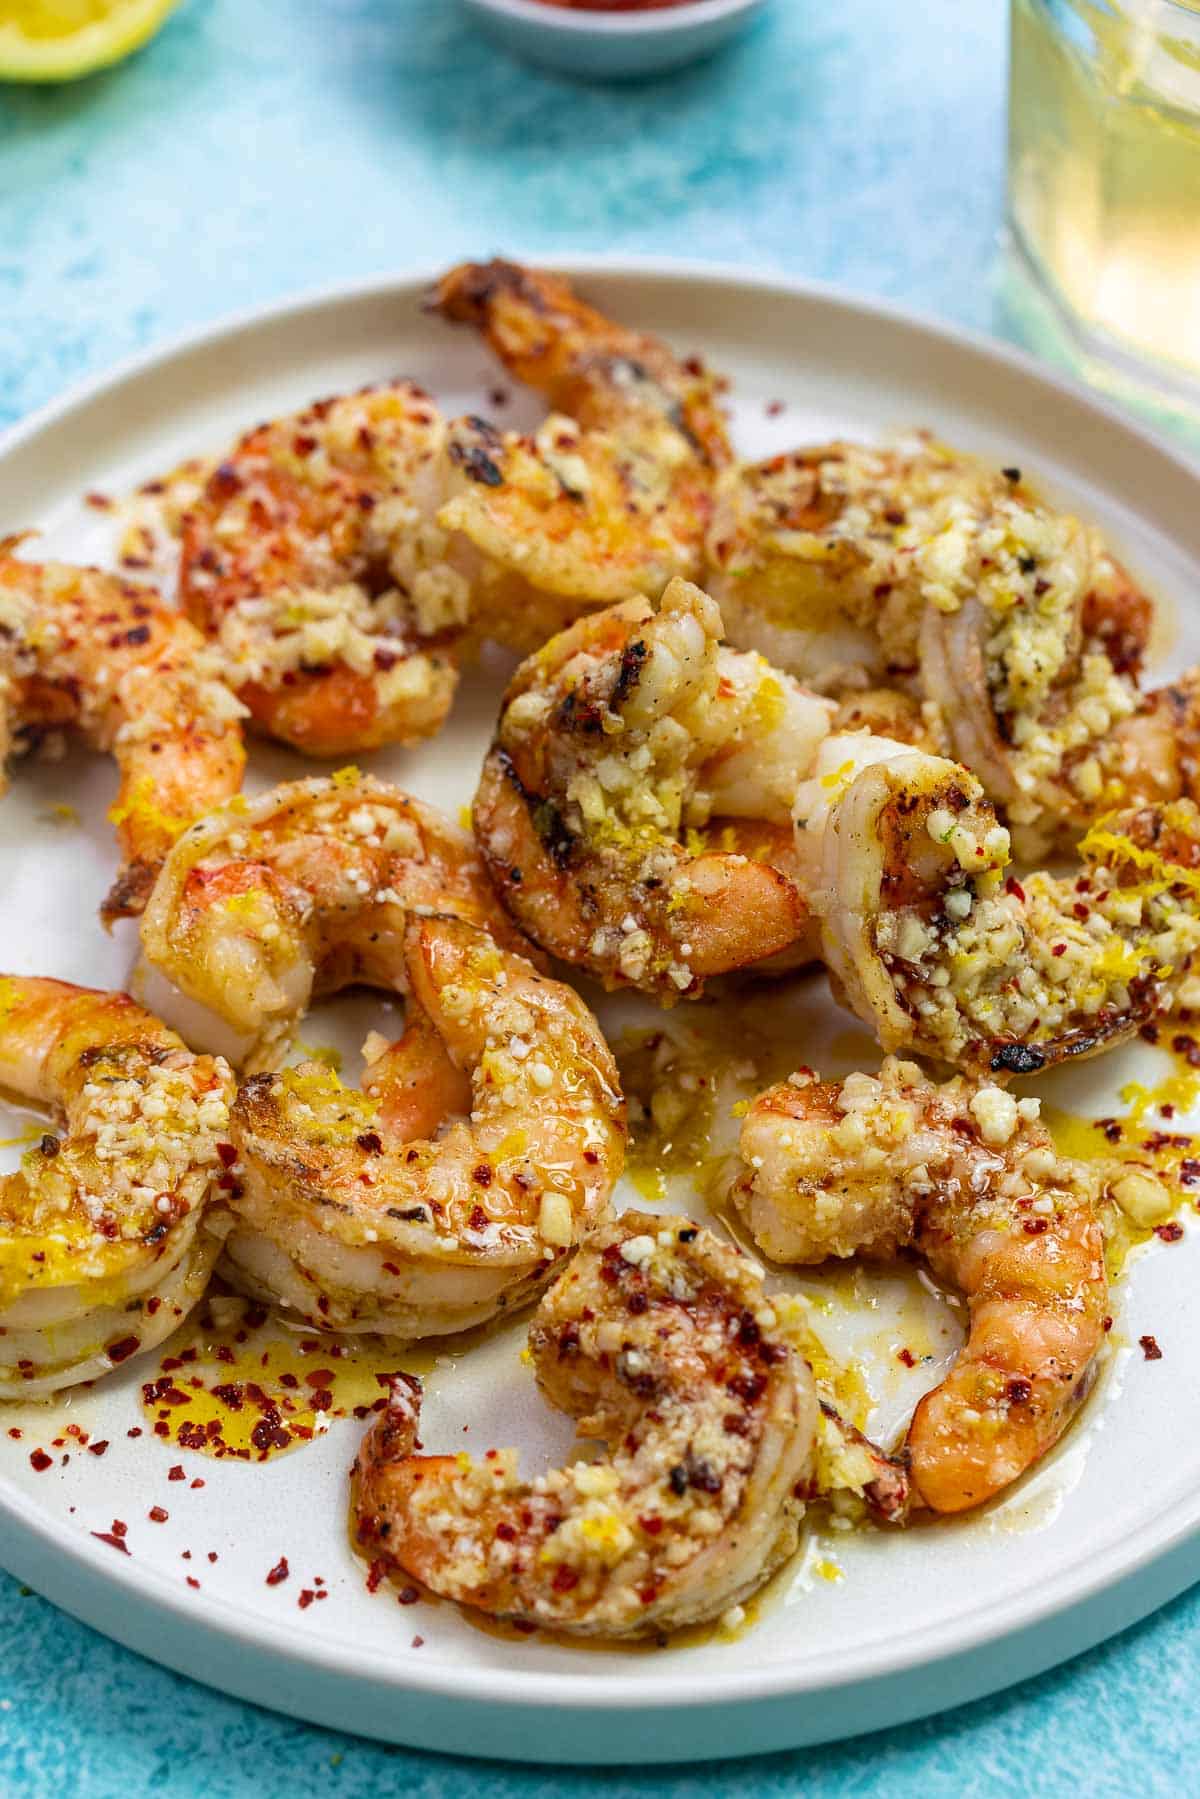 What kind of shrimp to use?The bigger the shrimp, the better, when it comes to grilling. In this shrimp recipe I use jumbo shrimp (approximately 21 to 25 shrimp per pound), because they’re easier to manage on the grill and don’t dry out as easily as smaller shrimp. No one likes dry, rubbery shrimp! The sauceThe secret to this shrimp recipe is in the sauce, but you only need a few simple ingredients to make it
How to make garlic shrimp with parmesanGrilled shrimp with garlic and parmesan is ready in under 10 minutes! Here’s how you make it:
Tips for best garlic parmesan shrimp
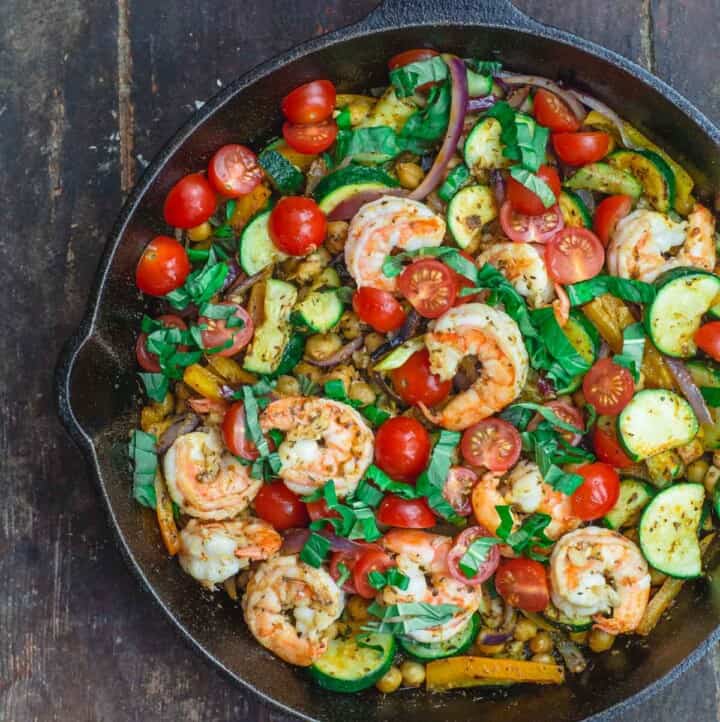
Serve it withServe garlic-parmesan shrimp as an appetizer for a crowd next to other easy appetizers like Greek salad skewers, muhammara, avocado hummus, Greek baked fries, and garlic fried tomatoes. Leftovers and storageStore leftover garlic-parmesan shrimp in an airtight container in the refrigerator for up to 3 days. Reheat over medium-low heat in a skillet until warmed through. More simple shrimp recipesBrowse all Mediterranean recipes.  10-Minute Garlic Parmesan Shrimp Recipe
Easy grilled shrimp recipe ready in 10 minutes or less! Plump jumbo shrimp are quickly cooked on a hot grill before being tossed with lemon-garlic sauce and Parmesan cheese. The bigger the shrimp, the better for this recipe. I used jumbo shrimp, which are easy to handle and flip on the grill. They also don't dry out as quickly as smaller shrimp.
Servings 6 people
Calories 158.5kcal
Ingredients
Instructions
VideoNotes
Nutrition
Calories: 158.5kcal | Carbohydrates: 2.9g | Protein: 11.9g | Fat: 11.1g | Saturated Fat: 2g | Polyunsaturated Fat: 1.1g | Monounsaturated Fat: 6.9g | Trans Fat: 0.01g | Cholesterol: 98.9mg | Sodium: 606.6mg | Potassium: 144.8mg | Fiber: 0.5g | Sugar: 0.2g | Vitamin A: 698.3IU | Vitamin C: 9.2mg | Calcium: 95mg | Iron: 0.8mg
The post Grilled Garlic-Parmesan Shrimp (10-Mins) appeared first on The Mediterranean Dish. via The Mediterranean Dish https://www.themediterraneandish.com/garlic-parmesan-shrimp/
0 Comments
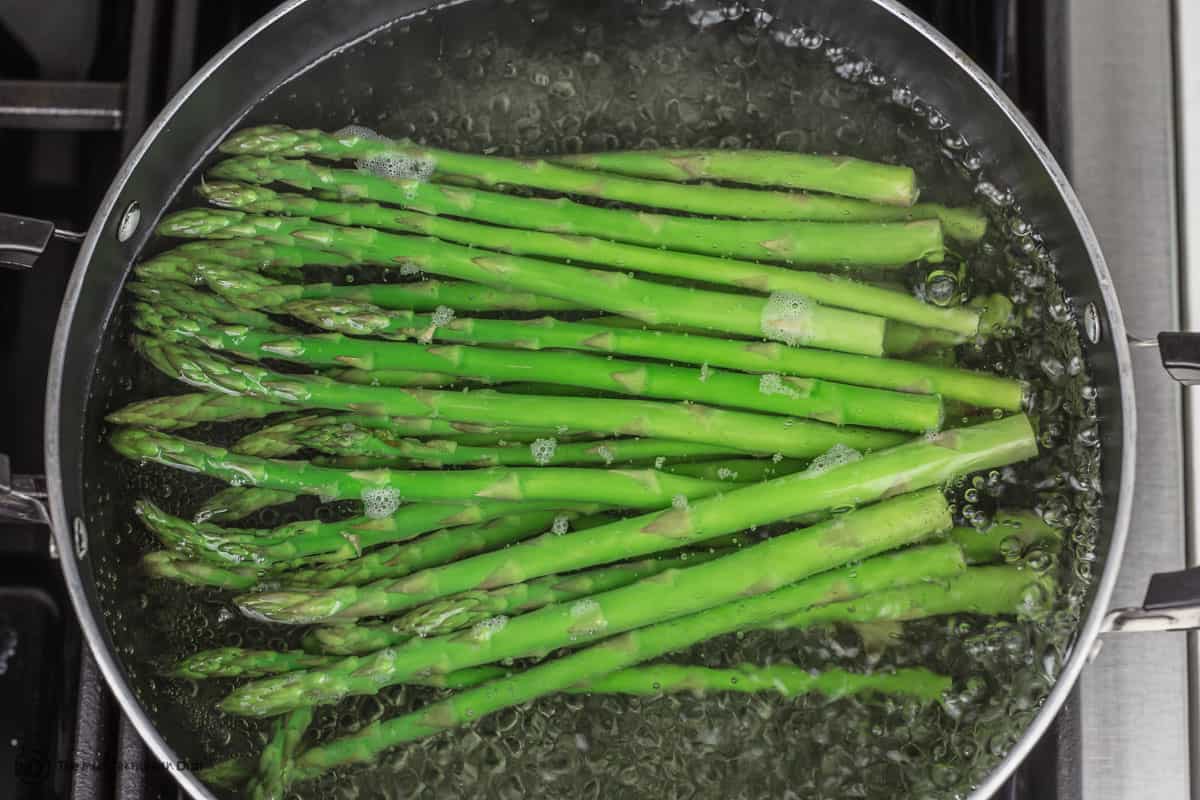
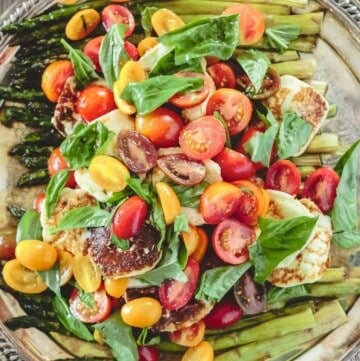
Blanch asparagus in boiling water for 3 to 4 minutes, then quickly transfer it to an ice bath. This is how to blanch asparagus properly so that it is crisp-tender and perfectly green. And for a fun and beautiful way to serve it, top your blanched asparagus with a simple Mediterranean-style salsa for an elevated vegetarian side. 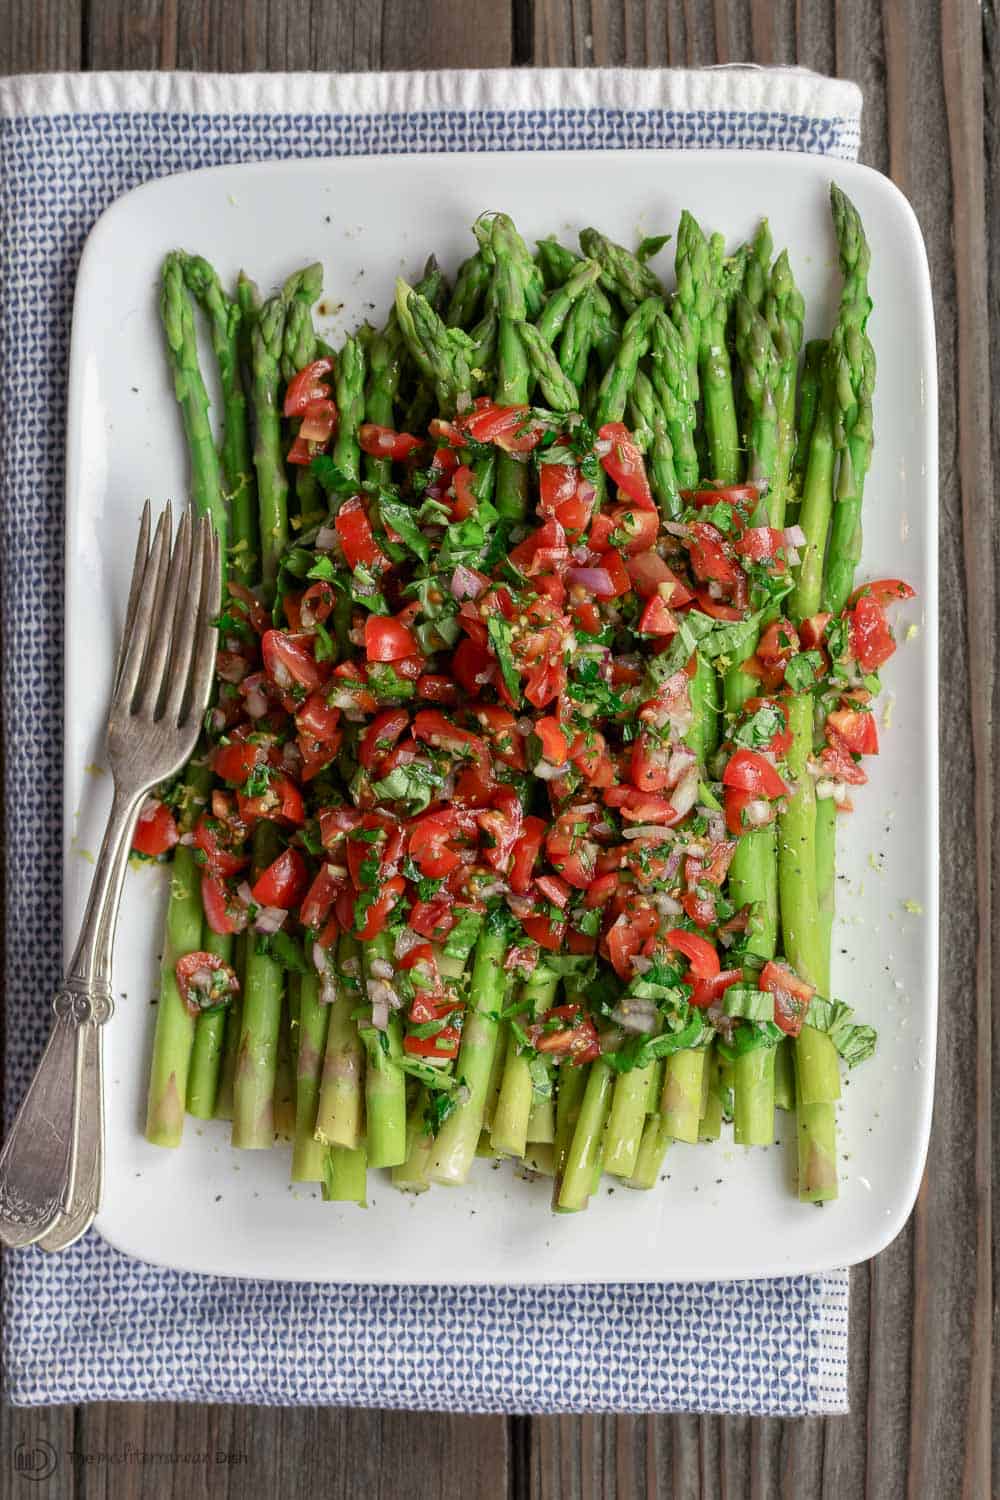 Asparagus!Filled with nutrition including fiber, folate, and vitamins C and K, asparagus is a delicious and versatile vegetable that can make a beautiful statement no matter how you prepare it! I love it quickly sauteed and finished with lemon and feta cheese or tossed in a veggie-forward pasta primavera. And when I’m in the mood for a beautifully composed salad, I often roast my asparagus whole to serve as a bed for a delicious mixture of fresh tomatoes and basil (if you haven’t tried my roasted asparagus salad yet, you need to put it on your list!) But simple blanched asparagus, finished with nothing more than a drizzle of good olive oil and a good pinch of kosher salt is just as divine. And that’s what we’re doing today in this easy asparagus recipe. We’ll walk through how to blanch asparagus properly so that it is crisp-tender and perfectly green. Simple and delicious! In this postWhat to look for when buying asparagus?While asparagus can be found year-round, the best time to buy it is between February and June (when it's in season). Here's what you should look for when buying asparagus:
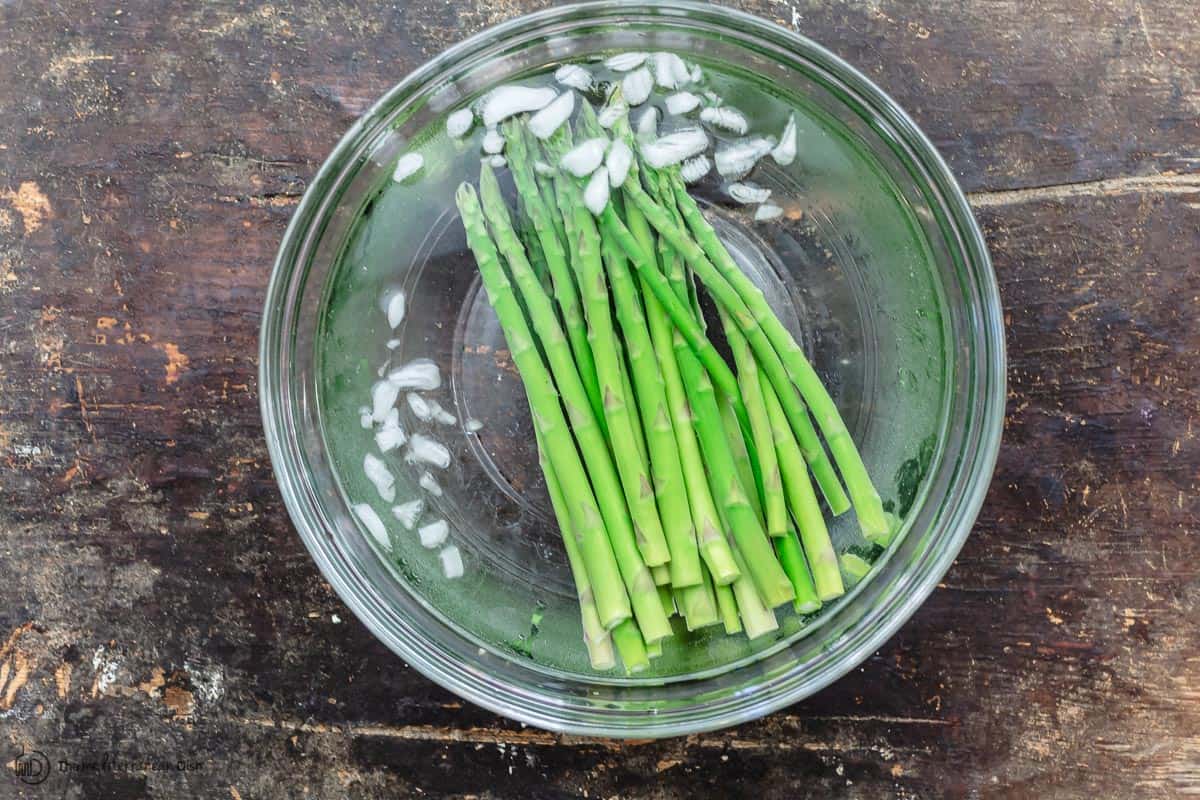 How to store asparagusI like to use fresh asparagus within a day or so of buying it for best flavor and texture. But if you need to keep asparagus fresh for a few days, there is a way to store it! 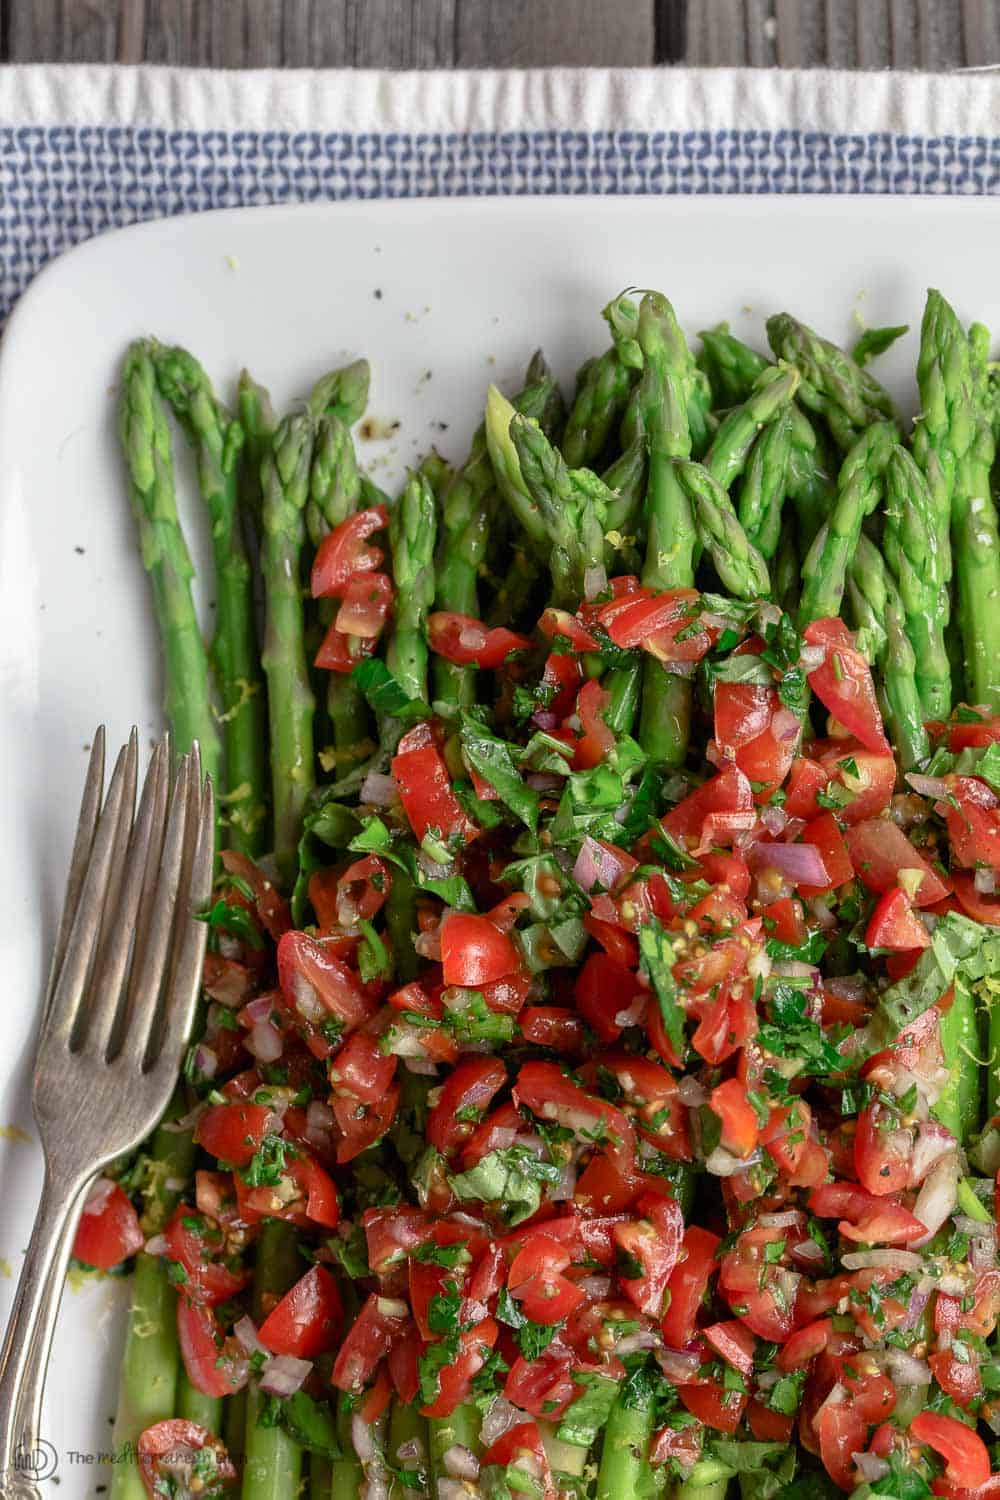 How to cut asparagus spearsBefore you blanch your asparagus, it’s important to cut it properly. Both thick and thin asparagus spears have tougher ends, but thicker stalks tend to have woodier, harder bottoms. No matter the thickness, these tough ends become even tougher when cooked, and should be trimmed off. Luckily, trimming asparagus spears is an easy task. Two ways to cut asparagus spears: How to blanch asparagusIf you’ve wondered how long to blanch asparagus, I’ve got you covered! Blanching asparagus takes just a few minutes and minimal prep! Here’s how to blanch asparagus:
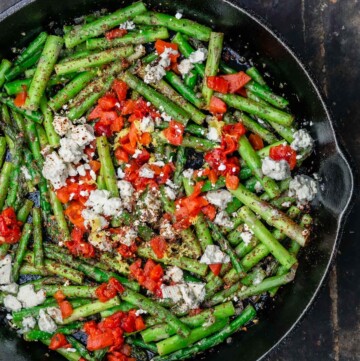
What goes with asparagus?Simple blanched asparagus, finished with olive oil, kosher salt, and maybe a squeeze of lemon juice is a great side dish to go with nearly anything you like! Try it next to a baked fish like lemon garlic salmon or roasted mackerel. It’s also delicious next to meat or poultry, like garlic dijon chicken and grilled lamb chops. A little Mediterranean salsa to top your blanched asparagusFor something a little more special, try assembling your asparagus on a platter and top it with my simple Mediterranean-style salsa, made with tomatoes, shallots, and herbs. This fun dish can be served at room temperature or even cold like a composed asparagus salad, so you can prepare it ahead and keep it in the fridge, if you like.  Leftovers and storageBlanched asparagus will keep in the refrigerator for up to 4 days in an airtight container. The salsa will keep for around 2 days. To prevent the asparagus from getting soggy, store it separately from the tomato salsa. More asparagus recipes to tryBrowse all Mediterranean recipes. 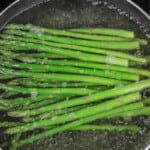 How to Blanch Asparagus
Learn how to blanch asparagus like a pro! Simply cook in boiling water for a few minutes, and then shock in an ice bath. This easy method for blanched asparagus takes just a few minutes and very little prep! Serve it with roasted fish, skillet chicken, or grilled lamb chops. (More ideas in the post!) Or, top your bright, simple blanched asparagus with a flavor-packed Mediterranean salsa with tomatoes, shallots, and fresh herbs.
Servings 6 people
Calories 40.2kcal
Ingredients
Optional Salsa Topping
Instructions
VideoNotes
Nutrition
Calories: 40.2kcal | Carbohydrates: 8.3g | Protein: 3.4g | Fat: 0.3g | Saturated Fat: 0.1g | Sodium: 12.5mg | Potassium: 405mg | Fiber: 3.3g | Vitamin A: 1635.4IU | Vitamin C: 27.9mg | Calcium: 44.9mg | Iron: 3.3mg
* This post has been recently updated with new information and media for readers' benefit. The post Easy Blanched Asparagus Recipe appeared first on The Mediterranean Dish. via The Mediterranean Dish https://www.themediterraneandish.com/easy-asparagus-recipe-with-mediterranean-salsa/ Lemon chicken piccata recipe ready in under 20 minutes! You won’t believe how easy it is to make this Italian-American dish. The secret is in the lemon-wine piccata sauce with capers and just a bit of ghee. 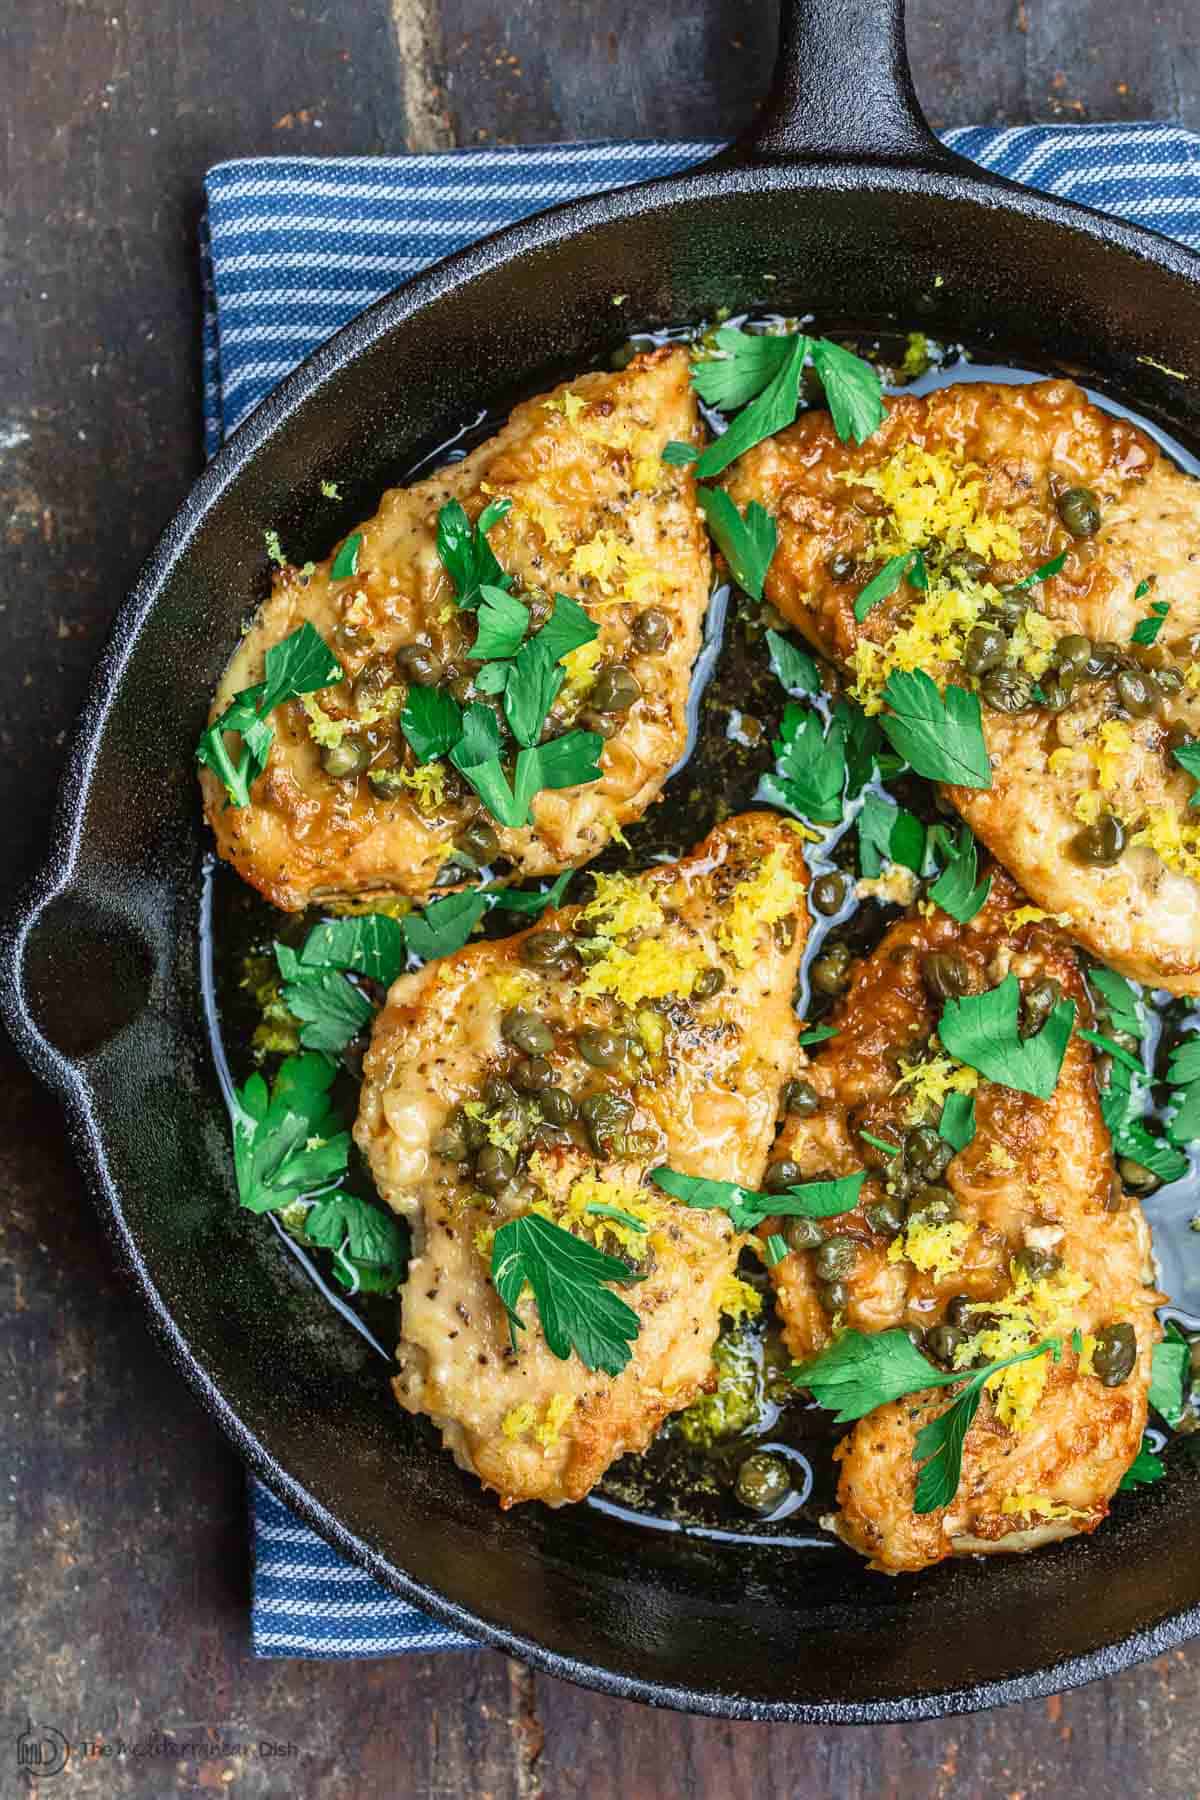 What is chicken piccata?Lemon chicken piccata is an easy Italian-American dish that is made of chicken breast cutlets that are dredged in flour, pan-seared, and finished with a rich and flavorful lemon sauce with capers. This chicken piccata recipe is a quick dinner that comes together in less than 20 minutes (16, to be exact). And while a more traditional version uses only butter, this recipe swaps the butter for quality extra virgin olive oil and a little bit of ghee (clarified butter). You still get all of that buttery goodness in the sauce. In this post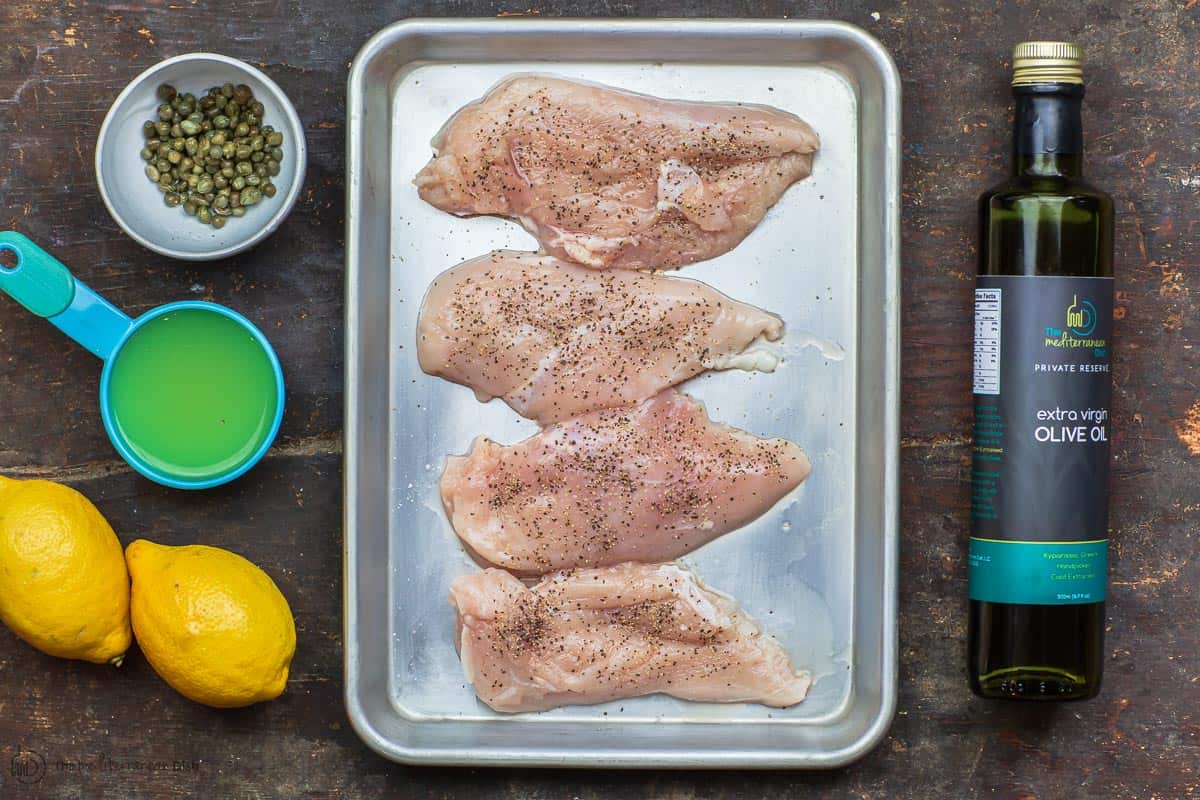 What is piccata sauce made of?We add the chicken piccata sauce ingredients to the same pan the chicken is initially seared in. The key to a good lemon piccata sauce is depth of flavor, and the brown bits from the cooked chicken provide a good bit of that! Here are the 4 simple ingredients you need for the piccata sauce:
What kind of wine to use?You will want to use a dry white wine in this lemon chicken piccata recipe. Other types of white wine, (like Moscato) are too sweet and are not suitable for the piccata sauce. Some great white wines to choose from are:
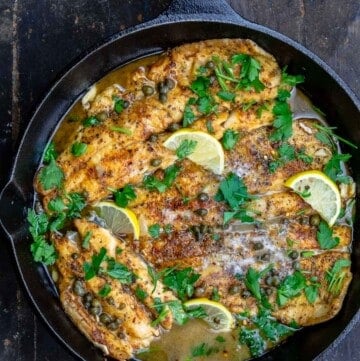
If you do not use alcohol in cooking, use low-sodium chicken broth or vegetable broth instead. How to make chicken piccataIn 4 easy steps and less than 20 minutes, you can have perfectly tangy, rich lemon chicken piccata. Here’s how to make it: Step 1: Butterfly the chicken breastsChicken breasts can be thick and uneven. So it's a good idea to butterfly them so that they cook quickly and evenly, by splitting them in half horizontally, creating thinner cutlets. To do that, start with a sharp knife. Place your hand on top of the chicken, and carefully slice horizontally. (And if you need to, you can even cut the cutlets in halves crosswise, ending up with smaller pieces. So if you started with 2 large chicken breast halves, you can end up with up to 8 smaller pieces.) Pat the butterflied chicken breasts dry with a paper towel and season the chicken with kosher salt and black pepper on both sides. Using your flour of choice – all-purpose, whole wheat (for Mediterranean diet), or gluten-free – dip your chicken pieces in the flour until evenly coated and shake off any extra flour. This is just a light coating of flour. 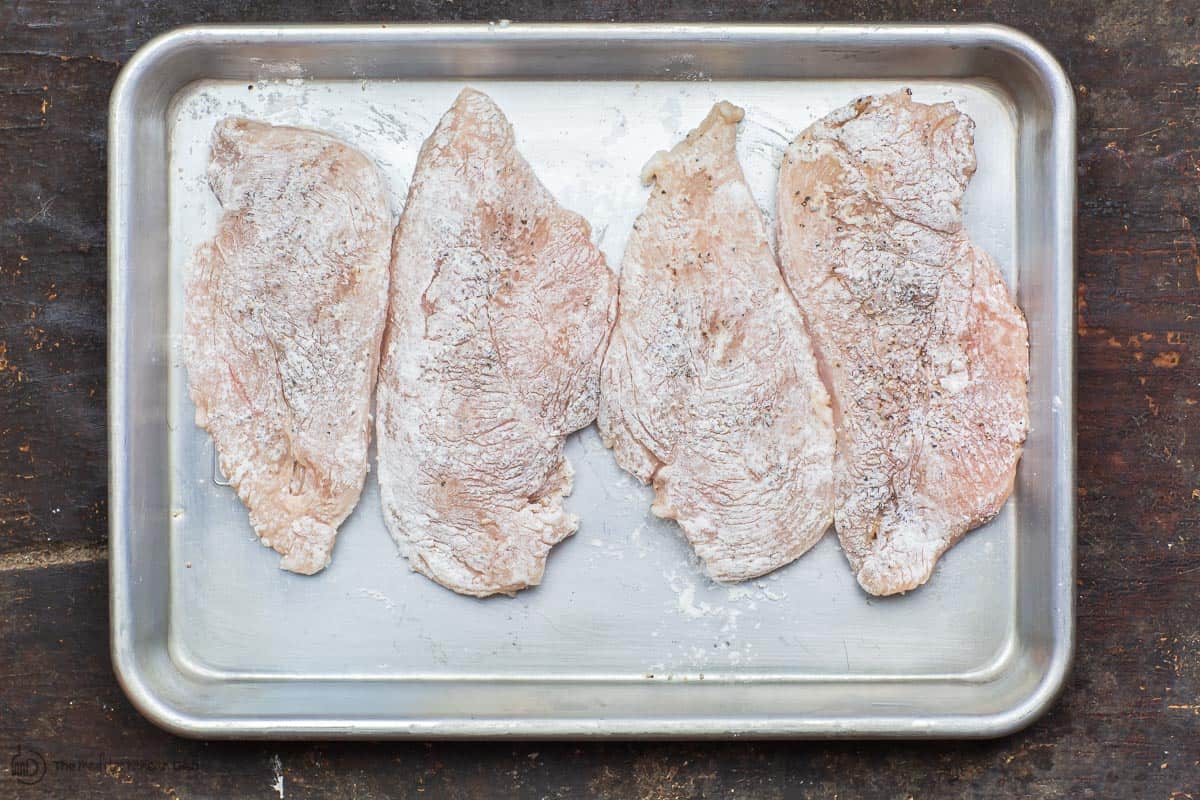 Step 2: Sear the chickenIn a large cast iron skillet or pan, heat 2 or so tablespoons extra virgin olive oil over medium heat or medium-high heat until shimmering (not smoking). Cook the chicken for 3 minutes on each side. You are looking for a golden-brown color. You may need to work in batches so all the chicken is equally golden in color. Remove the cutlets from the skillet and set aside briefly. Step 3: Make the lemon-caper sauceTo make the chicken piccata sauce, heat the same large skillet to medium heat and add a drizzle of olive oil. Add 3 tablespoons of ghee (or butter if you prefer) and let it melt. Once melted, stir in ⅓ cup fresh lemon juice, ½ cup white wine, and 3 to 4 tablespoons rinsed and drained capers. Bring the lemon butter sauce to a boil and scrape all those yummy browned bits from the chicken from the bottom of the pan. This adds depth of flavor to your piccata sauce. Step 4: Simmer the chicken in the sauceAdd the chicken cutlets back to the pan with the sauce. Lower the heat and let chicken simmer in the sauce for 4 to 5 minutes. Make sure to baste the chicken pieces with that flavorful sauce as it simmers! Do this by using a larger spoon to scoop some sauce from the pan and pour the sauce over top of the chicken. Remove the chicken from the heat and garnish with parsley for a pop of gorgeous green color and freshness! And if you like, sprinkle some lemon zest on top. Serve and enjoy. 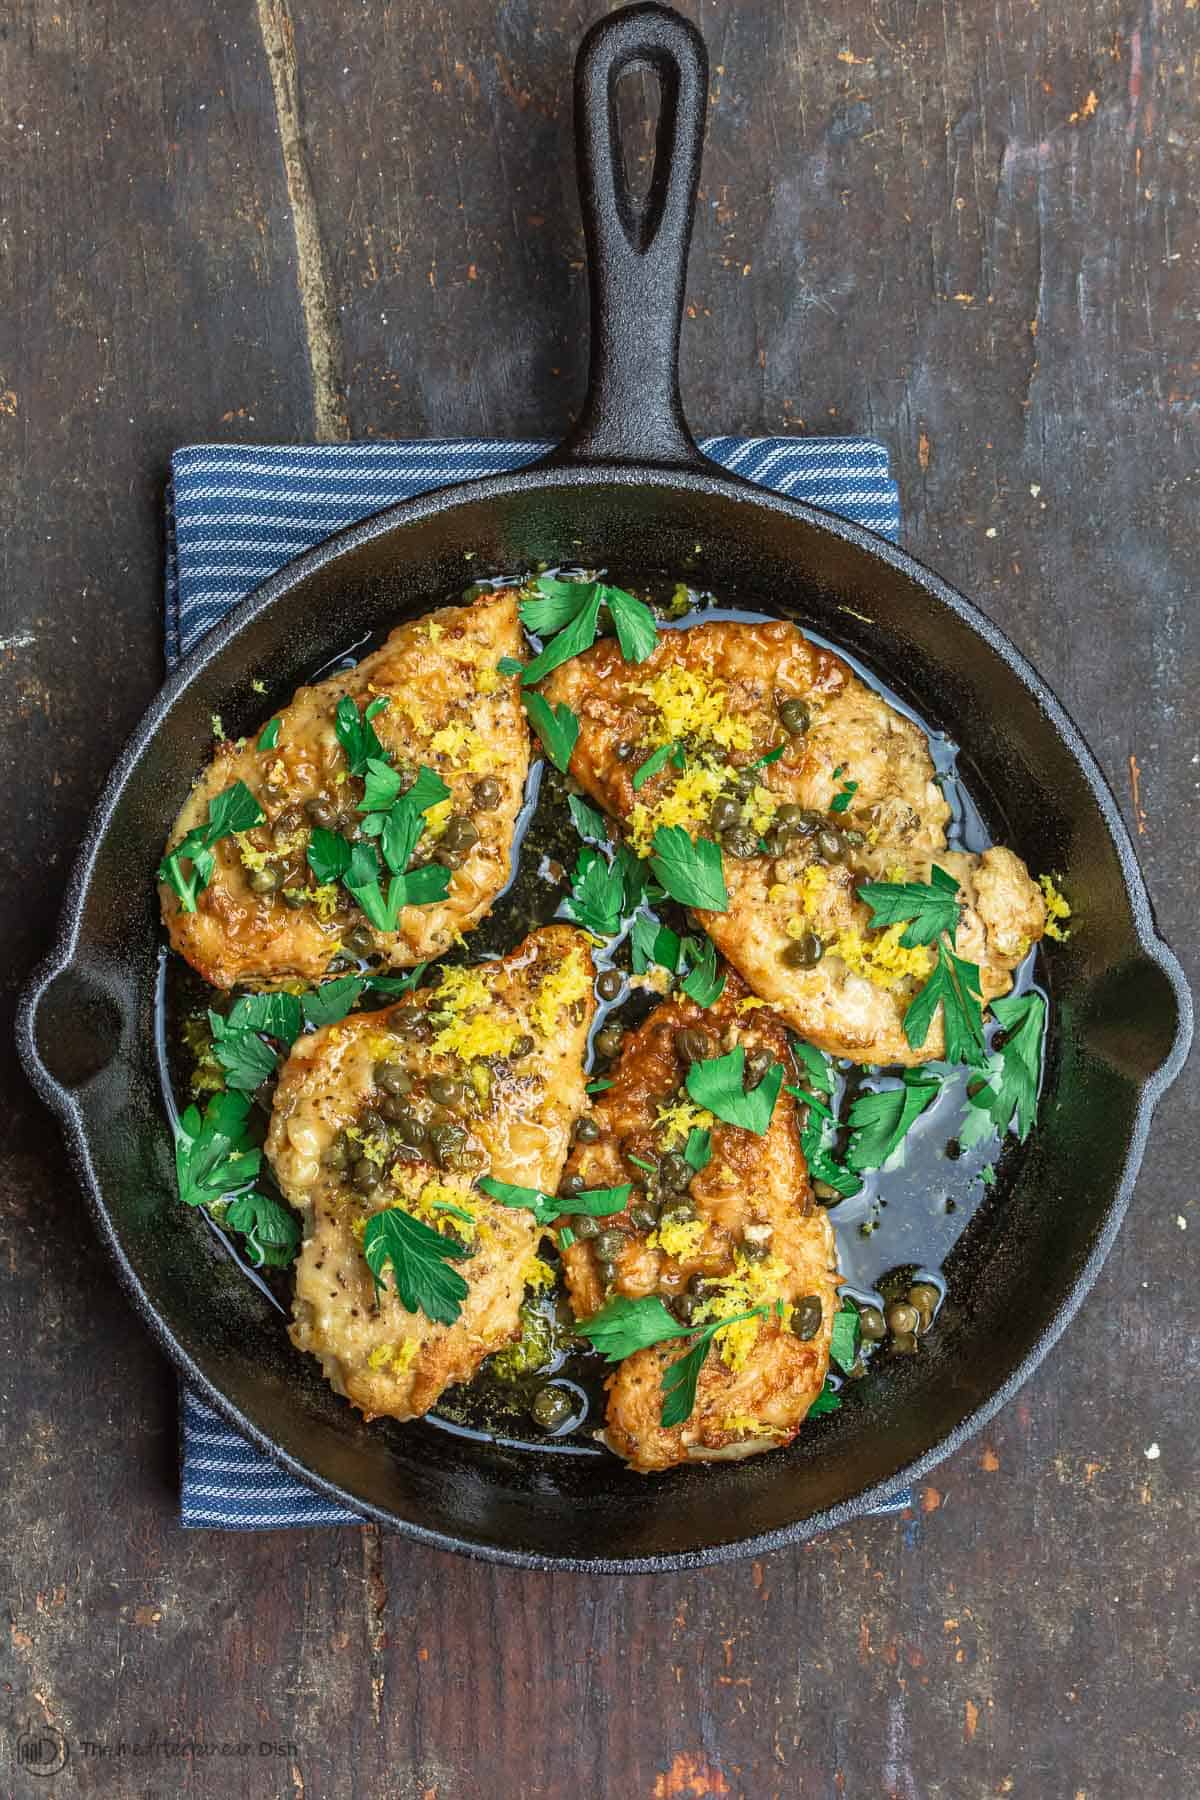 Tips for successHere are some tips for the best chicken piccata recipe:
What to serve with chicken piccata?This easy chicken piccata recipe is a delicious quick meal for any night of the week. If you like, make a bit more of the sauce and toss some pasta to serve along with chicken piccata (orzo pasta is a good option). You may like to pair the chicken piccata with this lemon rice (if you want to keep with a lemony theme) or Lebanese rice. Simple boiled potatoes with garlic and fresh herbs also complement the flavors from the chicken and are great for soaking up the lemon sauce. Or, for more crunch and color on your plate, add a side of crispy Brussels sprouts or a bright salad like Shirazi salad. 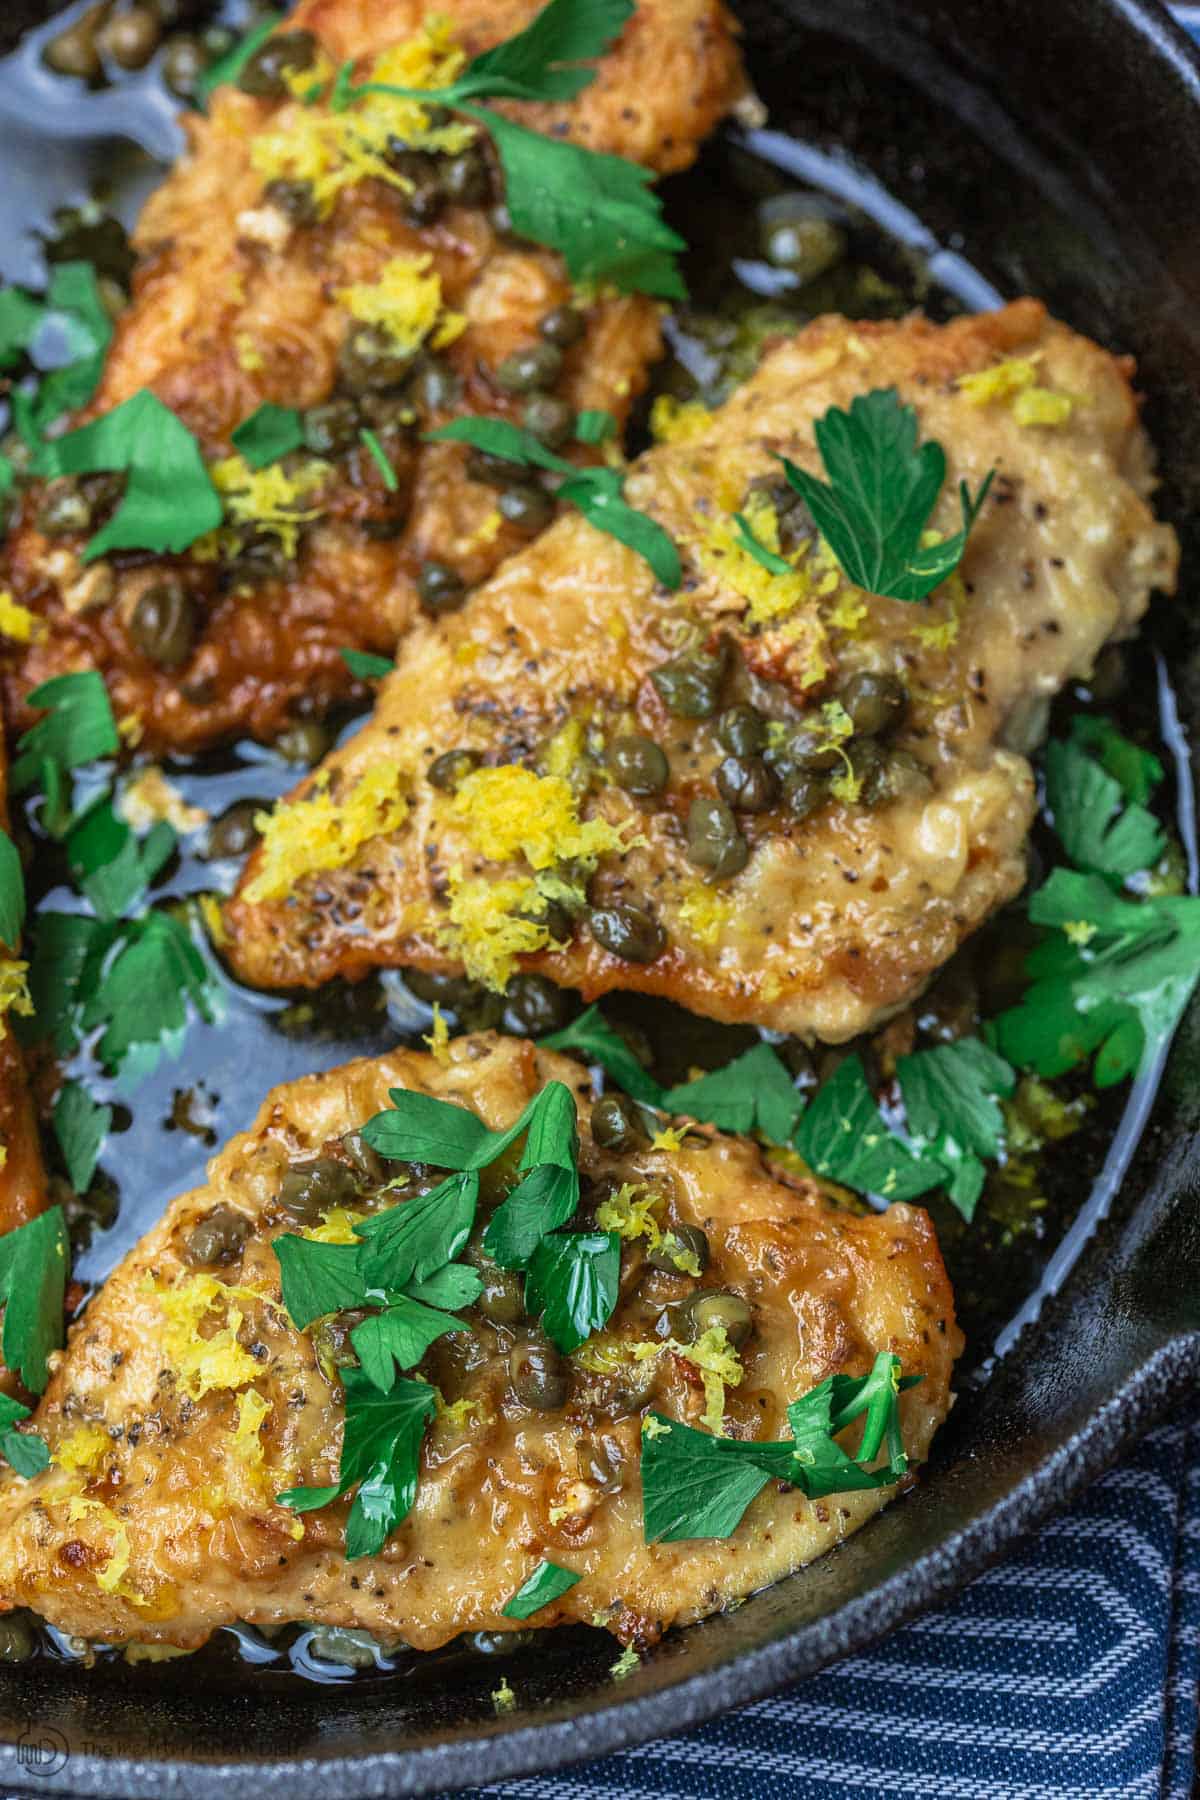 Leftovers and storageIf you have any leftovers, you can store your leftover lemon chicken piccata in an airtight container in the fridge for about 3 to 4 days. Reheat in a skillet over medium heat until warmed through. More chicken cutlet recipesBrowse all Mediterranean recipes.  Lemon Chicken Piccata Recipe
This flavor-packed lemon chicken piccata comes together in 20 minutes! Chicken cutlets are seared in a bit of extra virgin olive oil, then simmered in a bright lemony sauce with capers. I use a little dry white wine in the piccata sauce, but if you do not use alcohol, substitute with an equal amount of chicken broth. Toss chicken piccata with pasta, or serve it with lemon rice, boiled potatoes, crispy Brussels sprouts, or a colorful Shirazi salad.
Servings 4 people
Calories 348kcal
Ingredients
Instructions
VideoNotes
Nutrition
Calories: 348kcal | Carbohydrates: 3.1g | Protein: 26.3g | Saturated Fat: 8.1g | Cholesterol: 101.4mg | Potassium: 461.8mg | Fiber: 1g | Vitamin A: 34IU | Vitamin C: 9.5mg | Calcium: 40.4mg | Iron: 1.2mg
*This post originally appeared on The Mediterranean Dish in 2019 and has been updated with new information and media for readers' benefit. The post Easy Lemon Chicken Piccata Recipe appeared first on The Mediterranean Dish. via The Mediterranean Dish https://www.themediterraneandish.com/lemon-chicken-piccata/ These easy Greek salad skewers turn a traditional recipe into a colorful party appetizer. Think of it as Greek salad on a stick, drizzled with a zesty vinaigrette! 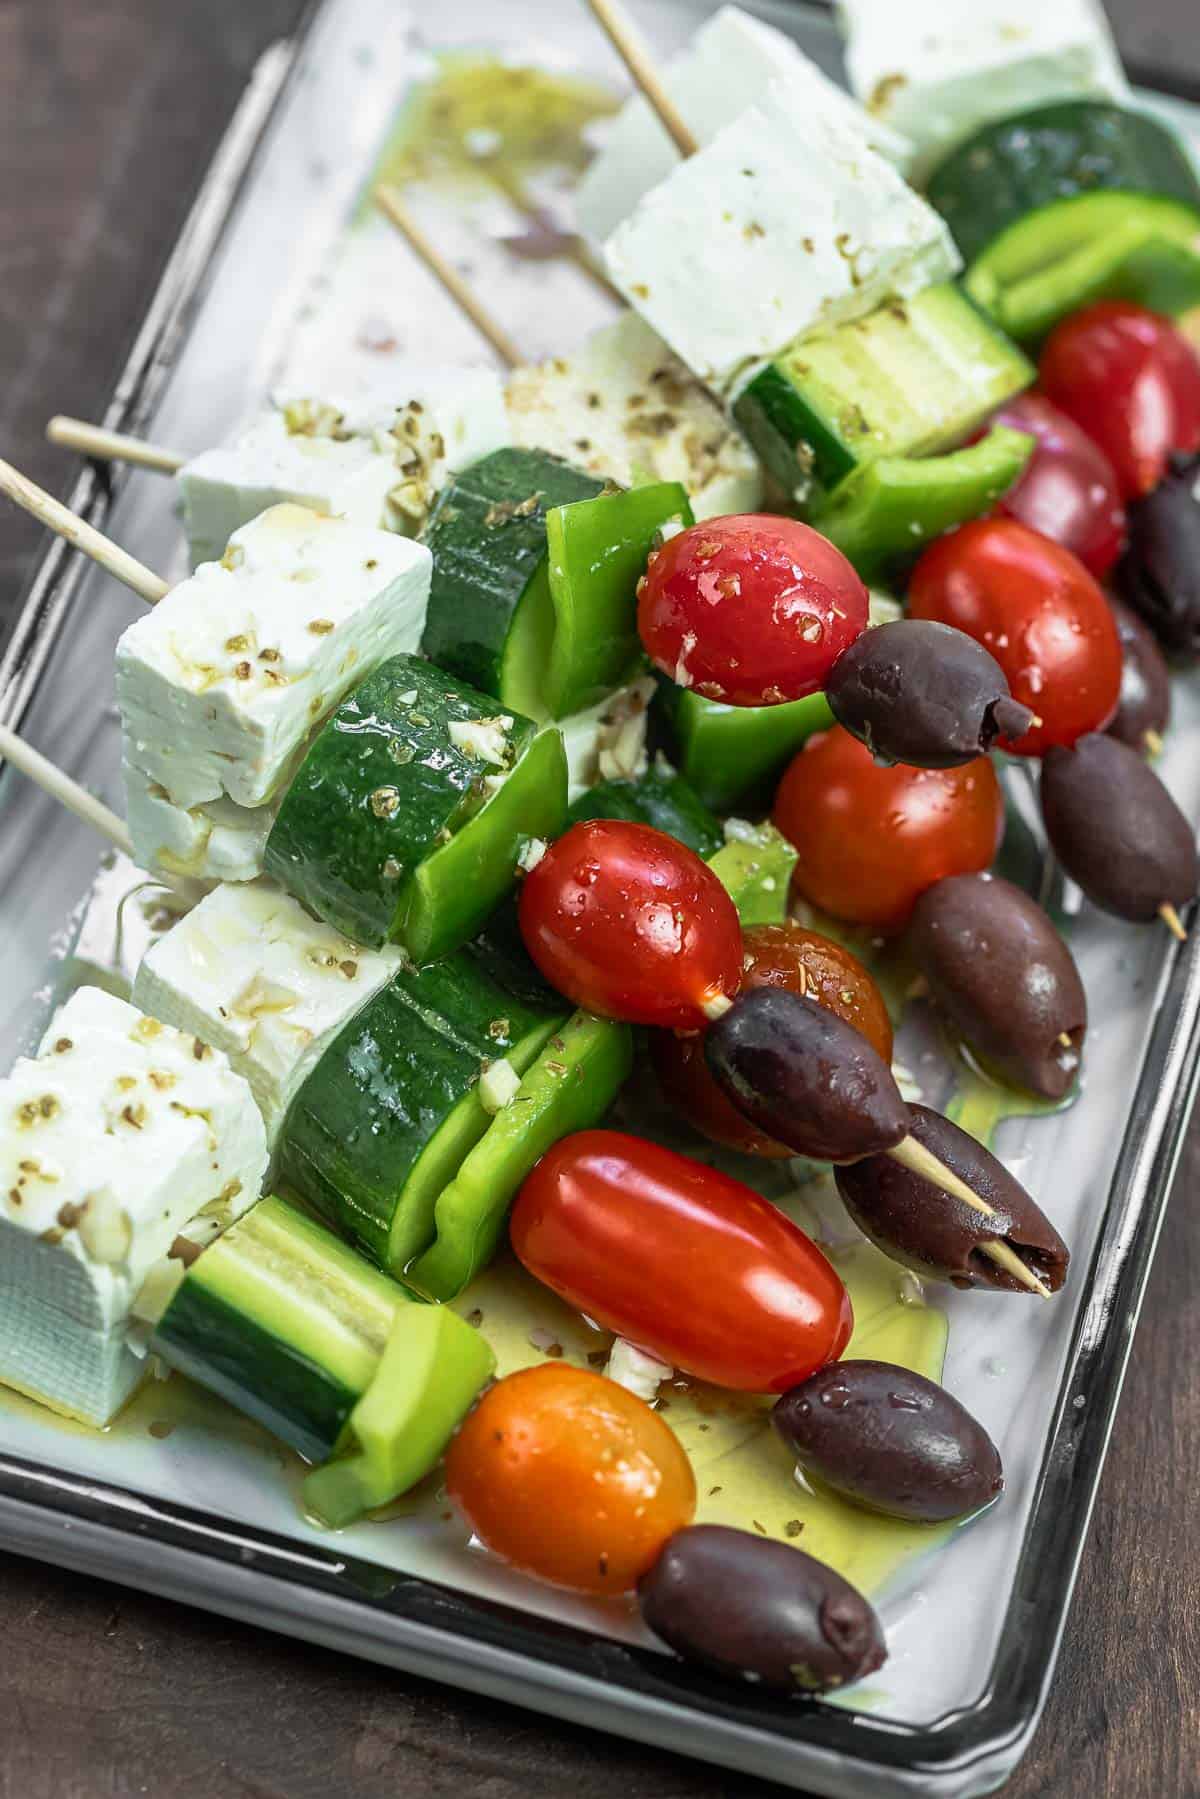 Greek salad on a stick!I love food on a stick. From vegetables to chicken, kofta , and much more. I’ll use any excuse to thread food onto skewers. And after I shared a recipe for Italian-style antipasto skewers, I was inspired to take one of my favorite salads and turn it into finger food! The result? This Greek salad skewers recipe, so full of Mediterranean flavors, and the perfect appetizer to feed a small crowd! Just as you would expect of a classic Greek salad recipe, these salad skewers include blocks of creamy feta, cucumbers, bell peppers, tomato, and of course, pitted kalamata olives. Serve these Greek salad kabobs as is, or drizzle with a zingy vinaigrette to take it up another notch. In this post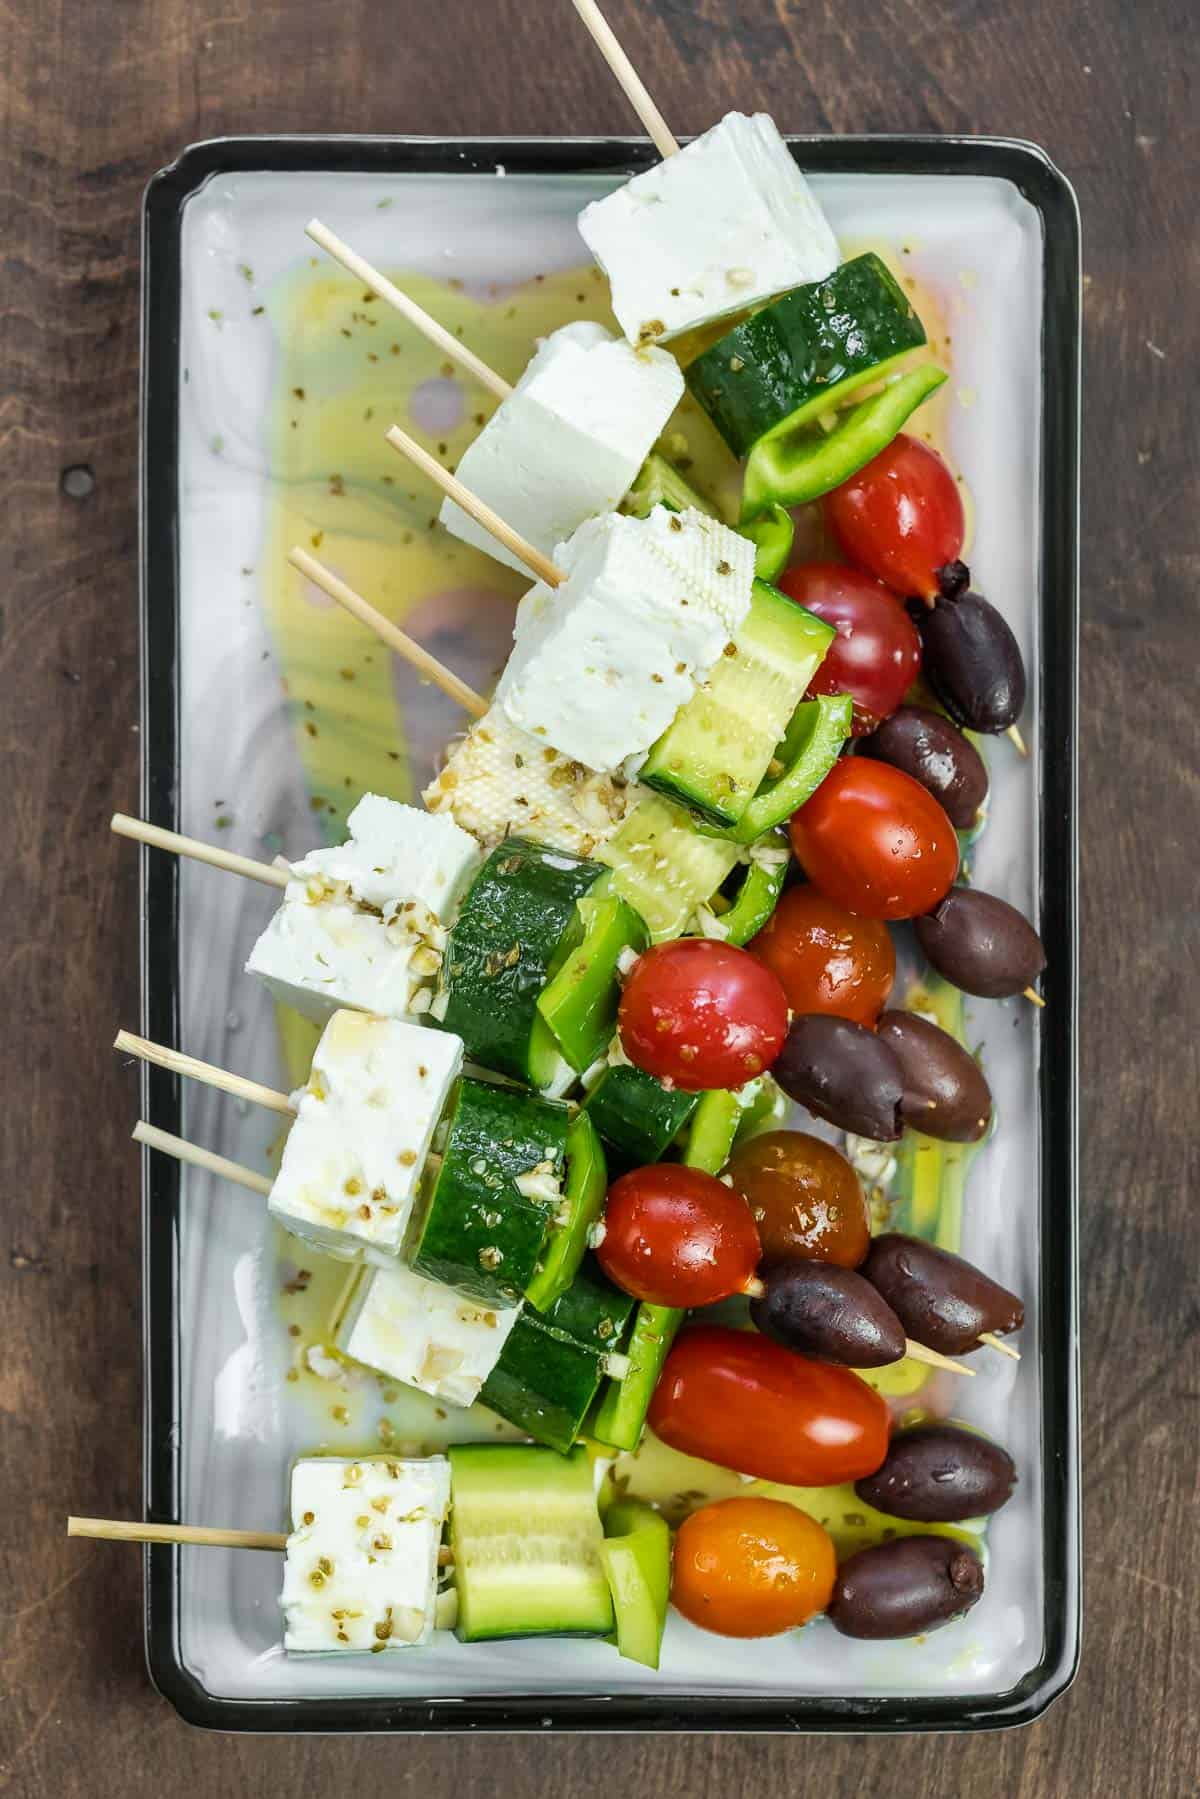 Ingredients for Greek salad skewersThese antipasto skewers with a Greek twist need just a few simple ingredients. Here’s what you’ll need to make them, as well as the optional red wine vinaigrette.
Greek-style vinaigretteLike I said earlier, the dressing here is optional, but it will add an extra layer of flavor that will brighten the salad skewers even more. You’ll need minced garlic, fresh lime juice (or lemon juice), red wine vinegar, dried oregano, and some quality extra virgin olive oil to make it. I like a robust, peppery oil like our Early Harvest Greek EVOO or Spanish Hojiblanca EVOO here. How to make Greek salad skewersAssembling the Greek salad kabobs is easy. First, prepare 10 to 12 smaller skewers; 6-inch bamboo skewers are a good option. Grab a skewer and thread one piece of feta cheese onto it (it’s important that you use creamy feta so it doesn’t fall apart) The feta will act as a strong base for the other kabob elements. Then, thread through a cucumber slice, followed by a piece of green bell pepper and one grape tomato. Finish off the Greek salad skewer with a pitted olive. Place the completed skewer on a serving plate and repeat with the next skewer. Repeat with the remaining skewers and try to follow the same pattern for all the antipasto skewers so they look cohesive. 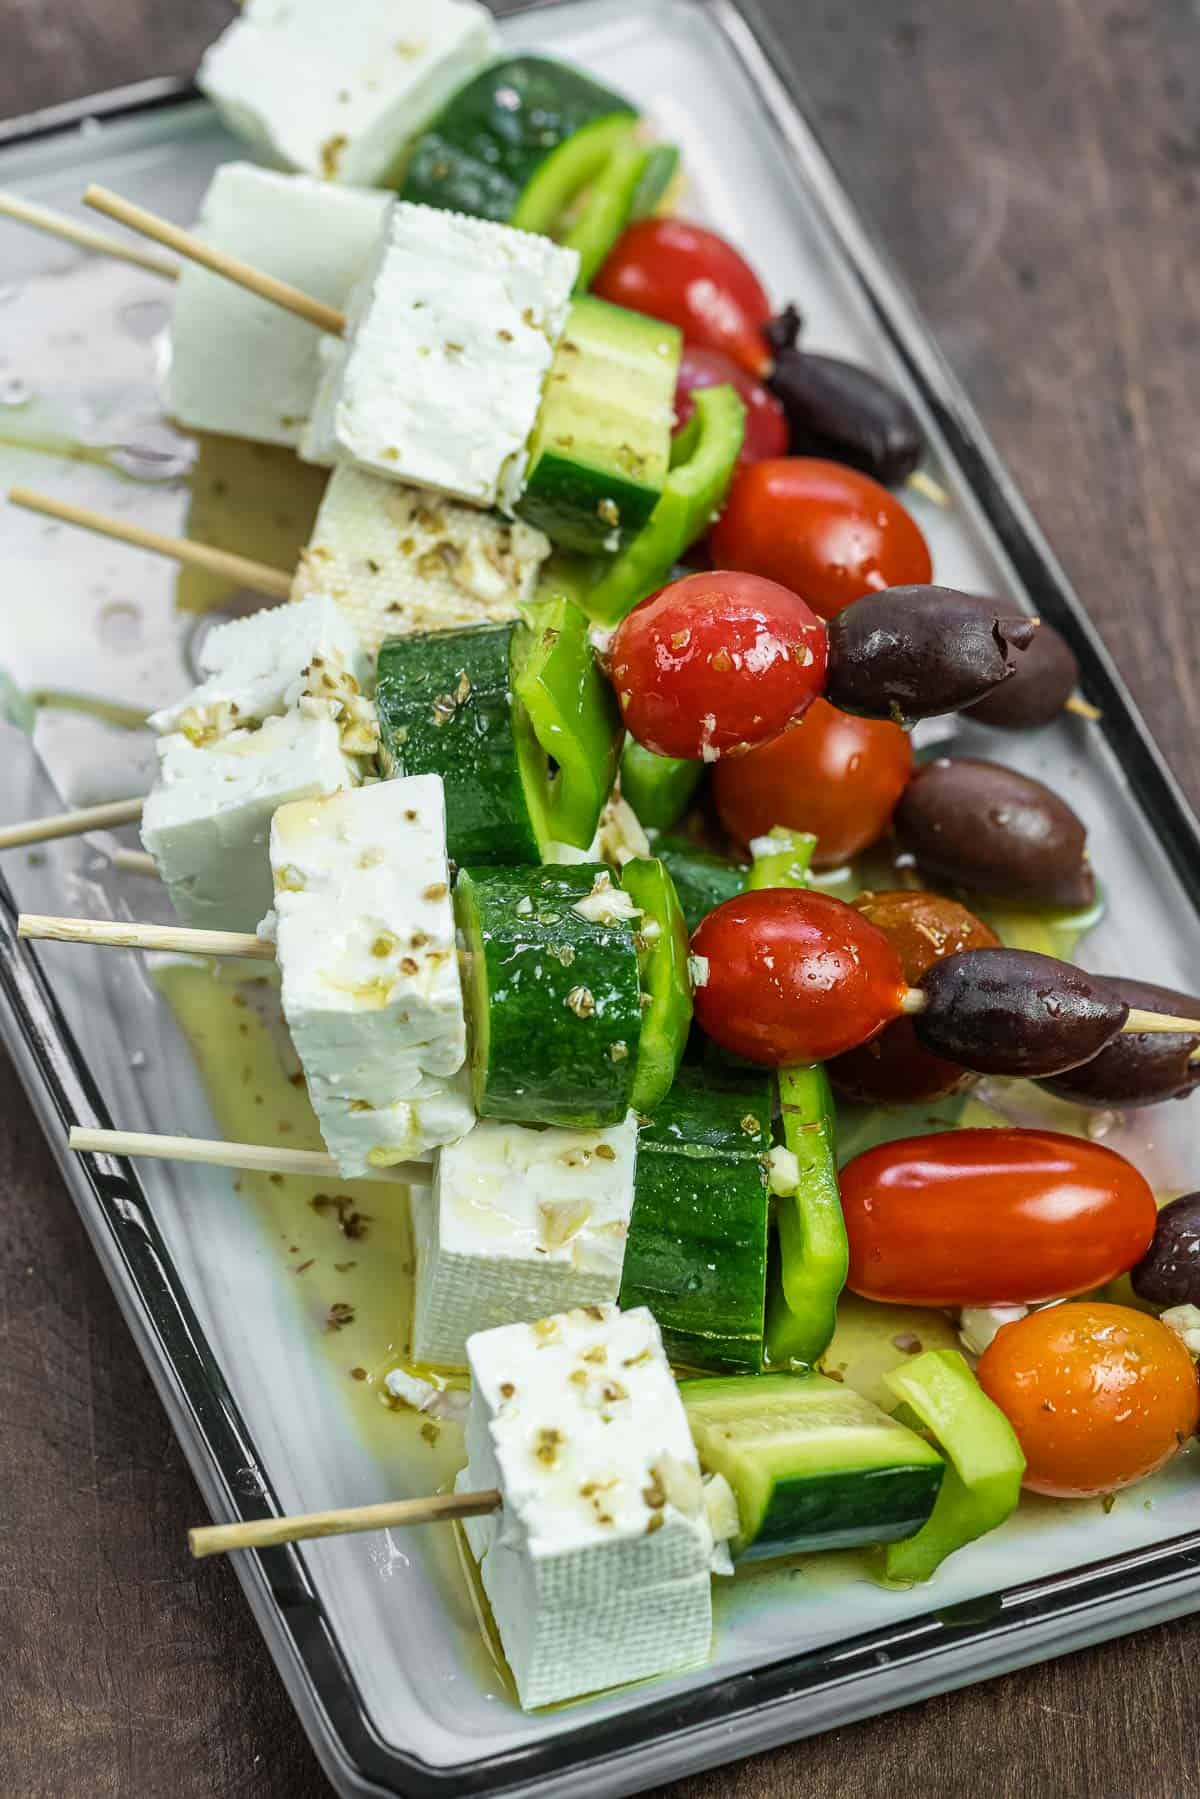 Serving suggestionsMy favorite way to serve these Greek salad kabobs is as part of a larger spread with lots of small nibbles for grazing. Try to choose a variety of shapes, colors, and flavors. I have loads of ideas for small bites here on the site, but here are some ideas for what you could serve alongside your salad kabobs:
Leftovers and storageGreek salad skewers will keep in the fridge in an airtight container for up to 3 days. Eat leftovers as is on the skewer, or take them apart and just enjoy them as a Greek salad! More appetizers to tryBrowse all Mediterranean recipes.  Greek Salad Skewers
These fun party skewers turn classic Greek salad into flavorful finger food. Serve these Greek salad skewers as is or take things up a notch with a drizzle of a zesty garlic and olive oil vinaigrette. These Greek salad kabobs are perfect as part of a larger grazing spread when you're entertaining a crowd. Serve them with a meat and cheese board, baked zucchini chips with tzatziki, and Greek meatballs (loads more ideas in the post!).
Servings 6 people
Calories 122kcal
Ingredients
For the Dressing
Instructions
VideoNotes
Nutrition
Calories: 122kcal | Carbohydrates: 5.3g | Protein: 4.8g | Fat: 9.6g | Saturated Fat: 4.3g | Polyunsaturated Fat: 0.6g | Monounsaturated Fat: 3.8g | Cholesterol: 25.2mg | Sodium: 527.1mg | Potassium: 171.9mg | Fiber: 1.3g | Sugar: 1.8g | Vitamin A: 490IU | Vitamin C: 22.3mg | Calcium: 160.4mg | Iron: 0.6mg
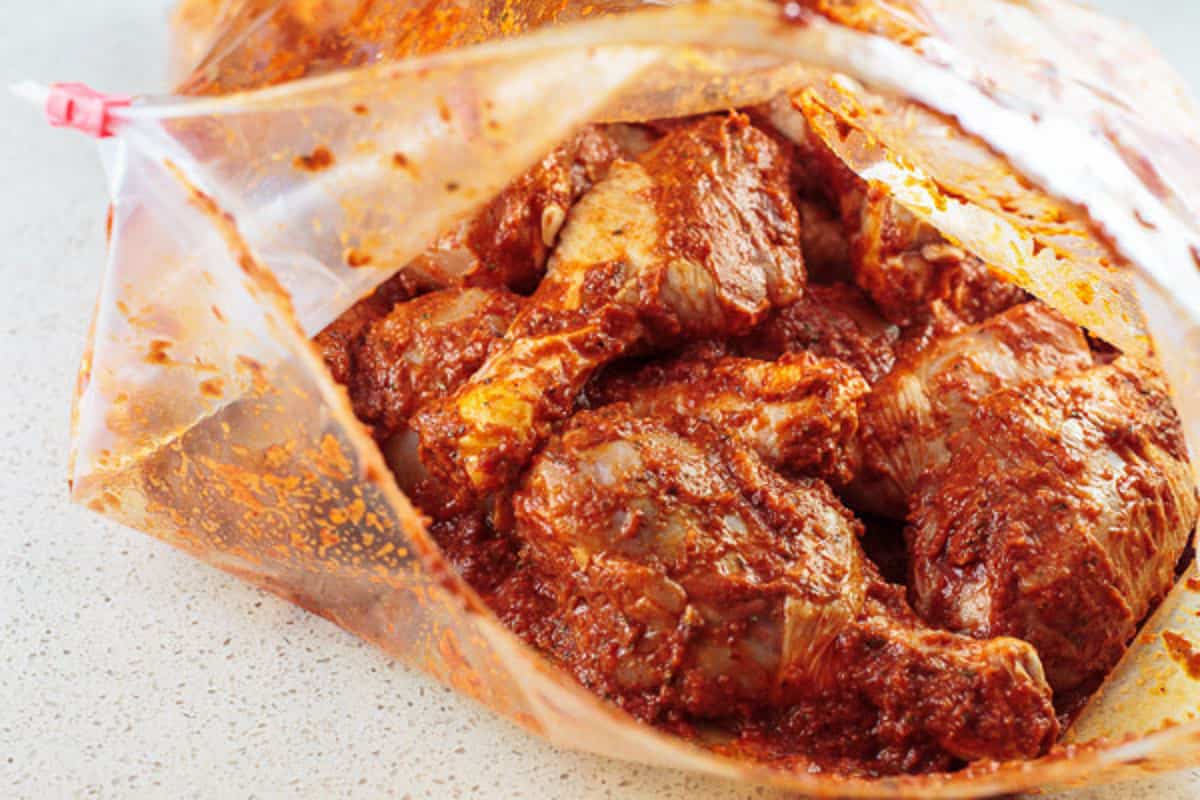
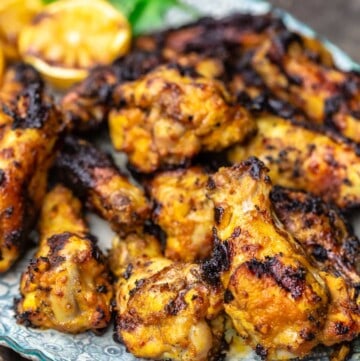
The post Easy Greek Salad Skewers appeared first on The Mediterranean Dish. via The Mediterranean Dish https://www.themediterraneandish.com/greek-salad-skewers/ Grilled chicken legs with the best garlicky harissa marinade! Warm spices and plenty of citrus give these grilled chicken drumsticks a decidedly Mediterranean twist. So easy and delicious. 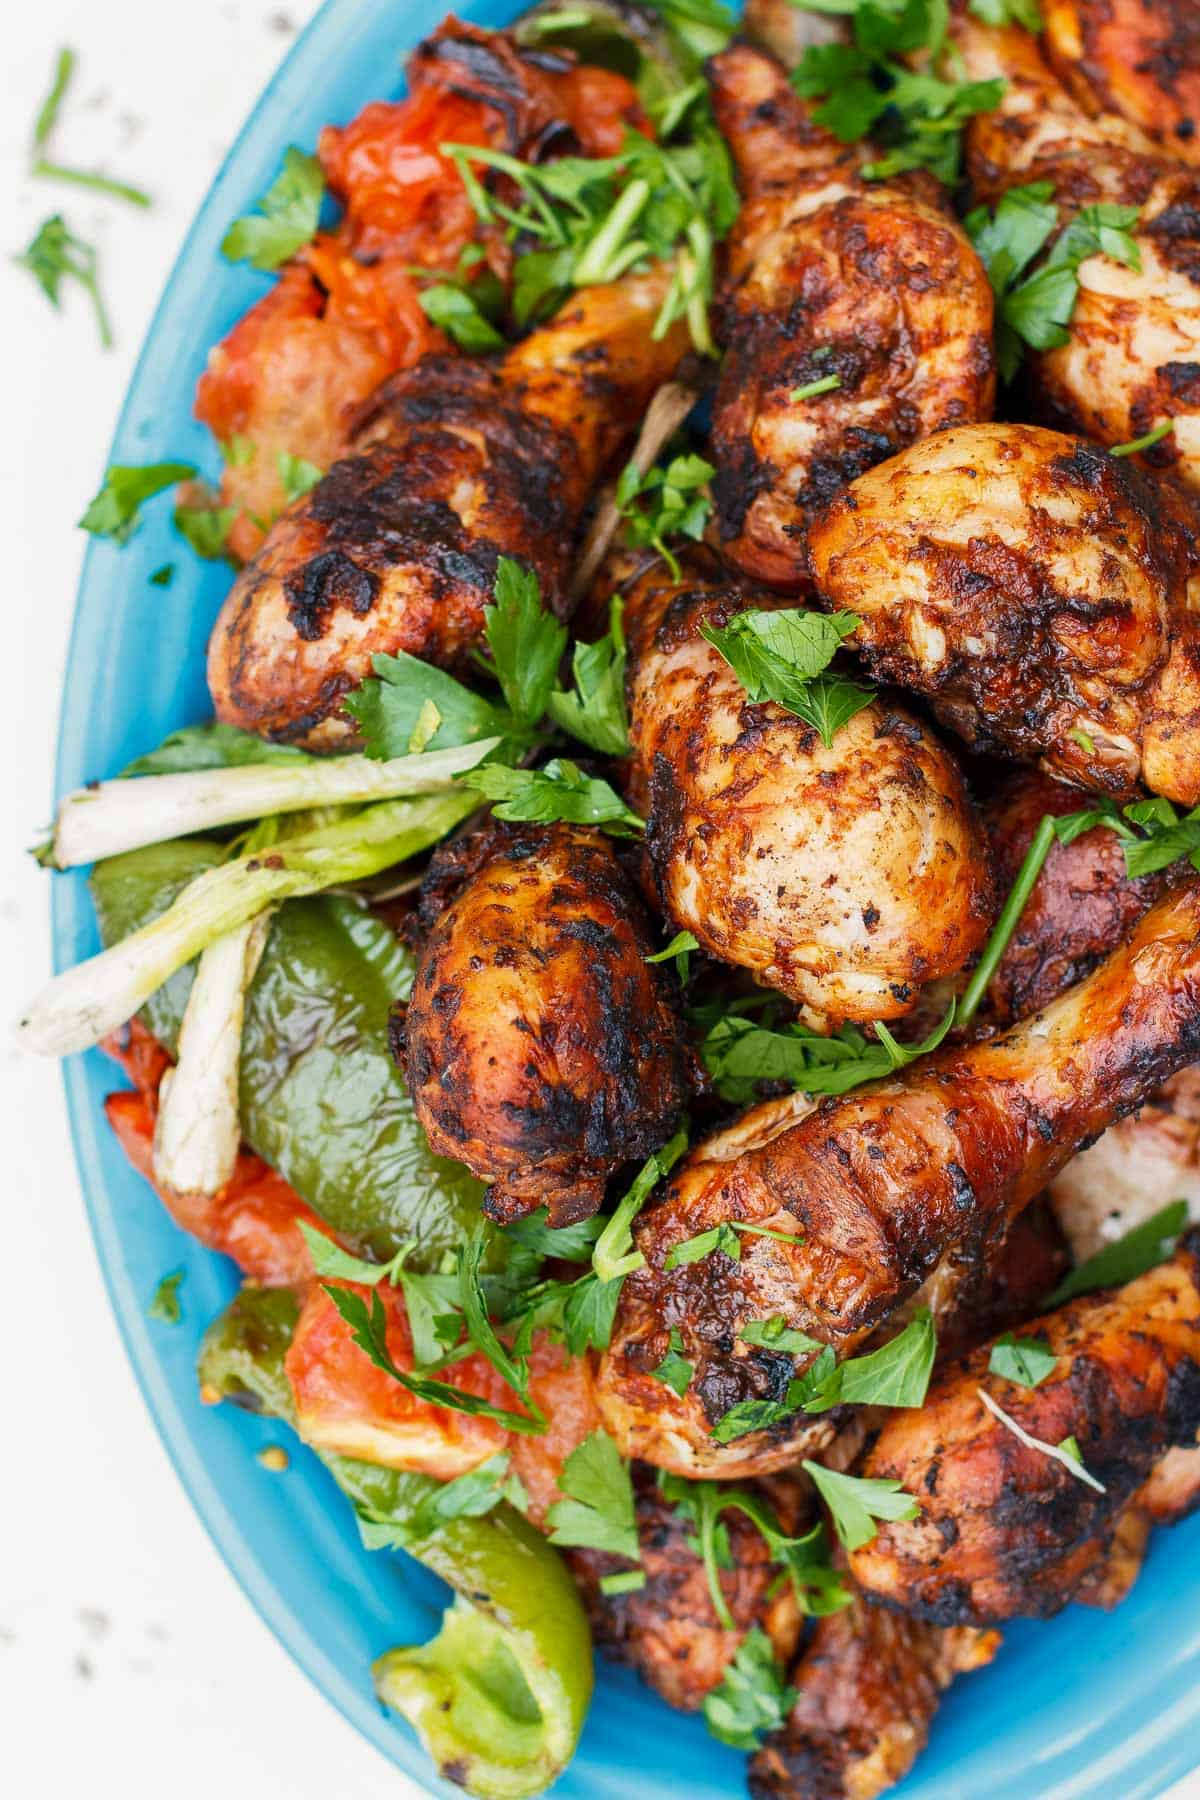 Next-level grilled chicken drumsticks!Few foods are as well-loved as chicken cooked over an open flame. But today's grilled chicken drumsticks recipe is next-level delicious, thanks to a bold and appropriately spicy garlic and harissa marinade! I’m no stranger to using harissa on chicken thighs and even salmon–the spicy Tunisian paste made with chile peppers and warm spices including cumin, coriander, and caraway does wonders to elevate flavor! For today’s grilled chicken legs, you can make my harissa paste recipe or buy a quality jar of it via our online shop to make the marinade. Combined with loads of garlic, lime juice, and a few robust spices, harissa makes an exceptional red marinade for chicken legs that will have you coming back for more. In this post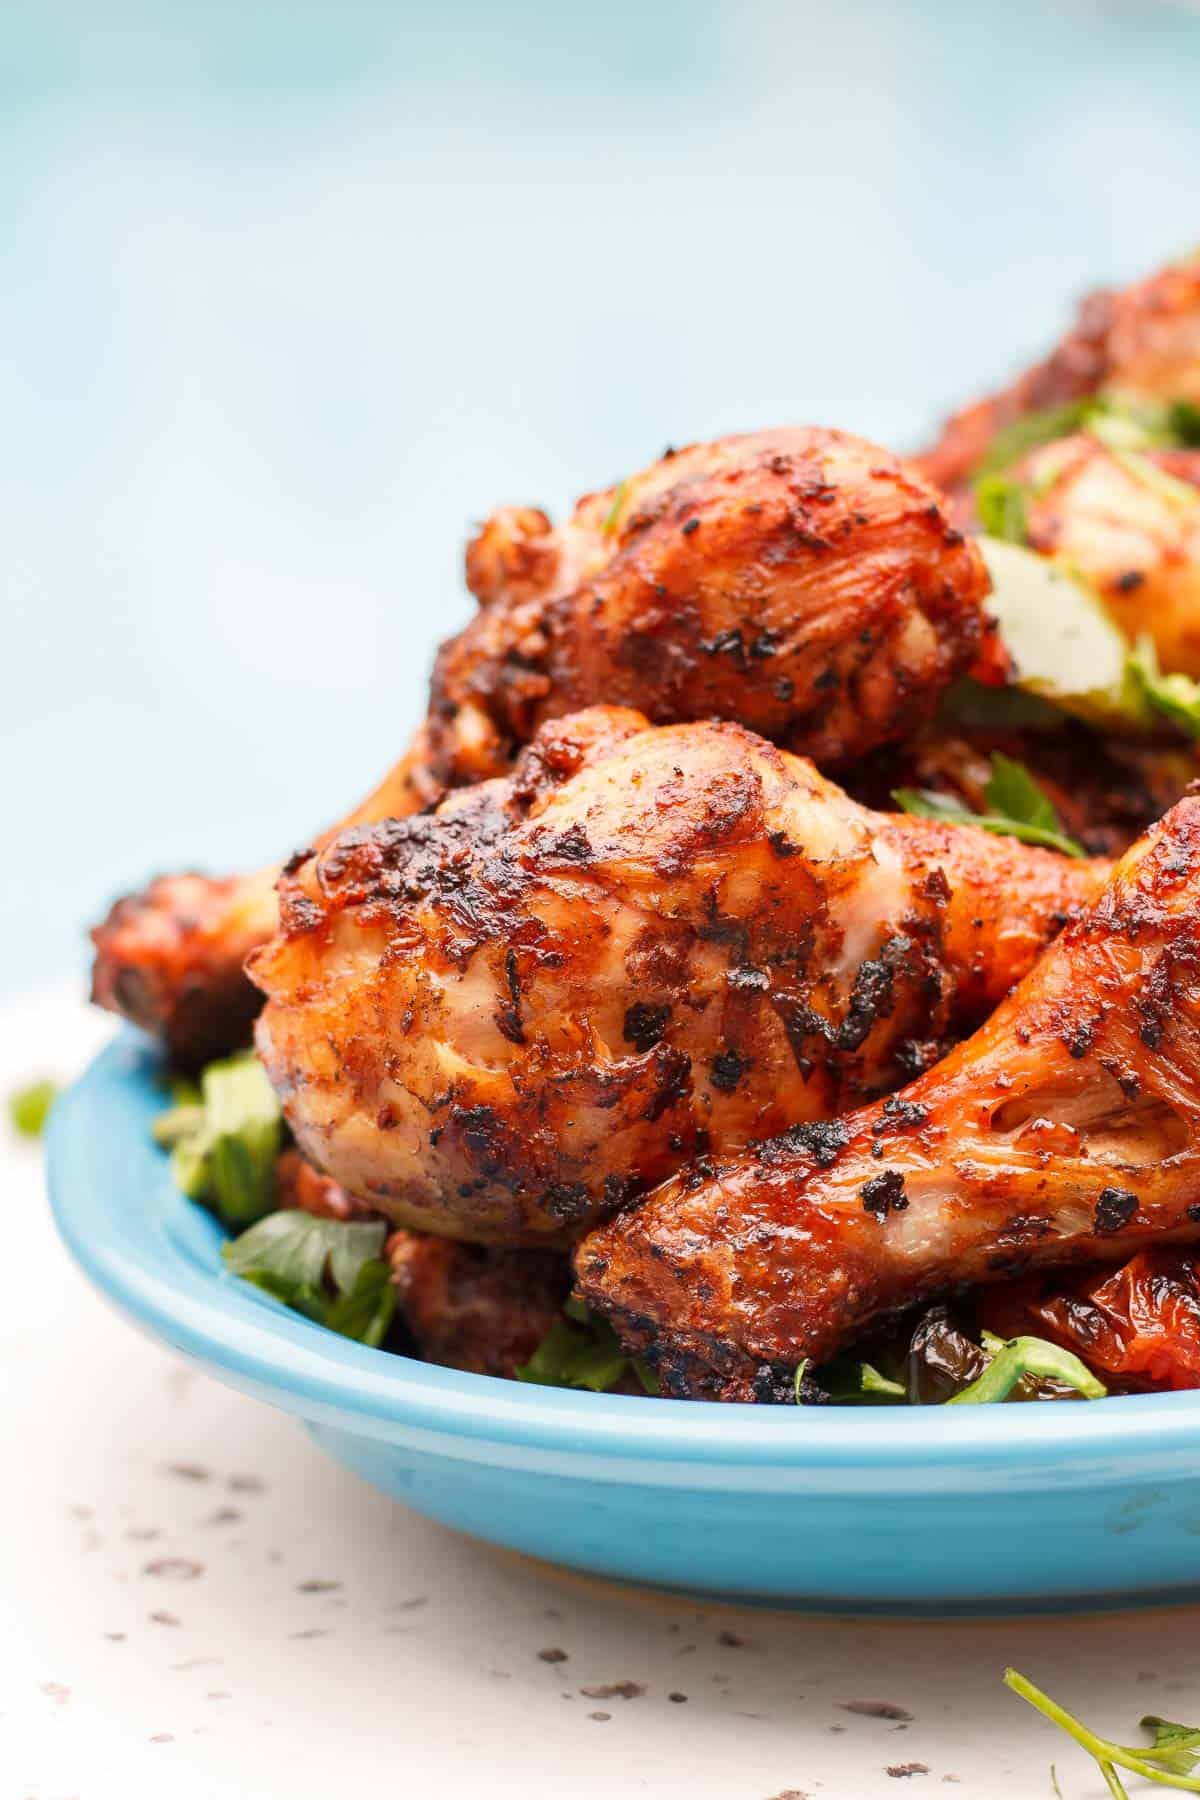 What you need for the chicken marinadeAnytime you have a chance to marinate your chicken ahead of time for 2 to 4 hours, or even for just 30 minutes, do it! It makes a difference in infusing the chicken with flavor and in gently tenderizing it. And when your Mediterranean chicken marinade is made of harissa paste, loads of garlic, and a few spices, you just can’t go wrong! Here is what you need for the marinade:
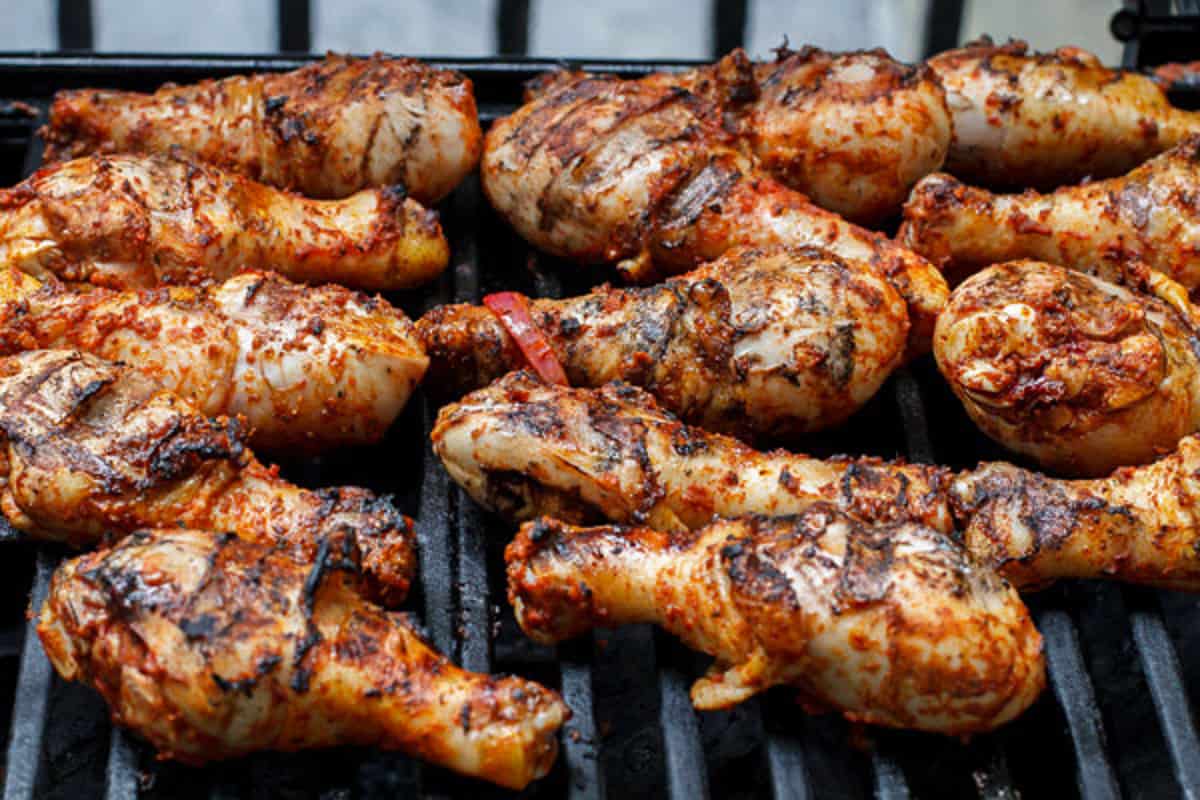
How to grill chicken drumsticksGrilled chicken drumsticks are easy and delicious! All you need to do is budget time to marinate the chicken for best flavor and juicy, tender drumsticks. Here’s how to make this chicken drumsticks recipe:
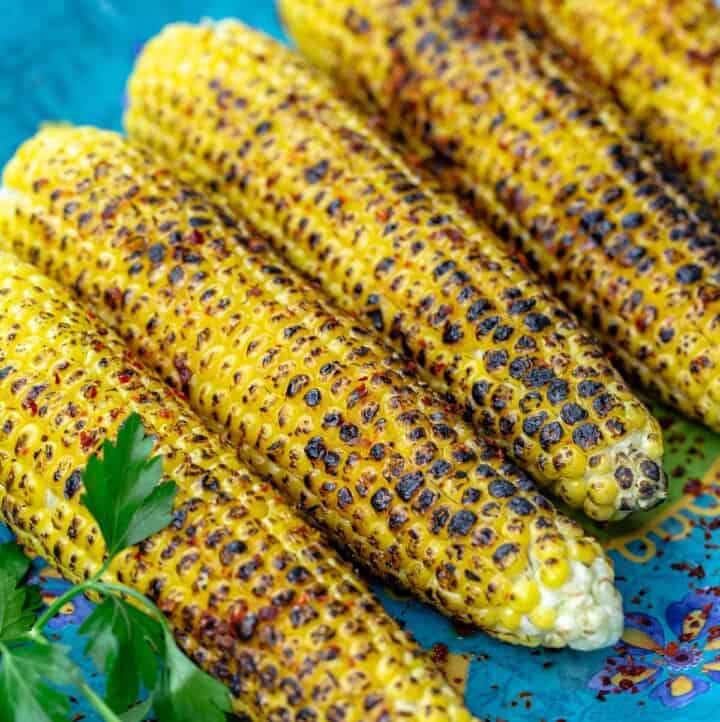
How long to grill chicken legs?Over medium heat, chicken legs will take 35 to 40 minutes to cook through. Be sure to cover the grill so the drumsticks cook on the inside as well without the outside becoming burned. Chicken drumsticks are fully cooked when the juices run clear (not bloody or pink) or when the internal temperature is 165 degree F when measured with a meat thermometer near the bone. What to serve alongI like to serve this chicken drumsticks recipe with grilled watermelon or simple roasted carrots. And you can’t go wrong with a salad, like a no-mayo potato salad, kidney bean and cilantro salad, or couscous salad. 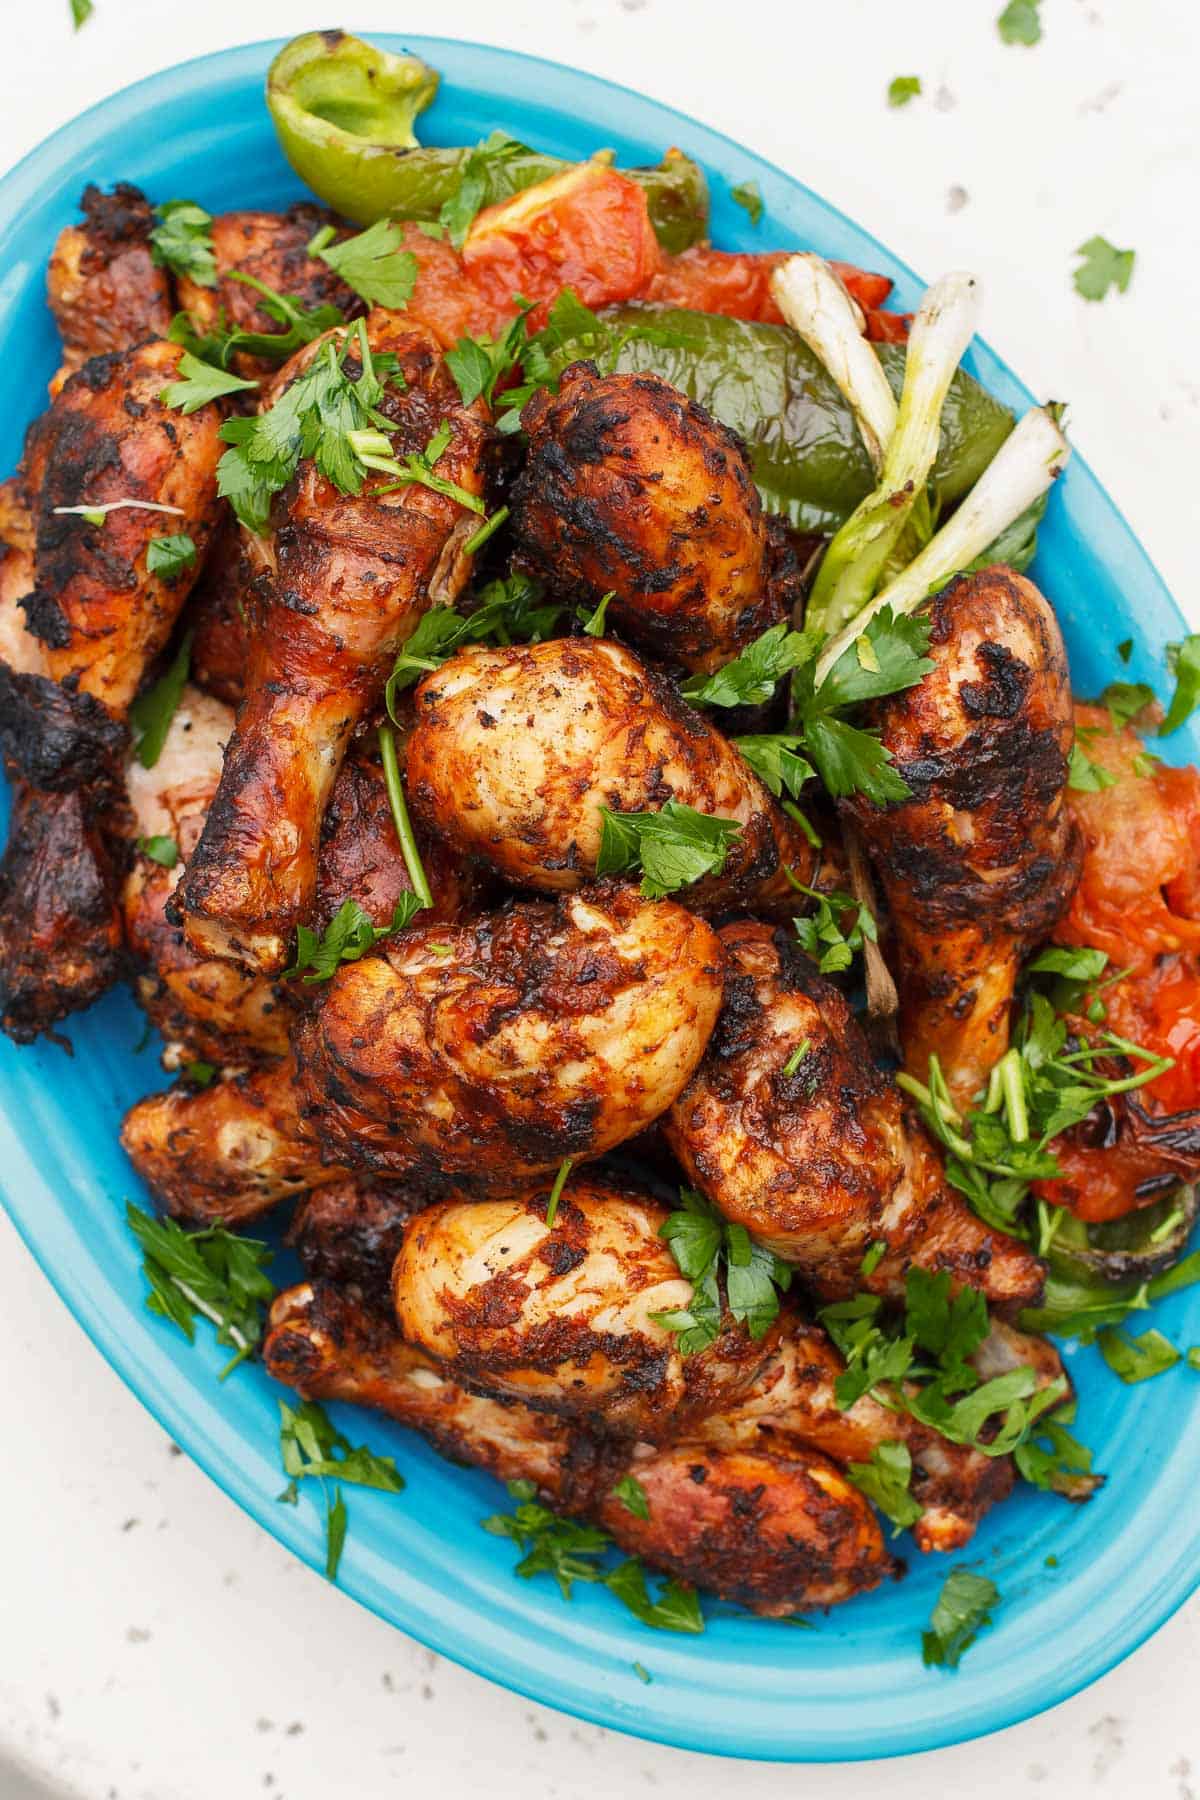 Leftovers and storageStore leftover grilled chicken drumsticks in an airtight container in the refrigerator for up to 4 days. Reheat them in a skillet over medium heat (perhaps with a little olive oil) until warmed through. More grilled chicken recipes Next-Level Grilled Chicken Legs (Best Marinade)
In this grilled chicken recipe, humble chicken legs are dressed in a garlic and harissa marinade. Spicy. Tangy. Simply addictive! If you have the time, let the chicken marinate for 2 to 4 hours. If not, even allowing the legs 30 minutes in the marinade will work wonders to infuse the meat with flavor! Serve these grilled chicken drumsticks with grilled watermelon, roasted carrots, no-mayo potato salad, kidney bean and cilantro salad, or couscous salad.
Servings 10 servings
Calories 315kcal
Ingredients
Instructions
VideoNotes
Nutrition
Calories: 315kcal | Carbohydrates: 6g | Protein: 27.4g | Fat: 19.8g | Saturated Fat: 4.6g | Polyunsaturated Fat: 3.6g | Monounsaturated Fat: 9.7g | Trans Fat: 0.1g | Cholesterol: 139.3mg | Sodium: 396mg | Potassium: 420.3mg | Fiber: 1g | Sugar: 2g | Vitamin A: 142.2IU | Vitamin C: 7.6mg | Calcium: 34.4mg | Iron: 1.4mg
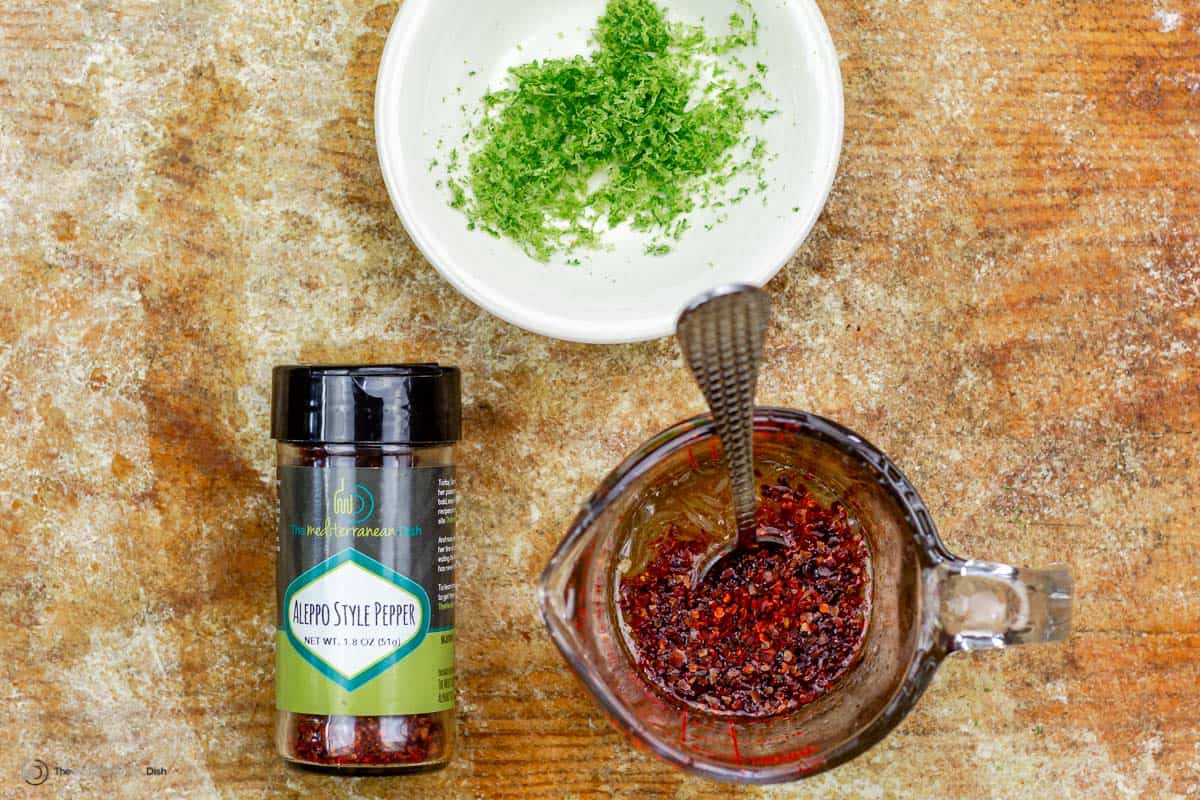
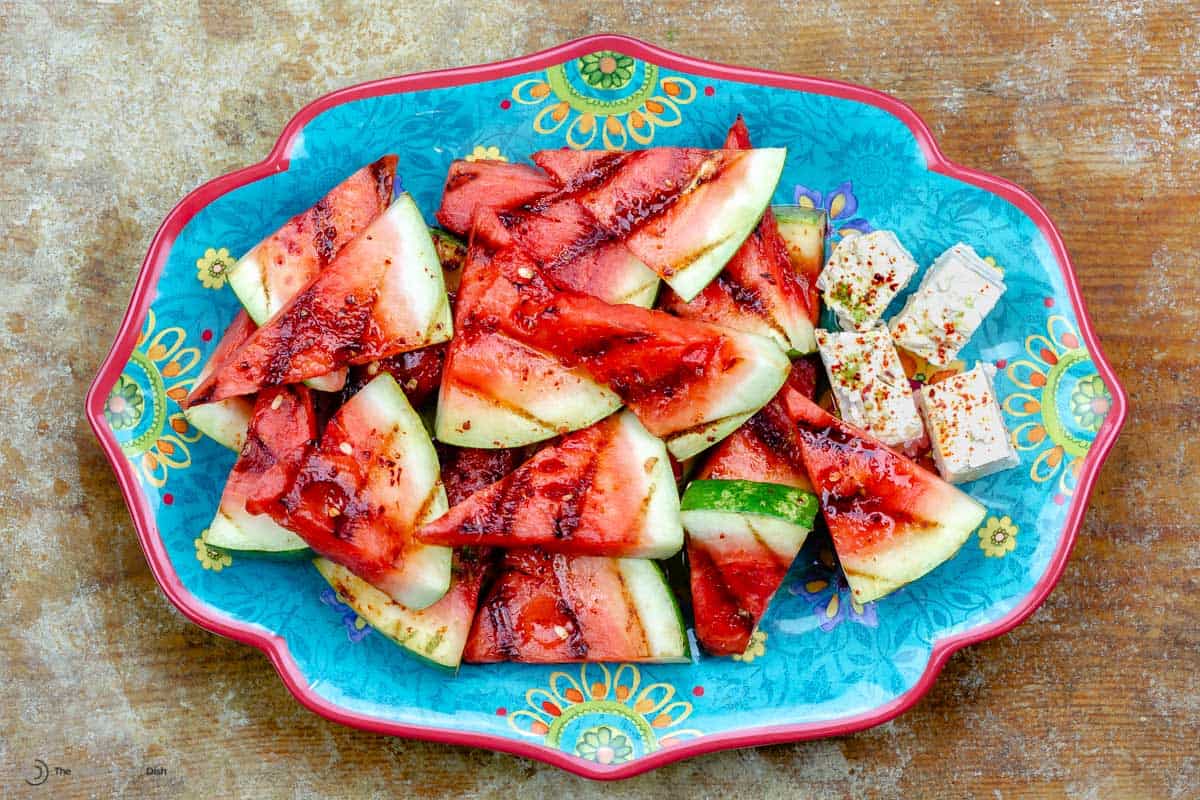
The post Grilled Chicken Legs with Garlic-Harissa Marinade appeared first on The Mediterranean Dish. via The Mediterranean Dish https://www.themediterraneandish.com/grilled-chicken-drumsticks-with-spicy-garlic-harissa-marinade/ Learn how to grill watermelon and turn it into a special summer appetizer everyone will love! This juicy grilled watermelon recipe is next level delicious thanks to a dash of Aleppo chili pepper flakes and a drizzle of honey-lime sauce. A must-try! 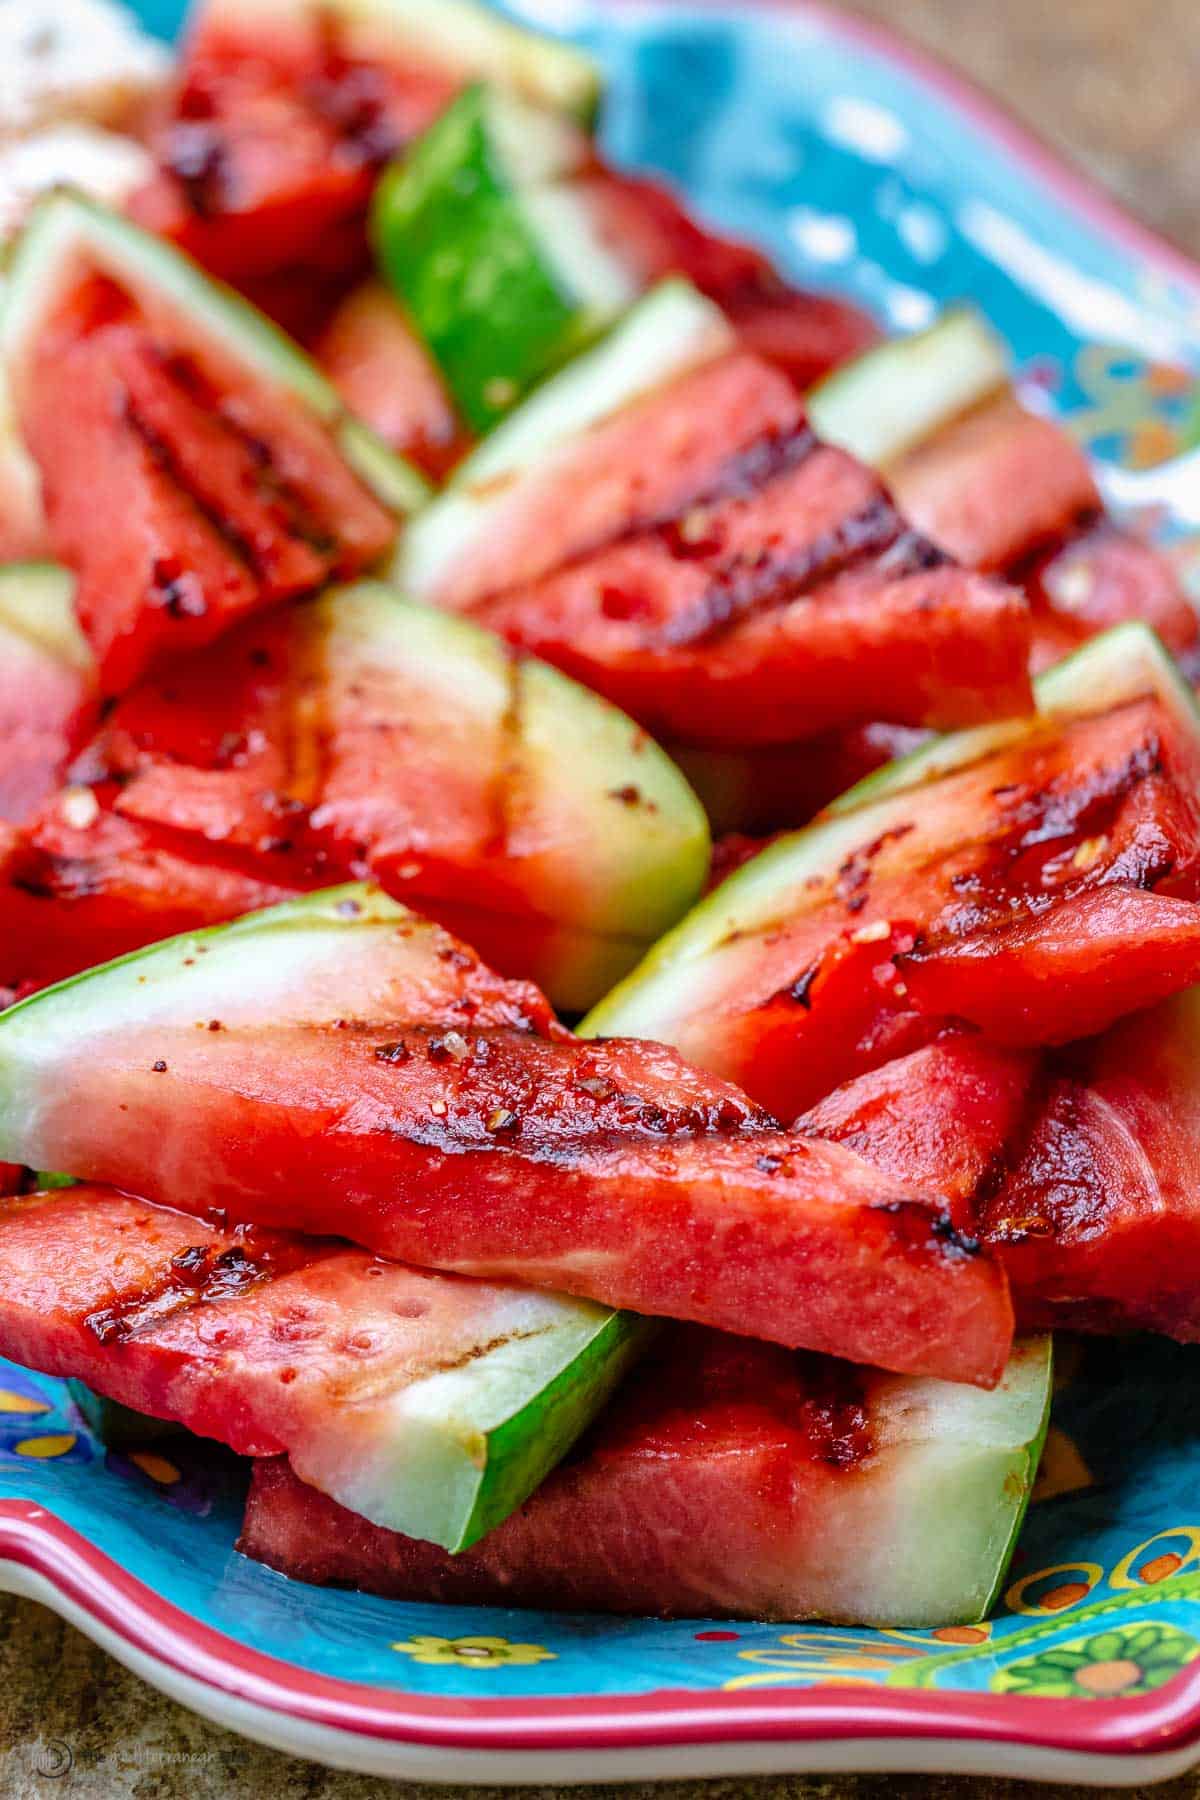 I love fresh, sweet watermelon – especially in this Mediterranean watermelon salad with a bit of salty feta and herbs, or in a refreshing summer cocktail like my watermelon sangria . But did you know you can grill watermelon, too? Grilled watermelon is delicious immediately off the grill on its own, but I highly recommend you make the honey-lime sauce to drizzle on top! The citrus and the sweet honey enhance the taste of the smoky, warm watermelon. It's a true balance of flavor, with heat, sweet, and citrus all in one. I like to add a side of creamy feta, or if I have it ready, some whipped feta! Table of contents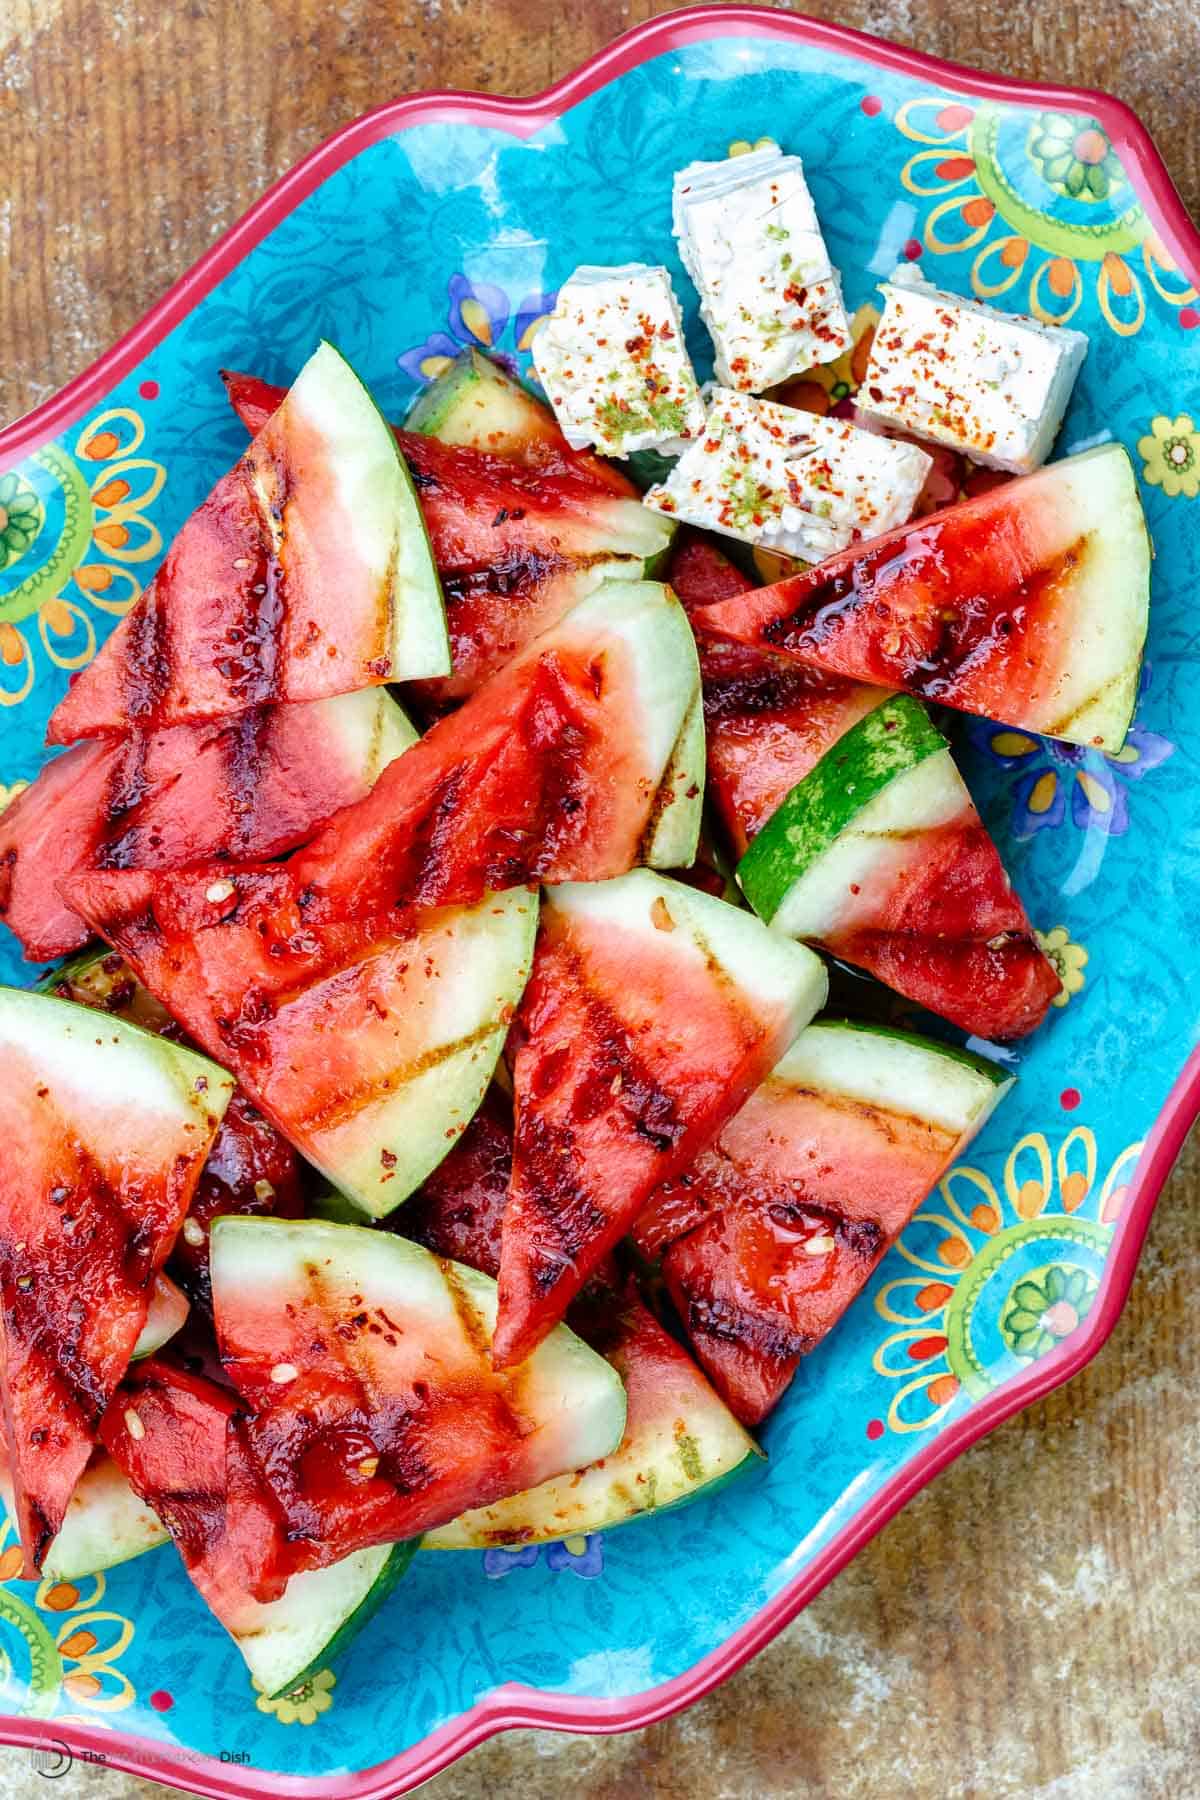 What happens when you grill watermelon?Grilling watermelon may sound odd, but don't dismiss the idea just yet! 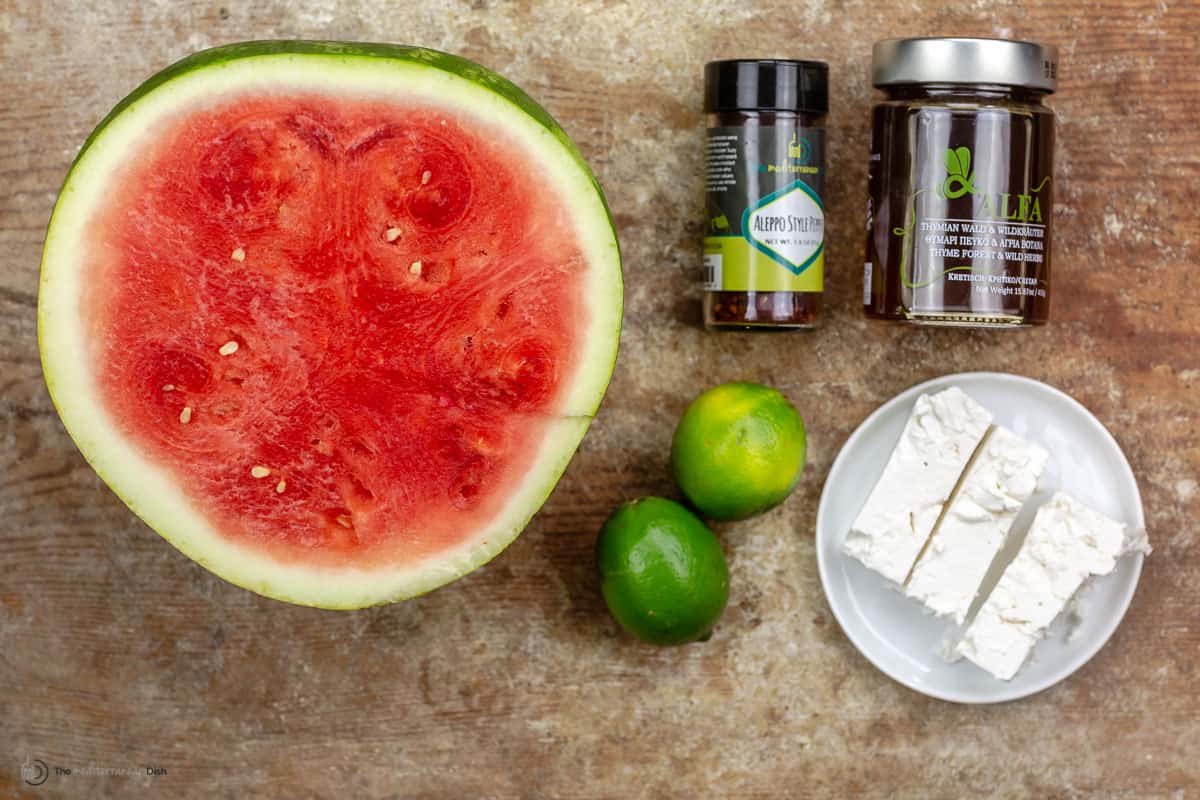 The honey-lime sauceThe sweet, spicy sauce with the perfect tang takes the caramelized watermelon to the next level! Here’s what you need for the quick honey-lime sauce:
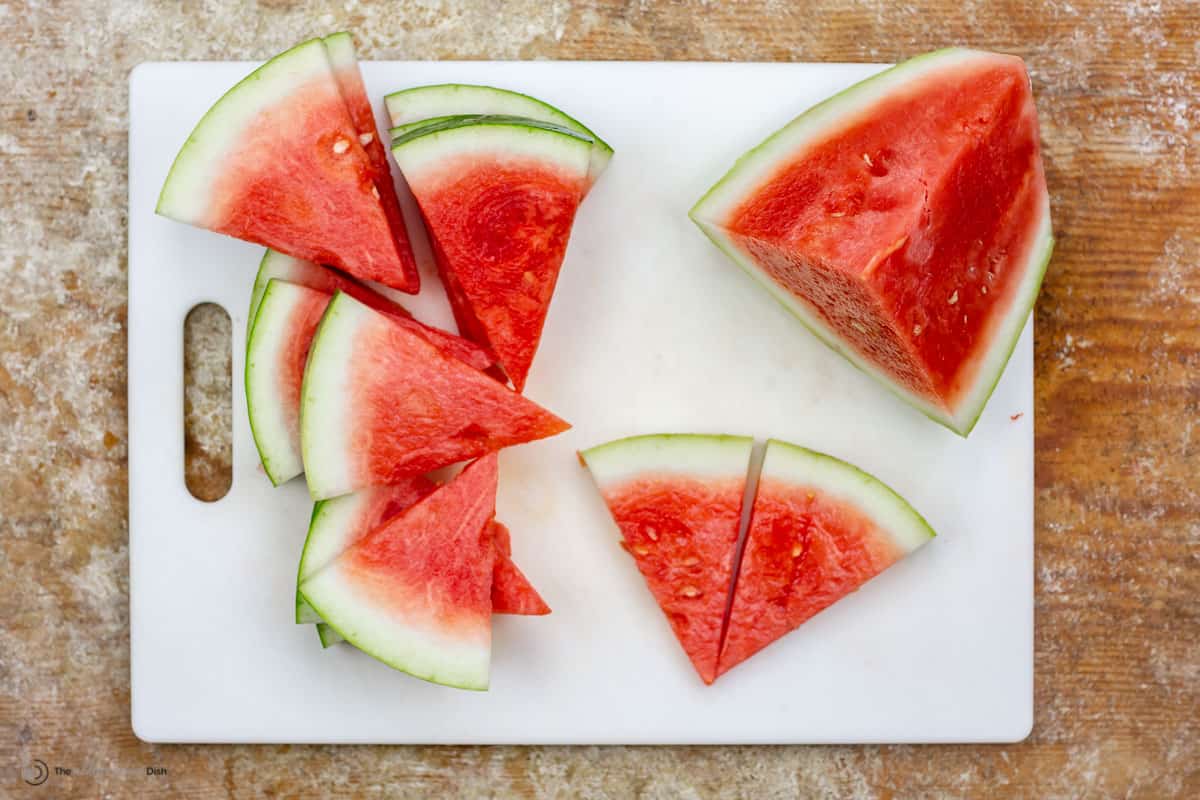
How to cut watermelon for grillingFor grilled watermelon, you want thick triangle-shaped slices with the rind on. This way the melon does not fall apart as it cooks. I have a full tutorial for how to cut a watermelon into wedges in just a few simple steps, but here's the gist:
How to grill watermelonGrilled watermelon is quick and easy to make. No outdoor grill? No problem! You can make this recipe on an indoor griddle or cast-iron grill. Here is what you do:
Tips for success
Serving your grilled watermelonServe grilled watermelon as an appetizer or a side dish to things like grilled harissa chicken, souvlaki, chicken wings, or grilled fish! You can even serve it as a dessert! Just add a scoop of vanilla ice cream and a drizzle of some good honey over the grilled watermelon wedges for a quick summertime dessert option. How to store leftoversGrilled watermelon slices should be enjoyed warm, straight from the grill. Only grill as much as you think will be eaten immediately, because cooked watermelon does not keep well. Any leftover fresh watermelon that hasn't been cooked should be tightly wrapped in plastic and put in the refrigerator. It will stay fresh for up to 5 days if stored properly. More grilling recipesBrowse all Mediterranean recipes.  How to Grill Watermelon (Easy Grilled Watermelon)
Juicy, charred, and a little smoky, this Grilled Watermelon with Chili and Honey-Lime Sauce is a quick and easy summer dish that will truly stand out! Pro tip: Use a mini watermelon. A "small" 2 ½-pound watermelon will yield plenty of grilled watermelon to feed a small crowd! Serve it as a side with harissa chicken or grilled fish, or as a summery dessert with a scoop of vanilla ice cream and a drizzle of honey.
Servings 6 servings
Calories 96.9kcal
Ingredients
Instructions
VideoNotes
Nutrition
Calories: 96.9kcal | Carbohydrates: 25.7g | Protein: 1g | Fat: 0.4g | Monounsaturated Fat: 0.1g | Sodium: 13.5mg | Potassium: 212.5mg | Fiber: 1.5g | Sugar: 21.4g | Vitamin A: 1069.1IU | Vitamin C: 18.8mg | Calcium: 21mg | Iron: 0.7mg
The post How to Grill Watermelon (Easy Grilled Watermelon) appeared first on The Mediterranean Dish. via The Mediterranean Dish https://www.themediterraneandish.com/grilled-watermelon/ Flavorful, tangy, and light, this simple lemon pasta without cream is the perfect meal in 15 minutes or less! With good extra virgin olive oil, fresh garlic and a good sprinkle of Parmesan cheese, this is the best lemon spaghetti you’ll try! 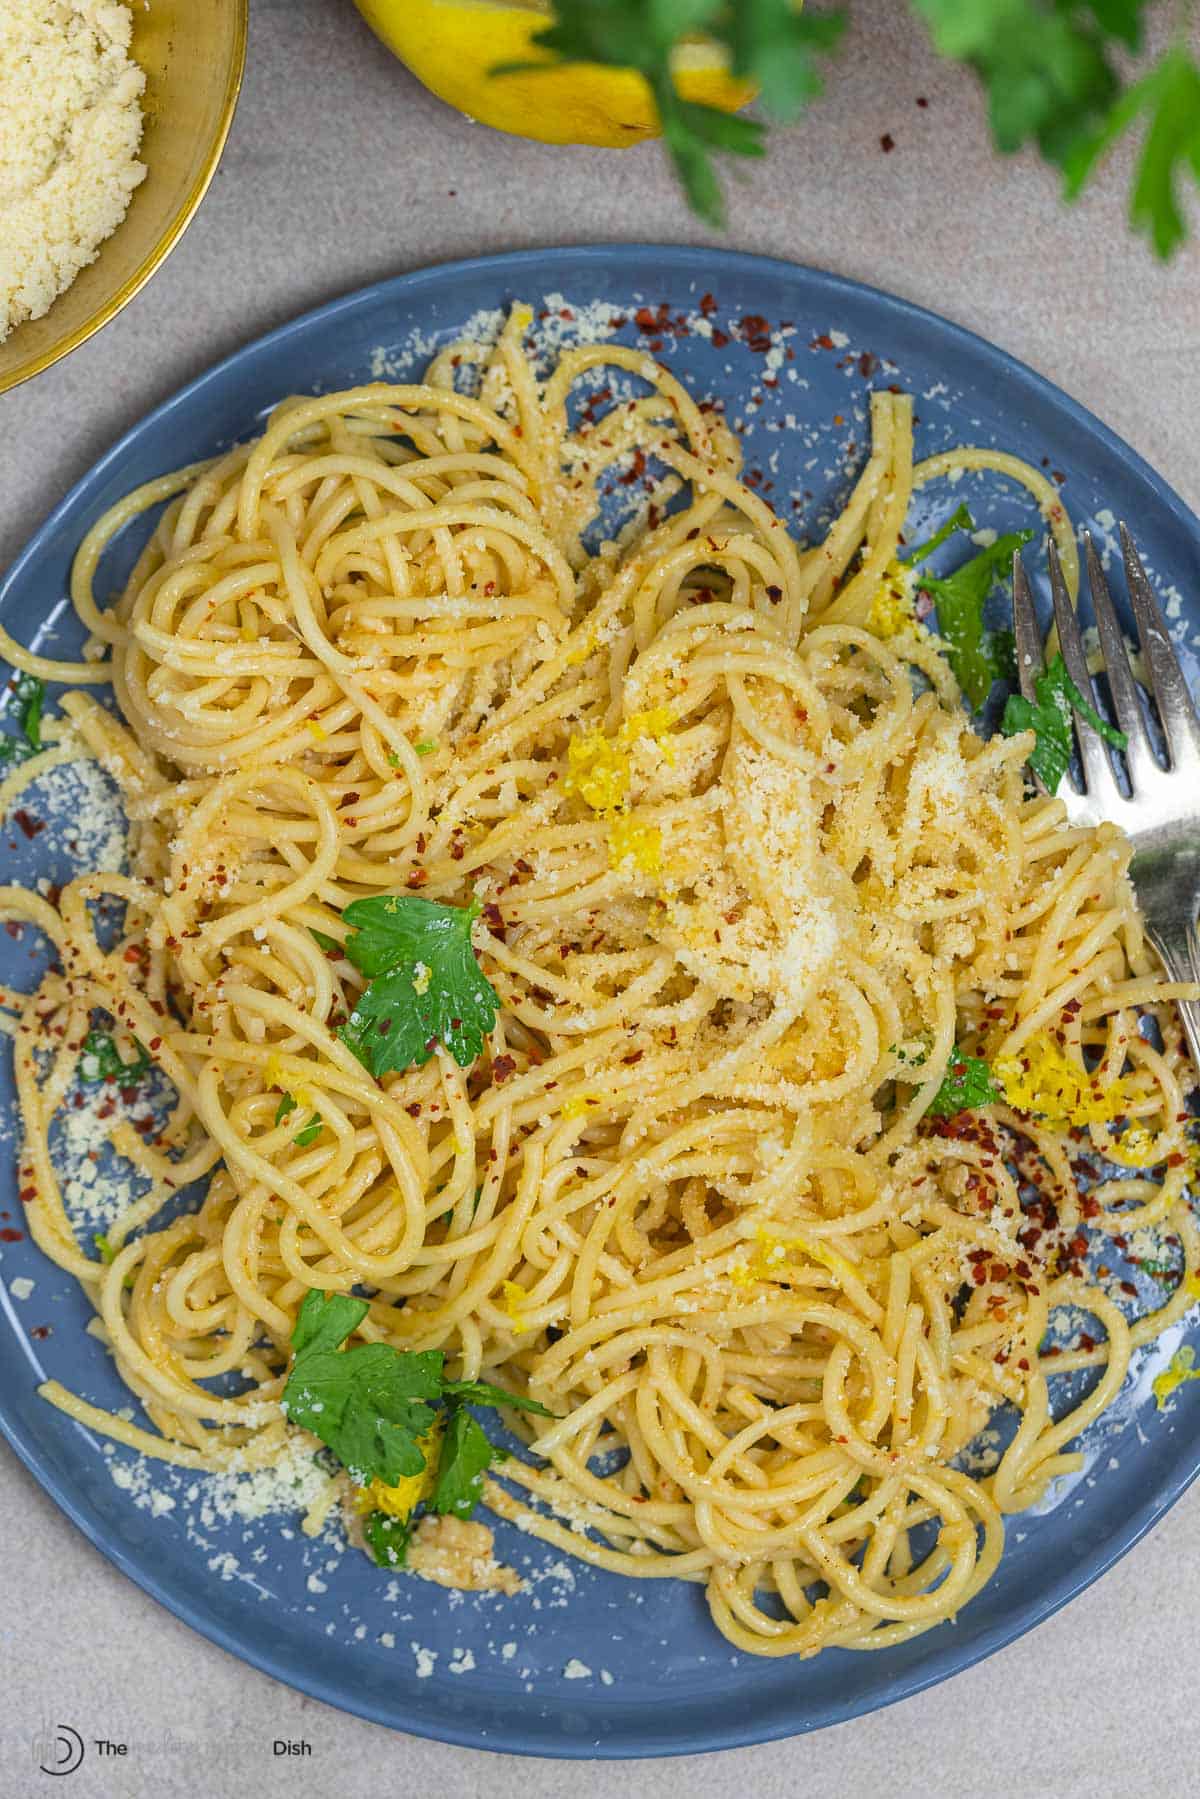 You won’t ever hear me say no to a traditional Italian pasta al limone! But I’m all in with this lighter lemon pasta that skips the heavy cream and butter in favor of a silky sauce made of olive oil and a bit of the pasta starchy water–like we do with spaghetti aglio e olio, only this sauce is perfectly tangy, thanks to fresh lemon juice and zest. And with a little bit of garlic, and a good sprinkle of grated Parmesan cheese, it is not short on flavor. You’ll still end up with a perfectly elegant, and just enough creamy lemon spaghetti–except the lemon is more pronounced and tangy in the best way. Seven ingredients and only 15 minutes to make this lemon spaghetti. Let’s go! Table of contents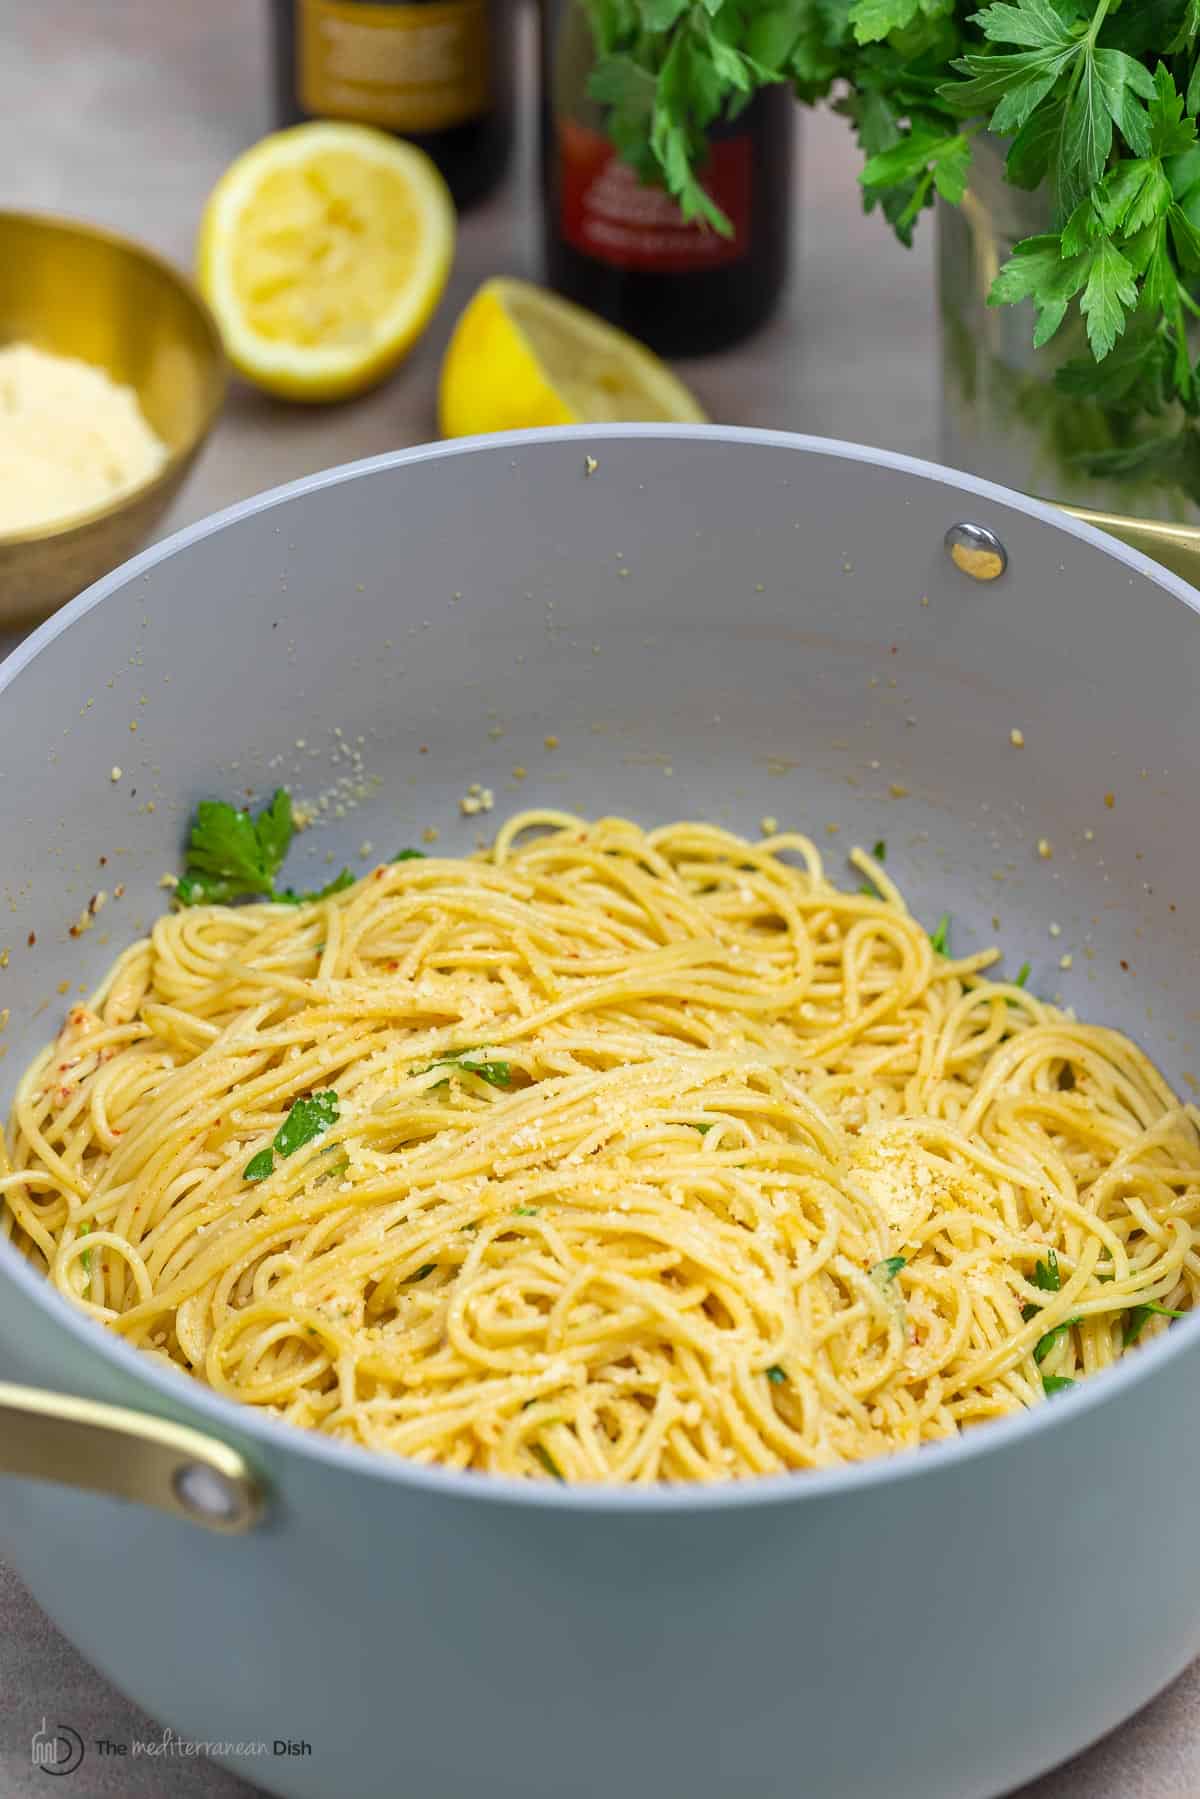 What kind of pasta to use for this lemon pasta recipe?You’ll need 12 ounces of a thin, long pasta. My personal preference is spaghetti, but you can also use angel hair pasta. These types of noodles are best for lighter sauces like this lemon spaghetti sauce because it’s easier to coat them evenly with sauce. The lemon pasta sauceThis light, lemony pasta sauce makes use of some starchy pasta cooking water, which acts as a thickener and, when combined with some good olive oil, forms a silky sauce, augmented with fresh garlic and sharp, nutty Parmesan cheese for loads of flavor. No heavy cream or butter needed! Ingredients you’ll need for the sauce
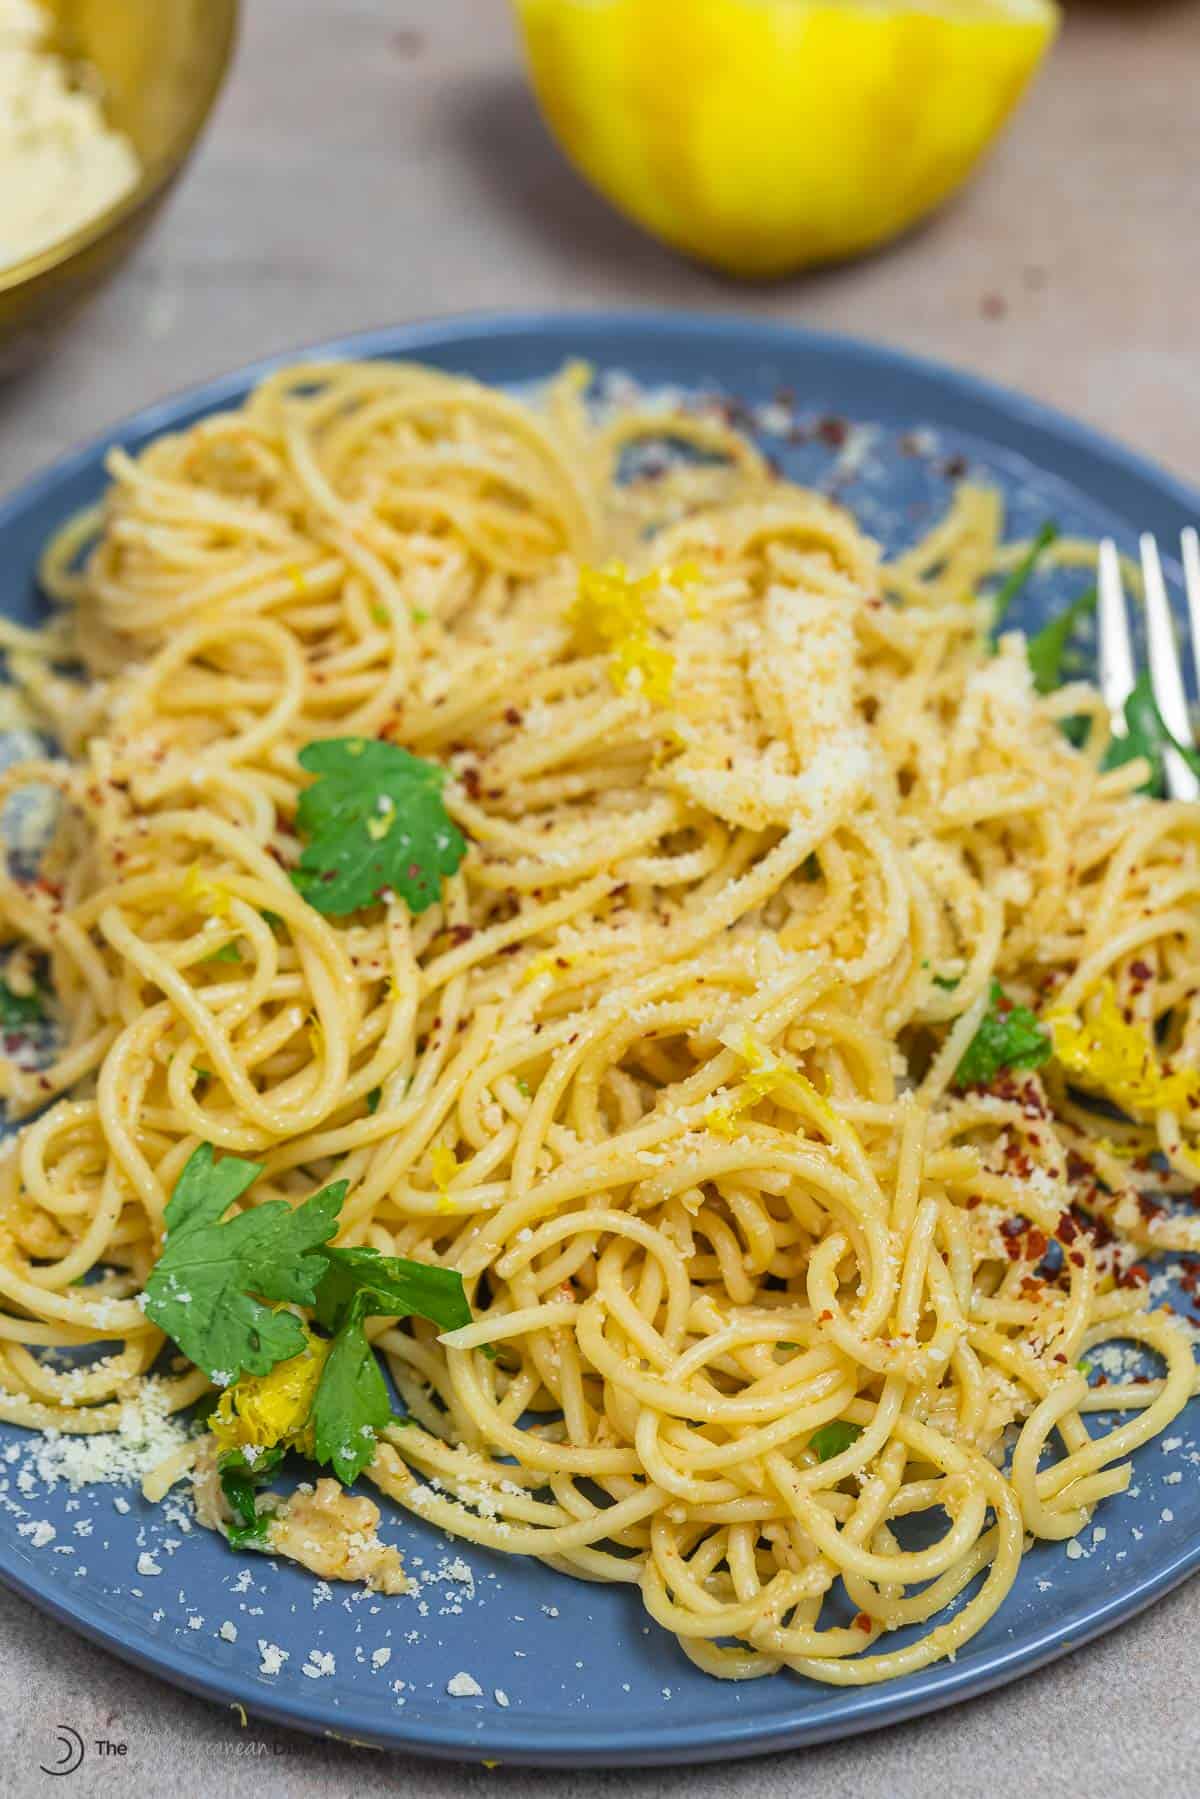 How to make lemon pastaLemon spaghetti is so easy to make! And you can quickly whip up the sauce while the pasta cooks, so the dish is ready in 15 minutes or less! Here’s how to make it:
Lemon pasta with chickenThis vegetarian spaghetti dish is super satisfying as is, but it pairs perfectly with chicken piccata! Or, you can always shred leftover baked chicken (or even rotisserie chicken) and throw it in the pasta. (Lots more chicken recipes here to pair with this lighter spaghetti al limone). Serve lemon spaghetti withI like serving some crunchy garlic bread or blistered tomato bruschetta as a quick starter before we dig into the lemon garlic pasta. And for a fresh side dish, I always make a big salad to go with this pasta dish. Try this quick lemony arugula salad or colorful pomegranate tomato salad. Leftovers and storageLeftover lemon spaghetti will keep for about 3 days in an airtight container in the refrigerator. To reheat, add it to a skillet on the stove over medium heat with a little water and heat for a few minutes until warmed through. More light and easy spaghetti recipesBrowse all Mediterranean Recipes 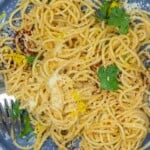 15-Minute Lemon Pasta (No Cream or Butter!)
This is not quite the traditional spaghetti al limone, but a close version that is a tad less creamy, but still elegant and delicious. It will come together in 10 to 15 minutes, making it an ideal easy weeknight dinner! I like using spaghetti in this lemon pasta, but angel hair pasta will work nicely as well. Keep it vegetarian, or pair it with chicken piccata or shredded leftover chicken!
Servings 6 people
Calories 313kcal
Ingredients
Instructions
VideoNotes
Nutrition
Calories: 313kcal | Carbohydrates: 43.9g | Protein: 9.2g | Fat: 11g | Saturated Fat: 2.1g | Polyunsaturated Fat: 1.3g | Monounsaturated Fat: 7g | Cholesterol: 2.8mg | Sodium: 76.4mg | Potassium: 173.3mg | Fiber: 2.1g | Sugar: 1.6g | Vitamin A: 503.4IU | Vitamin C: 7.6mg | Calcium: 74.2mg | Iron: 1.2mg
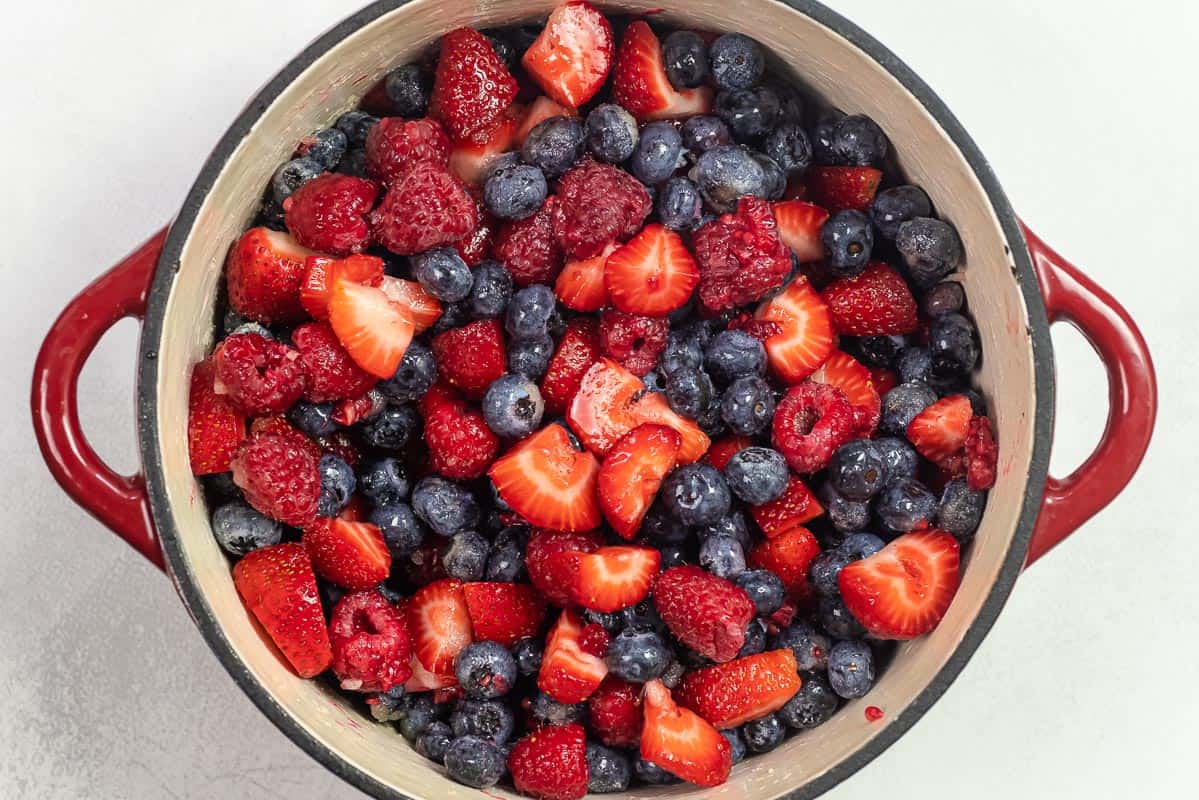
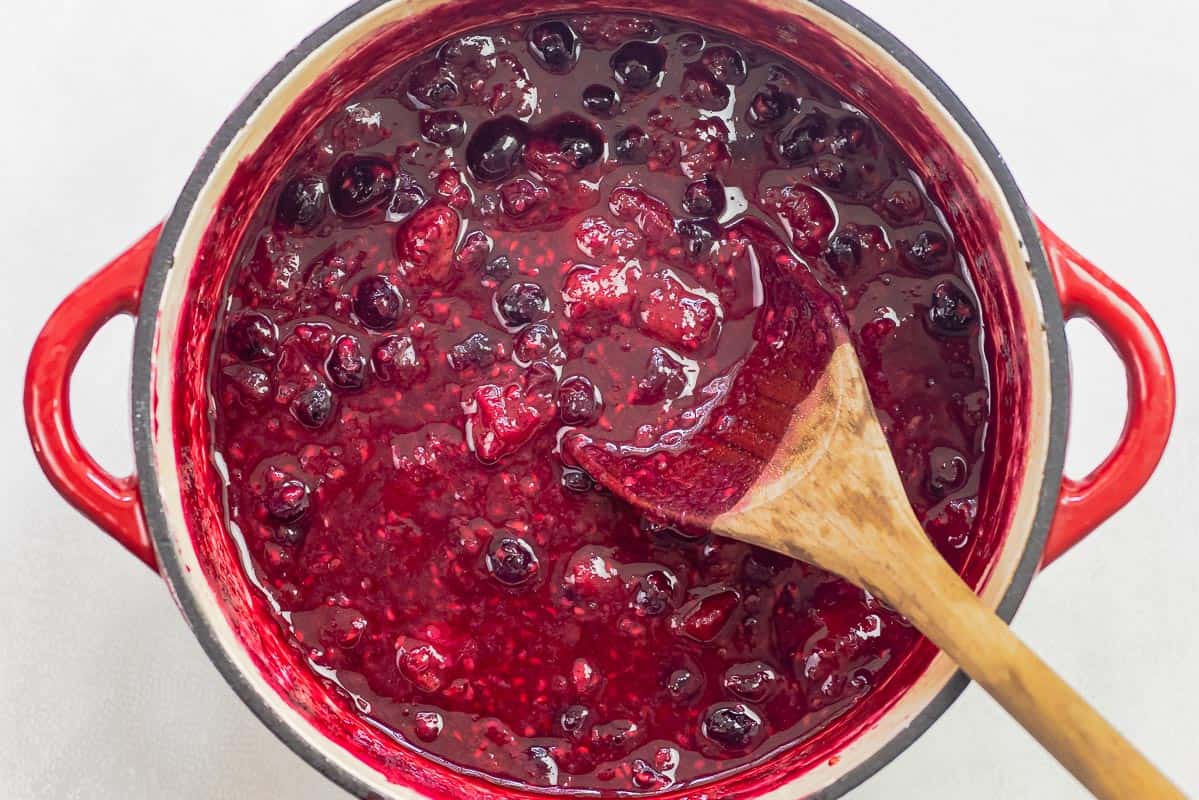
The post Easy Lemon Pasta Recipe (15mins!) appeared first on The Mediterranean Dish. via The Mediterranean Dish https://www.themediterraneandish.com/lemon-pasta/ Simple mixed berry compote with three types of fresh berries, lime juice, and some raw cane sugar. You can make this sweet-tart fruit compote in just a few minutes on the stovetop or in the oven! It will keep in the fridge for a good 10 days, and you’ll be using it in many ways from breakfast to dessert. 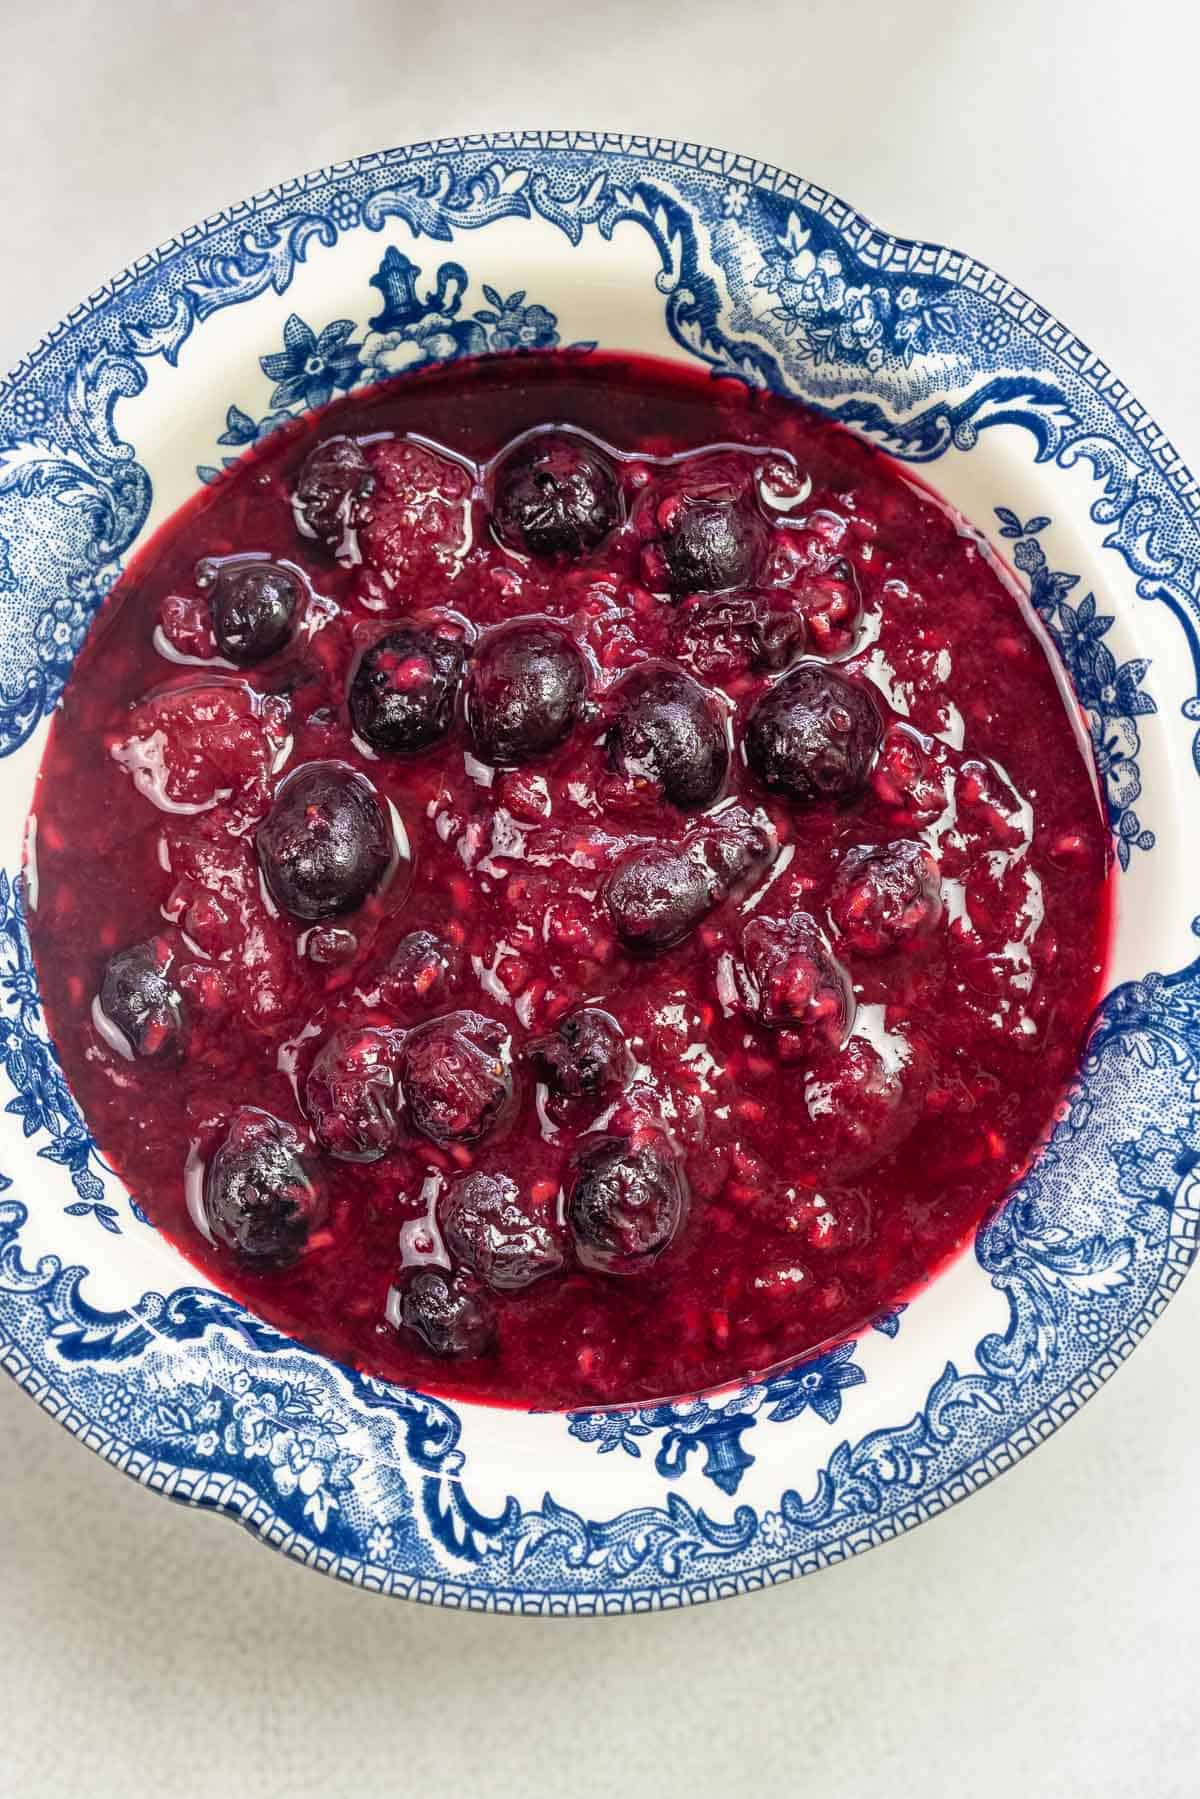 This fruit compote is the quick refrigerator jam you need!Berries, lime juice, and a little raw cane sugar. Heat until it smells magical. That’s it. That’s all it takes to make the perfect berry compote! So, if you have some berries that need to be used up ASAP, this fruit compote recipe is your ticket. My recipe calls for strawberries, raspberries, and blueberries, but you can use one berry or any combination of berries you like. I’ve made strawberry compote with this recipe, and it is just as delicious. I give you two easy methods for stovetop compote or roasted berries compote--it will take 15 to 30 minutes, tops. And once your blueberry compote has cooled, you can store it in the fridge for a good 10 days to stir in your morning yogurt, or use over a piece of Italian ricotta cheesecake or pudding. 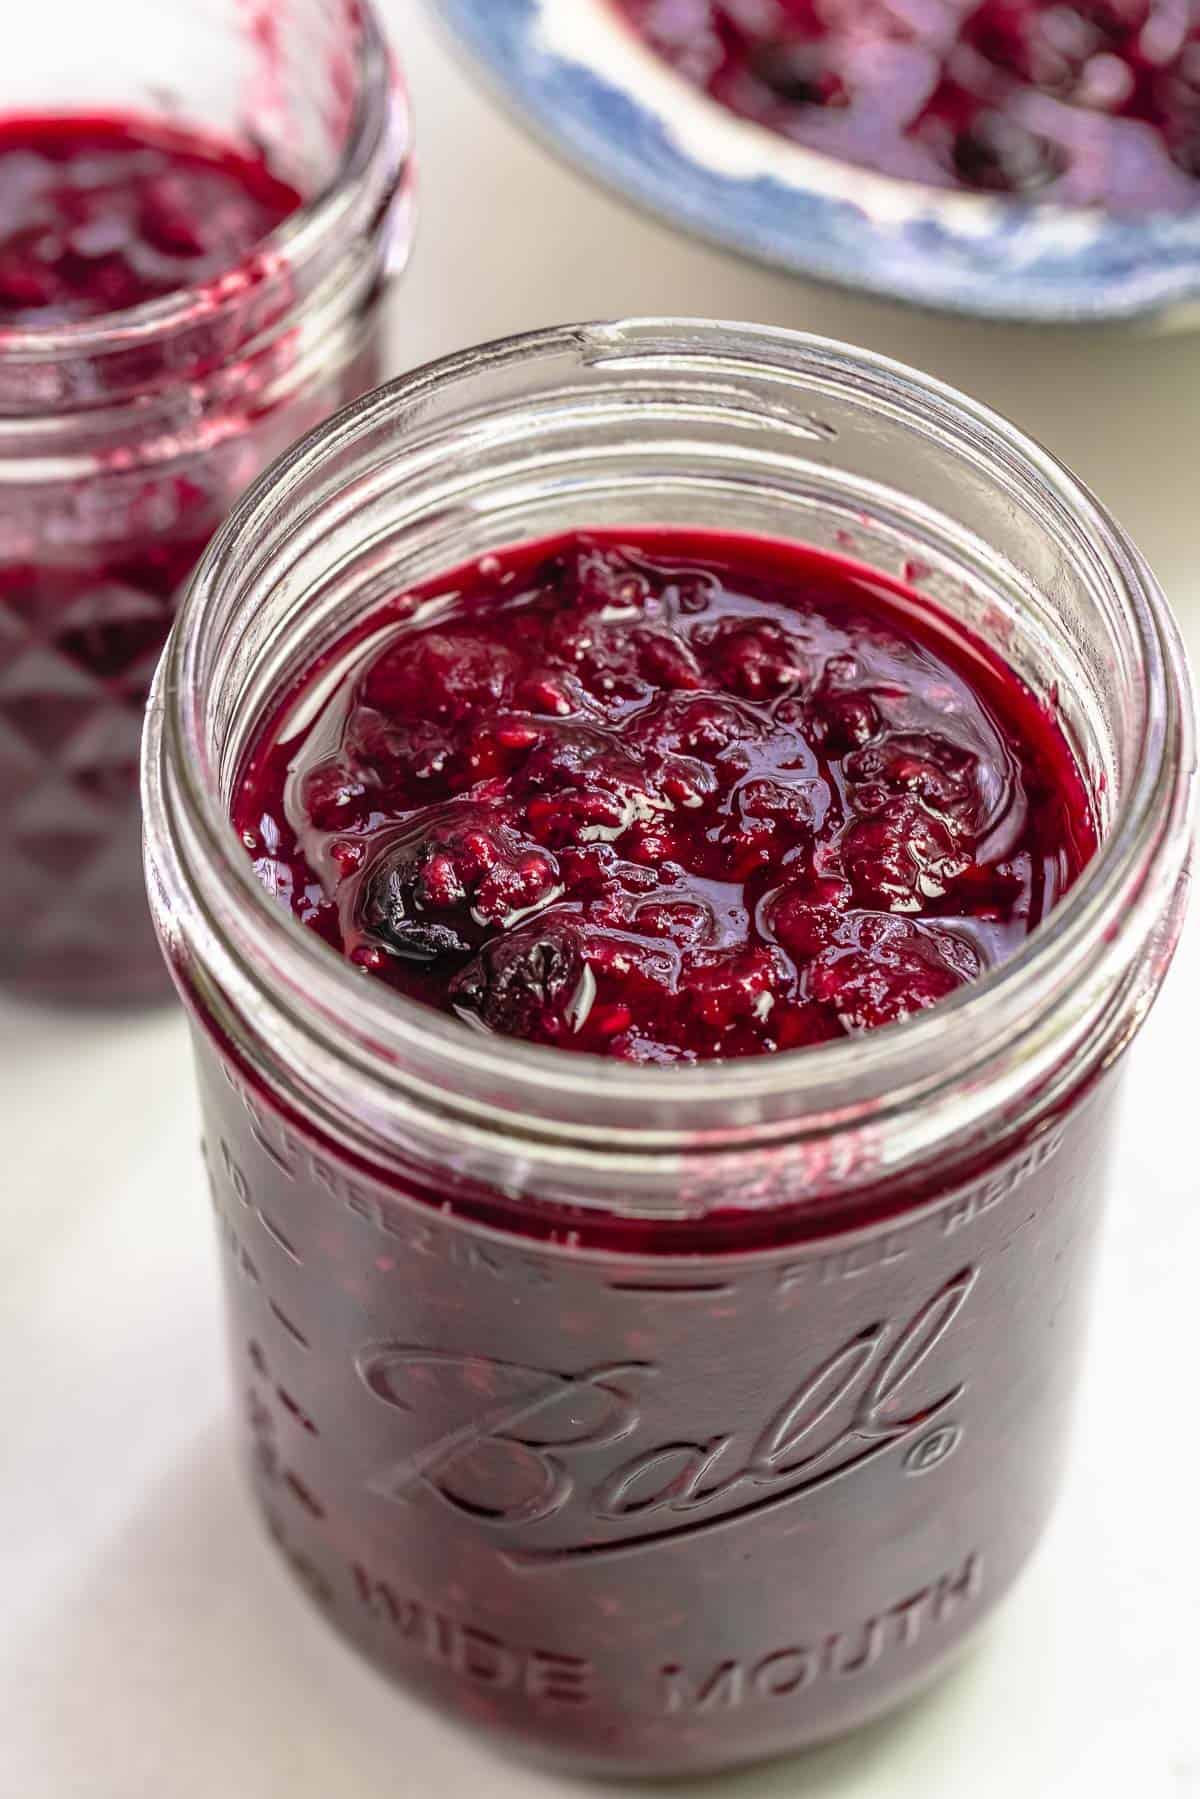 In this postWhat is compote made of?Compote (or compôte) is French for “mixture.†It is basically a sweet, chunky fruit sauce made with whole or chopped fresh or frozen fruit and sugar. The fruit and sugar are typically cooked on the stovetop for a brief time until the fruit has softened and collapsed into a delicious fruit sauce. Various fruits can be made into compote: berries, stone fruit like peaches and cherries, and pears. And sometimes, spices, liquor, or citrus juice, are stirred in the compote mixture for added flavor. Compote vs. jamYes, compote is similar to jam, with some key differences. The process of making and canning jam is a bit more involved. And while jam is made to last for several months once opened, compote is not preserved, and usually lasts up to 10 days in the refrigerator. Personally, I refer to this recipe as refrigerator jam. And we usually run out pretty quickly, so storage is not a huge issue in my house. 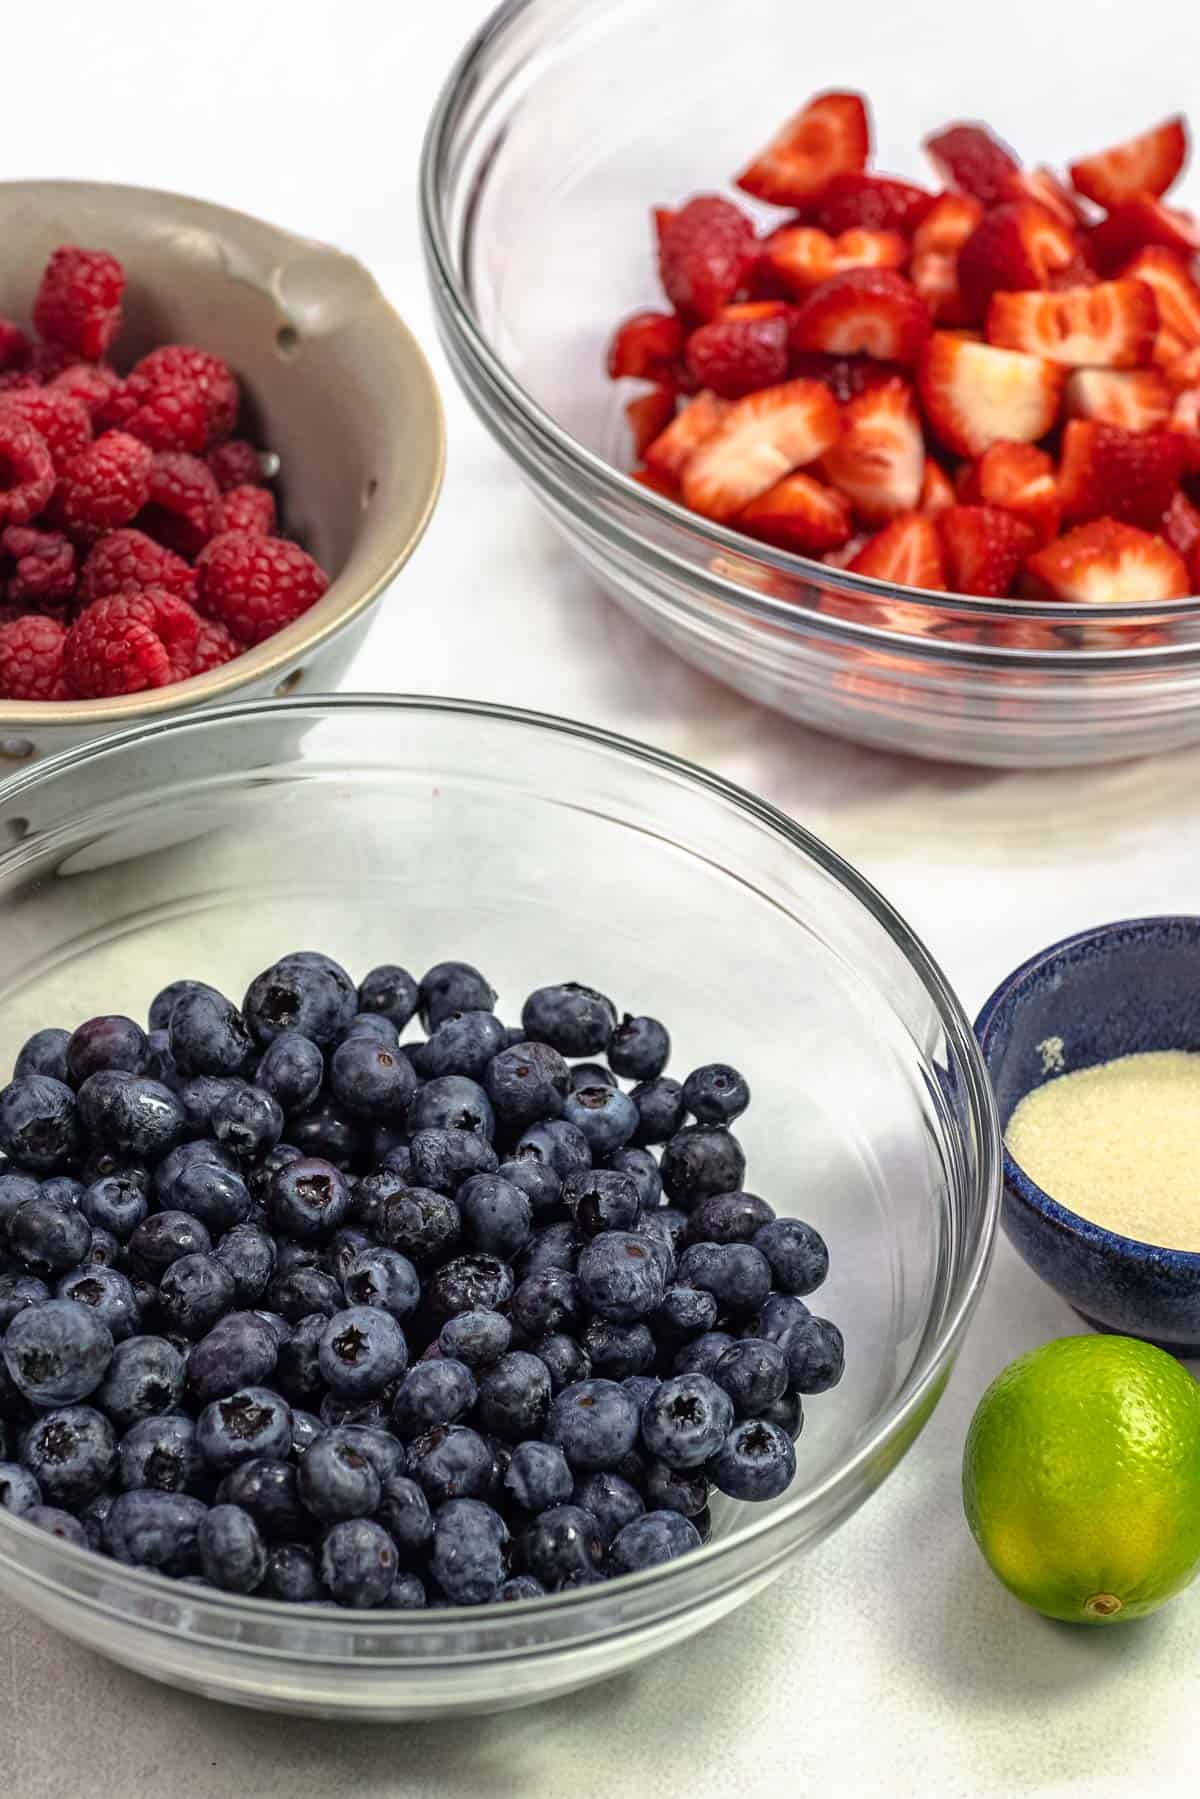 Berry fruit compote ingredients
How to make berry compote (2 ways!)You can make berry compote on the stovetop or in the oven. Both methods are easy! Here’s how to make triple berry compote (printer-friendly recipe below): Stovetop method:
Oven method (roasted berry compote):
Storing your compote or refrigerator berry jamOnce your fruit compote has fully cooled, you should transfer it to a mason jar and close the jar tightly. Keep the compote in the fridge for up to 10 days to use as needed. Can you use frozen fruit to make this recipe?Yes, you can absolutely use frozen fruit in a blueberry compote or a strawberry compote (really, any berry compote)! Frozen fruit is a great option if you are short on time, because you don’t need to prep the fruit. You don’t need to thaw the frozen fruit ahead of time, either. Simply throw frozen berries into the pot with the other ingredients. Your compote mixture will take just a few minutes more to cook, but it will have a beautiful jammy texture. More recipes with fruitBrowse all Mediterranean Recipes 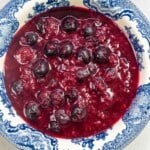 Quick Berry Compote Recipe (5 Ingredients. 2 Ways.)
Easy mixed berry compote with fresh berries, lime juice, and some raw cane sugar. It takes 30 minutes or less and you can make it on the stove or in the oven! I love using this fruit compote in yogurt for breakfast, spooned over some ricotta cheesecake for dessert, or even simply smeared onto some toast! This recipe makes 3 ½ cups of berry compote, and it will keep for up to 10 days in the fridge.
Servings 56 tablespoons (3 ½ cups)
Calories 10.8kcal
Ingredients
InstructionsStovetop method:
Oven method (roasted):
Notes
Nutrition
Calories: 10.8kcal | Carbohydrates: 2.7g | Protein: 0.2g | Fat: 0.1g | Saturated Fat: 0.004g | Polyunsaturated Fat: 0.04g | Monounsaturated Fat: 0.01g | Sodium: 0.2mg | Potassium: 23.4mg | Fiber: 0.7g | Sugar: 1.8g | Vitamin A: 6IU | Vitamin C: 5.8mg | Calcium: 2.9mg | Iron: 0.1mg
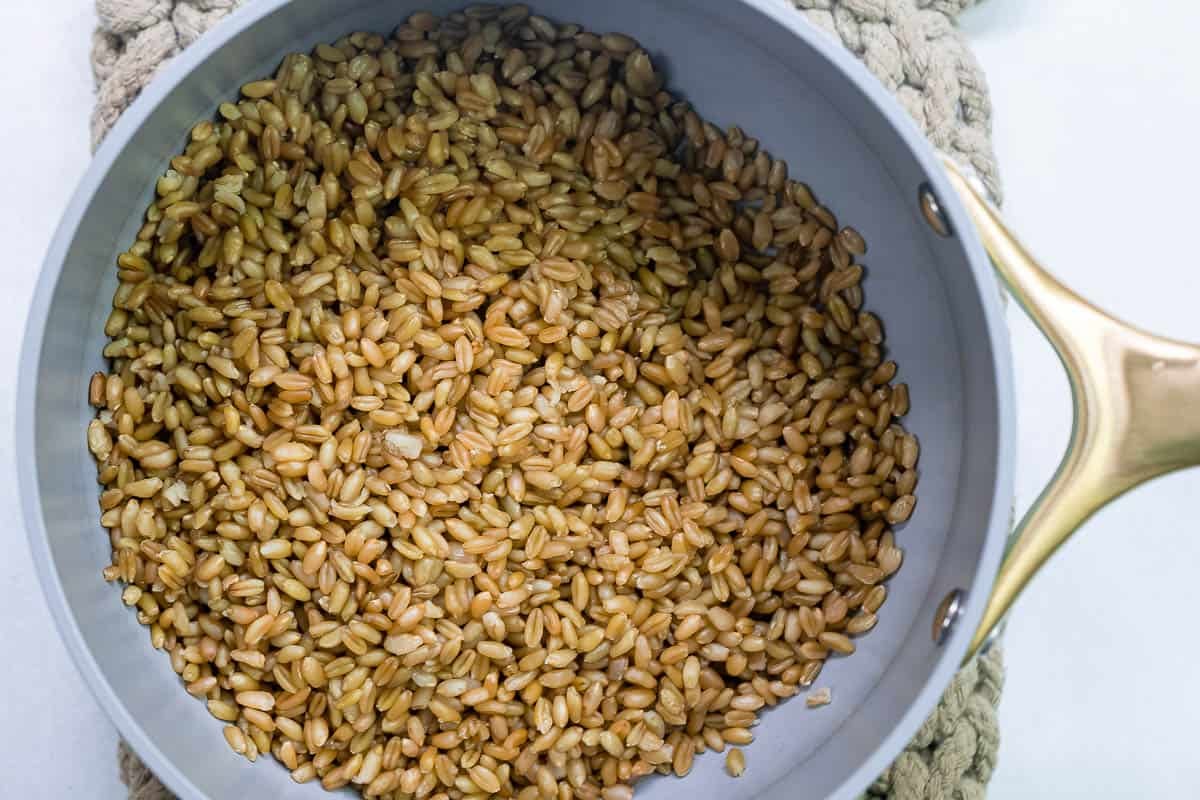
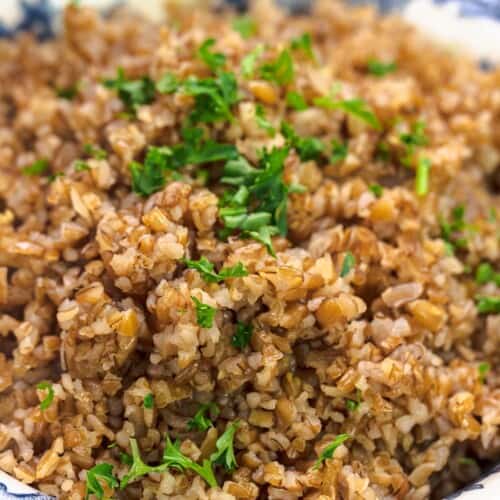
The post Quick Berry Compote Recipe (5 Ingredients. 2 Ways.) appeared first on The Mediterranean Dish. via The Mediterranean Dish https://www.themediterraneandish.com/summer-fruit-compote-recipe/ Here is everything you need to know about freekeh, a Mediterranean super grain with a delicious nutty, slightly smoky flavor. Plus, how to cook freekeh perfectly every time.  Freekeh may sound new to you, but like barley and farro, this nutritious wholegrain has been part of the Mediterranean diet for centuries! And if you’re looking to change things up from your typical grain or rice, it’s time to try it. You’ll love its chewy texture and unique, slightly smoky flavor. Freekeh is easy to cook on the stovetop, and you can use it as you do other grains–as a simple side dish, tossed in a salad, or added in a soup like I do with barley. Don’t worry, if it’s not available at a grocery store near you, you can find the best freekeh grains via our online shop. In this post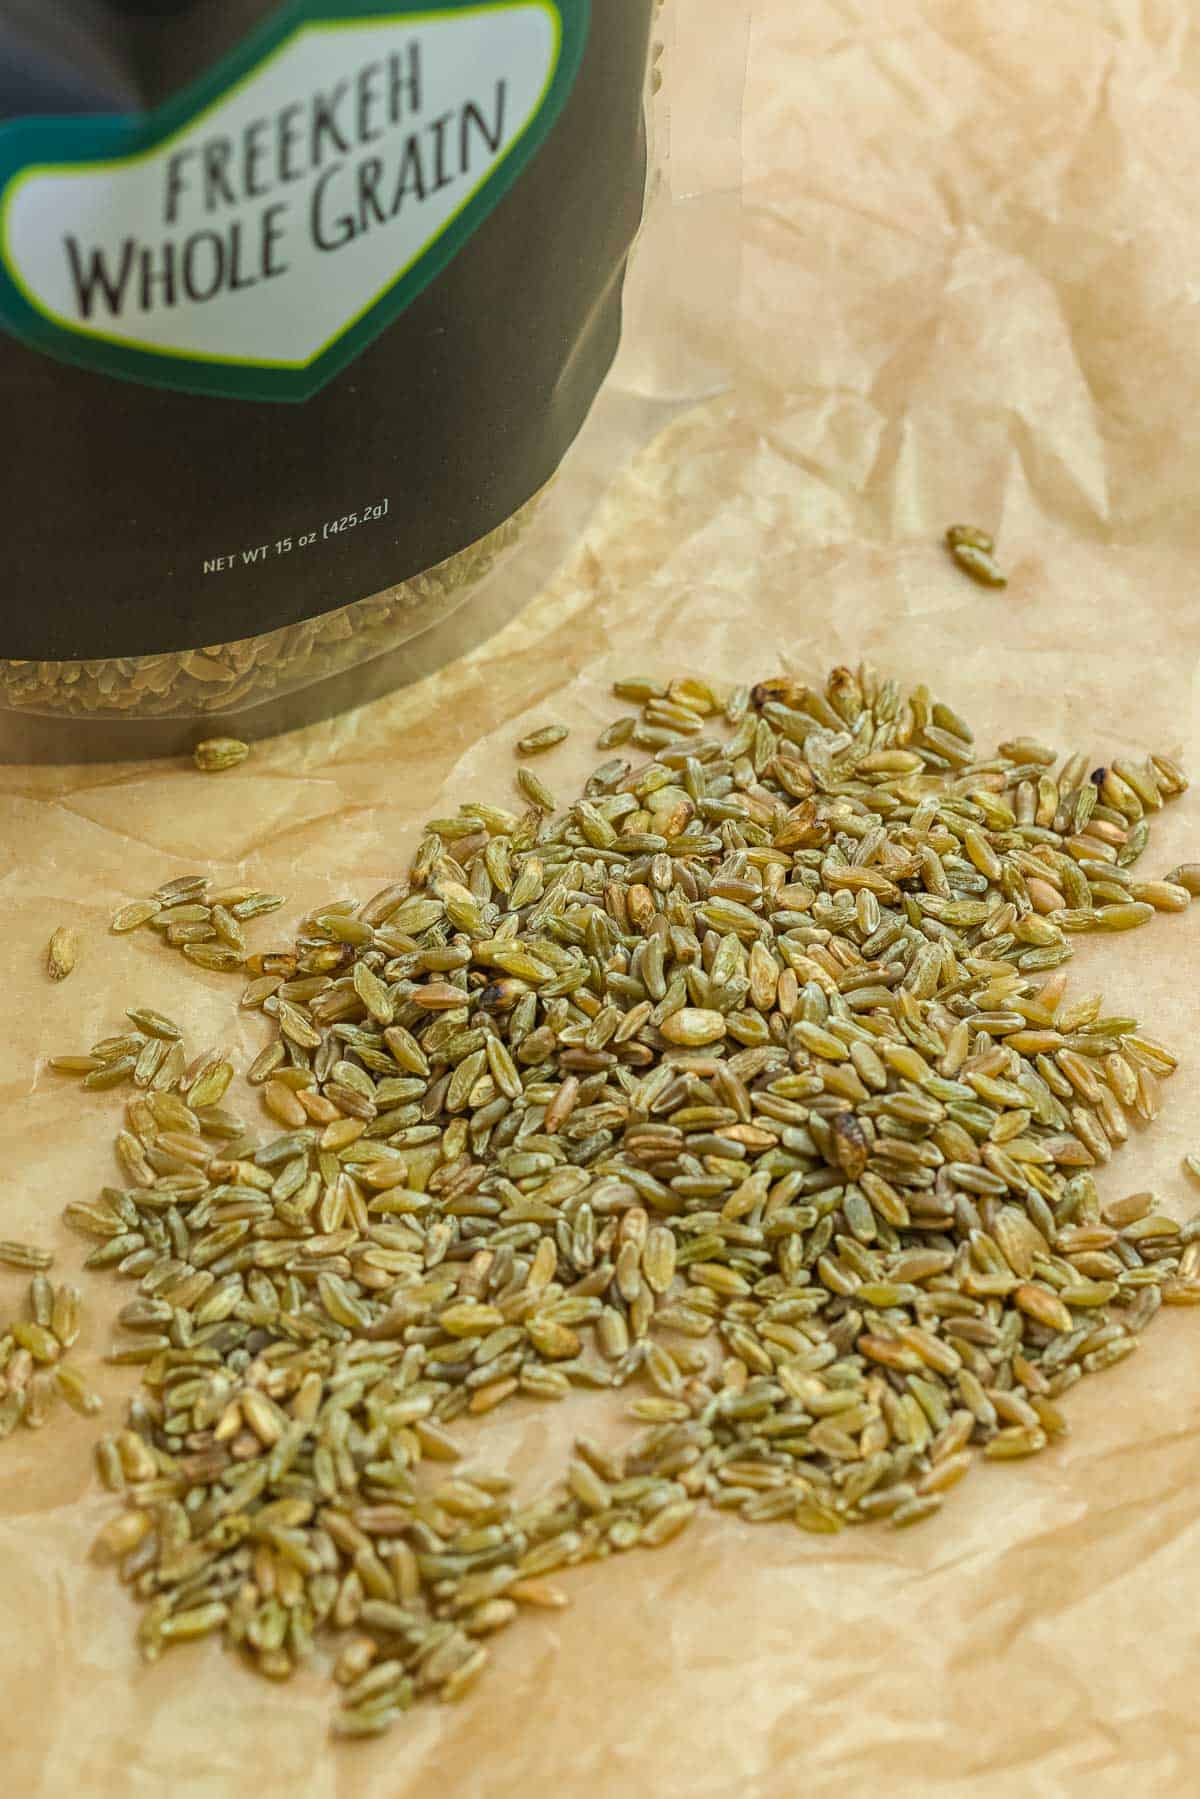 What is freekeh?Freekeh, also referred to as “farik†or “frik,†is an ancient Middle Eastern whole grain from young wheat that has been harvested early while the grains are still tender and green. The grains are then dried, fire-roasted, and rubbed (or polished) to remove the skins. In fact, this production process is where “freekeh†gets its name–from “faraka,†which means “to rub†in Arabic. It's is especially popular in the Levant and in Egypt, where I grew up. What does it taste like? Like bulgur or barley, you’ll find it to be chewy and nutty, but thanks to the fire roasting process, it has a unique, slightly smoky flavor that makes it extra delicious and satisfying! Freekeh nutritionOther than its unique flavor, freekeh is a nutrition powerhouse and one of the healthiest grains to try. It is high in fiber, containing three times more fiber than brown rice. It is low in carbs and calories, and has a low glycemic index, promoting stable blood sugar levels. 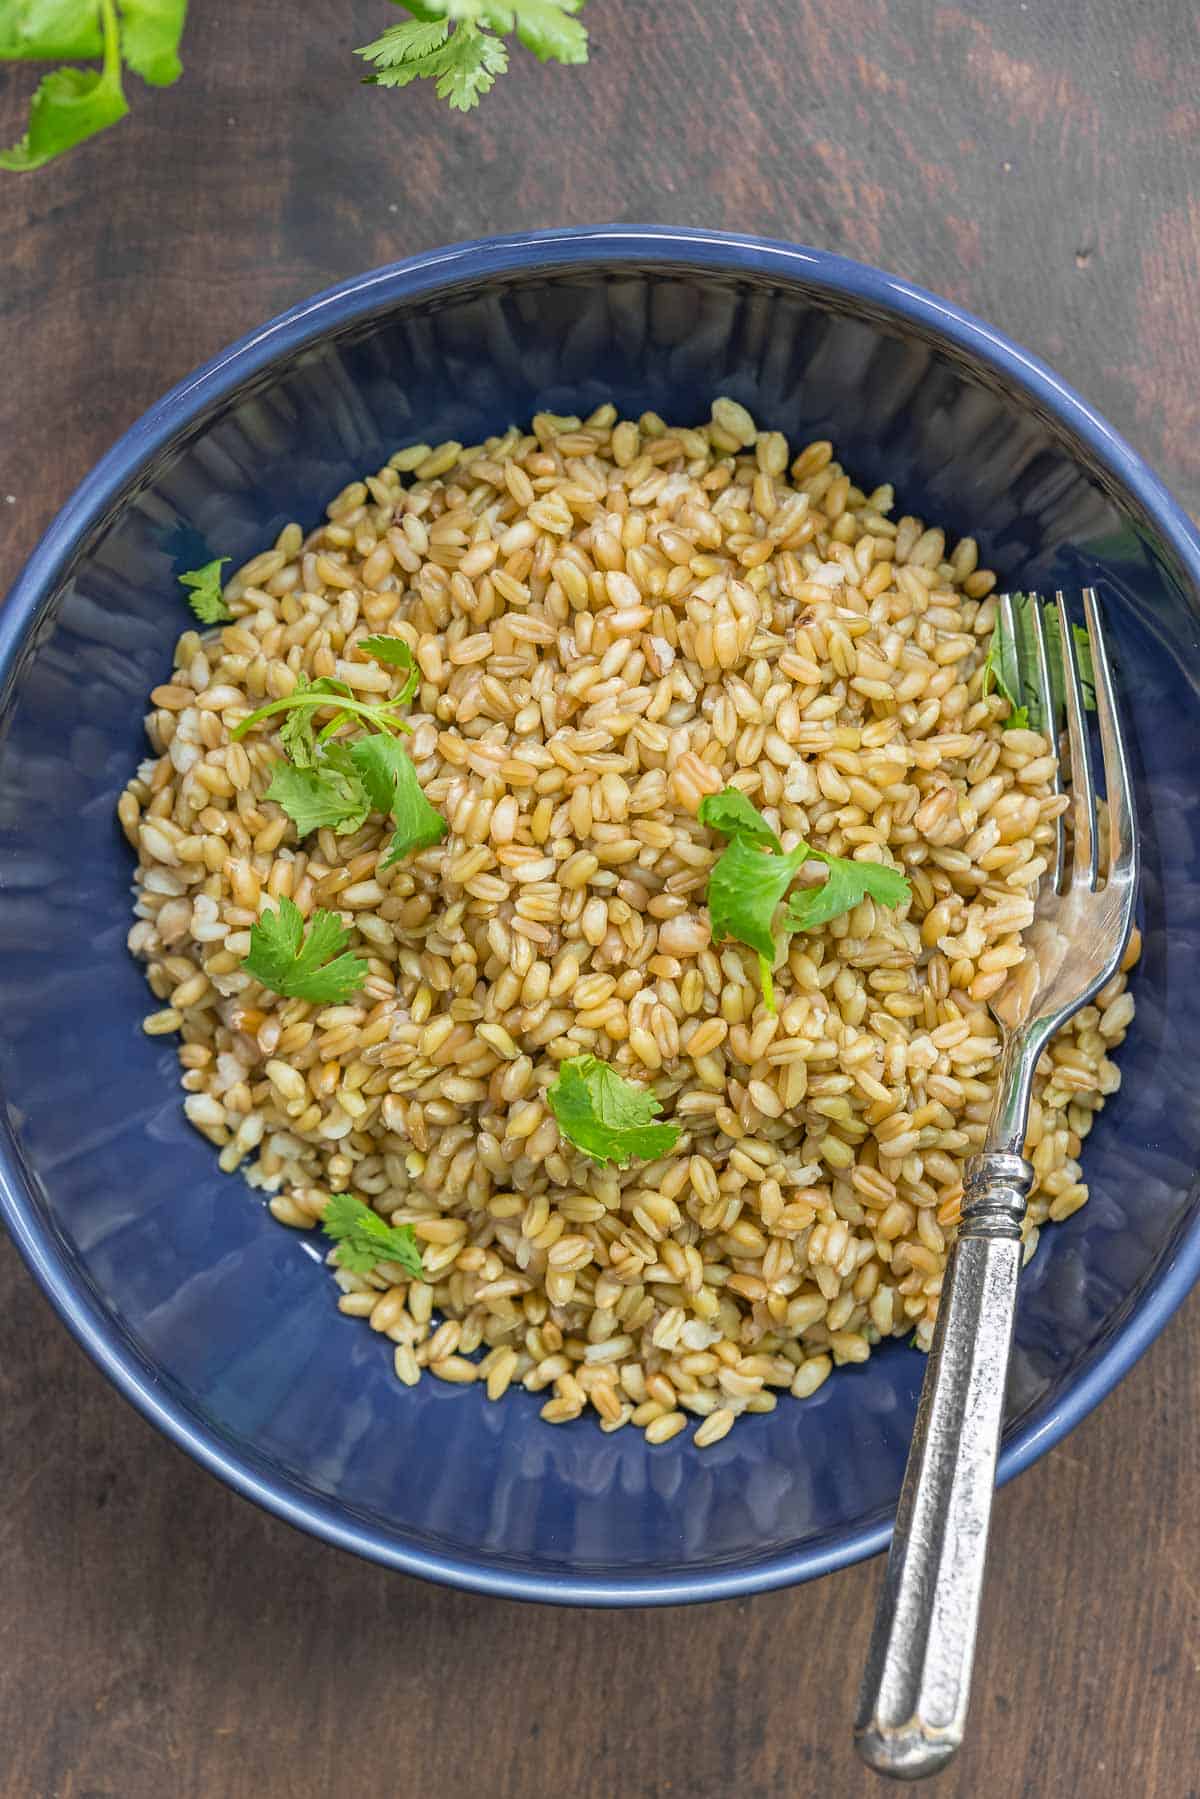 Cracked vs. whole freekehWholegrain freekeh is exactly what it sounds like: It is the whole freekeh grain, containing the bran, germ, and endosperm. (Whole grains are more nutritious than refined grains because refining removes protein and other nutrients from a grain.) The wholegrain kind takes a bit longer than the cracked kind to cook, and has a pleasant chewy texture. Cracked freekeh is wholegrain freekeh that has been broken into smaller pieces. It is quicker-cooking, and is similar to bulgur wheat in texture. It is still considered a whole grain, because it contains all the same parts as the whole grain. Is freekeh gluten-free?No. Like many grains, it contains gluten, and should be avoided by those on a gluten-free diet. You can replace it with rice or quinoa, if you must, but know that the flavor profile is quite different.  Where to buy freekehMy favorite wholegrain freekeh can be found in our online shop. It is all-natural, easy to cook, and has a distinctly rich, nutty and smoky flavor. You’ll find it to be a satisfying substitute for rice or pasta. Yield1 cup of dry freekeh (wholegrain or cracked) will yield about 3 cups of cooked grains. And to cook 1 cup of this grain, you’ll need 2 ½ cups of water or broth. How to cook freekehBoth cracked and wholegrain freekeh are very easy to cook with basically no prep. All you need is 1 cup of grains and 2 ½ cups of water or broth, and kosher salt. Here is how to cook freekeh:
How to serve freekehFreekeh is a versatile grain that I like to use in various ways! Soups and stews become instantly more filling with a cup of it added, and a freekeh pilaf has a complex, smoky flavor. This grain is a great substitute for rice, pasta, or quinoa. When I want to shake things up, I swap out bulgur for freekeh in tabouli or toss it (instead of quinoa) into this warm salad with butternut. And when I need a festive side or stuffing, I always turn to my cranberry apple freekeh, made with cracked freekeh. It also works well as a bed for a saucy protein dish, like shrimp fra diavolo, wine-braised chicken thighs, or Lebanese-style meatballs. Storage tipsLike other grains, freekeh has a long shelf life. Uncooked wholegrain freekeh should be stored in an airtight container away from light, moisture, or heat. An unheated pantry is ideal for helping it to last several years! Cracked freekeh will last for just a few months in your pantry, and should be stored in the fridge or freezer if you want to keep it for longer than that. Once cooked, store it in an airtight container in the refrigerator for up to 3 days. But it can be frozen for up to 3 months so it’s a good idea to cook large batches and freeze them to use later! More grain recipes you might enjoyBrowse all Mediterranean recipes 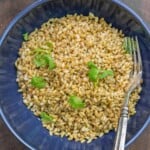 How to Cook Freekeh (Freekeh 101)
An easy tutorial for how to cook freekeh perfectly every time, and the answers to all your questions about freekeh: What is it? What does it taste like? Is it gluten-free? And much more! You can use this super grain as a substitute for rice or pasta, and instead of other grains as well! It tastes somewhat like bulgur wheat and barley, just with some smokiness in the mix as well.
Servings 6 people
Calories 86.7kcal
Ingredients
Instructions
VideoNotes
Nutrition
Calories: 86.7kcal | Carbohydrates: 17.3g | Protein: 5.3g | Fat: 0.7g | Sodium: 4.9mg | Fiber: 2.7g | Sugar: 0.7g | Calcium: 16.3mg | Iron: 0.5mg
The post How to Cook Freekeh appeared first on The Mediterranean Dish. via The Mediterranean Dish https://www.themediterraneandish.com/how-to-cook-freekeh/ This easy Mediterranean sea bass recipe comes together in just 15 minutes! A few simple steps give you the flakiest, most tender fish recipe. But the bold seasoning and colorful bell peppers take this simple pan-seared sea bass to the next level! 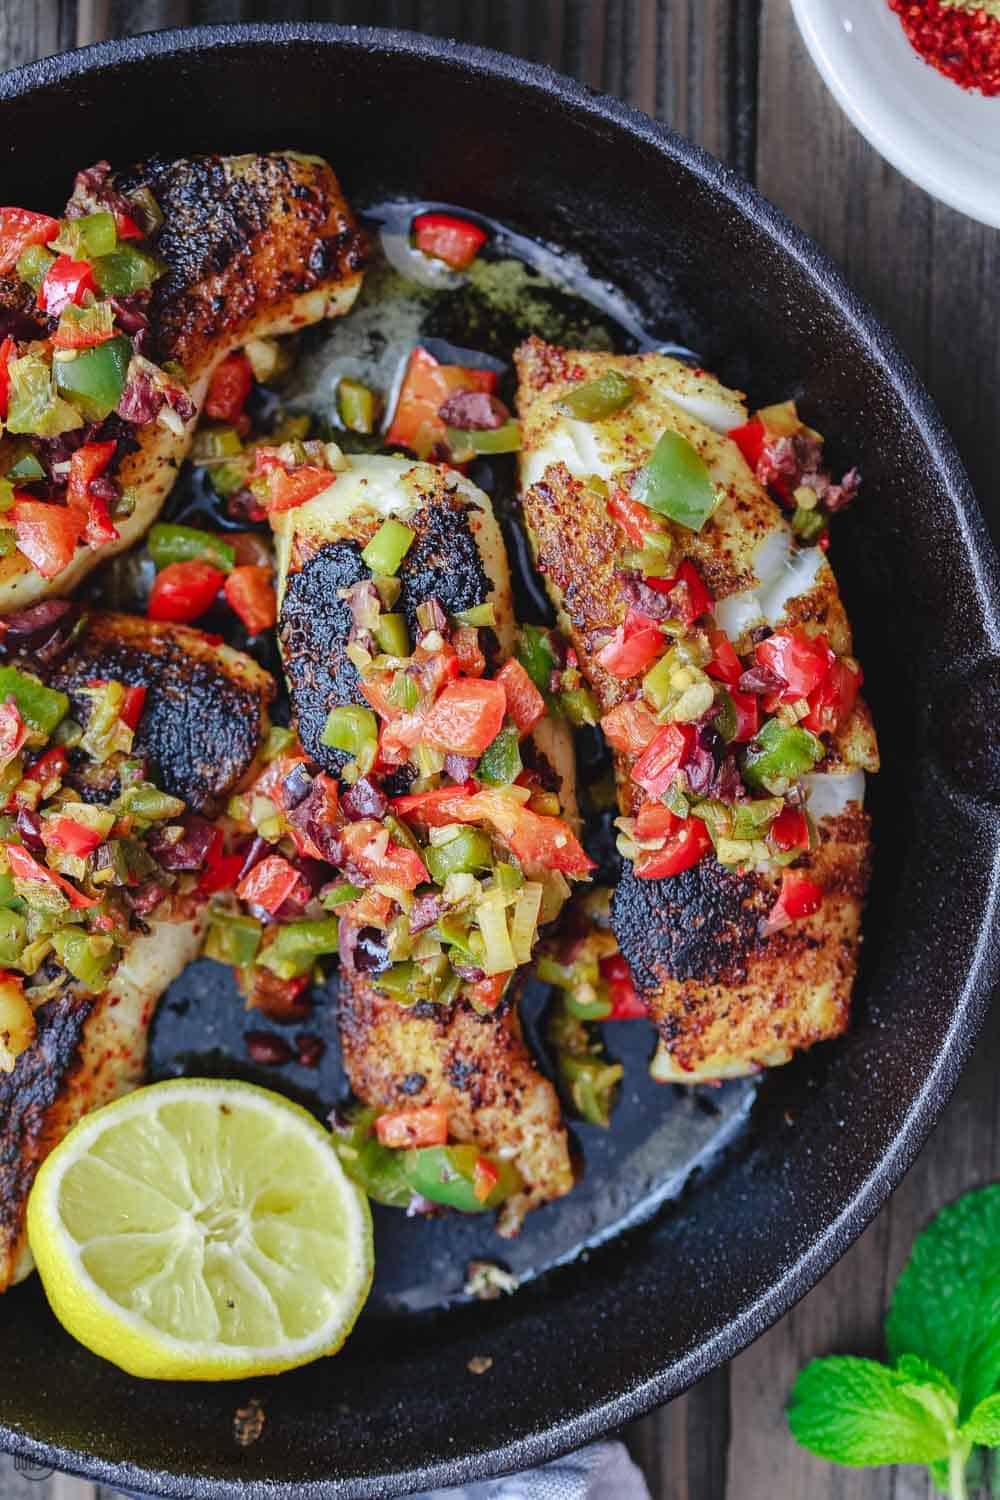 Easy sea bass recipeThis easy pan-seared sea bass recipe is a little taste of the Mediterranean in one pan! And it comes together in just 15 minutes. First, you’ll give a few sea bass filets a quick rub with a bold seasoning of cumin, coriander, Aleppo-style pepper, and garlic. Then you’ll briefly sear the fish in some extra virgin olive oil to create the perfect thin crust that gives way to tender, perfectly flaky sea bass underneath without too much work! To serve, hit your fish with a good splash of lemon juice and top it with my sautéed medley of bell peppers, garlic, shallots, and chopped kalamata olives. It’s not just a pretty embellishment, trust me! This delicious topping of veggies is the tastiest complement to this pan-seared fish recipe. Simply add your favorite grain or a big salad, and you’ve got dinner! 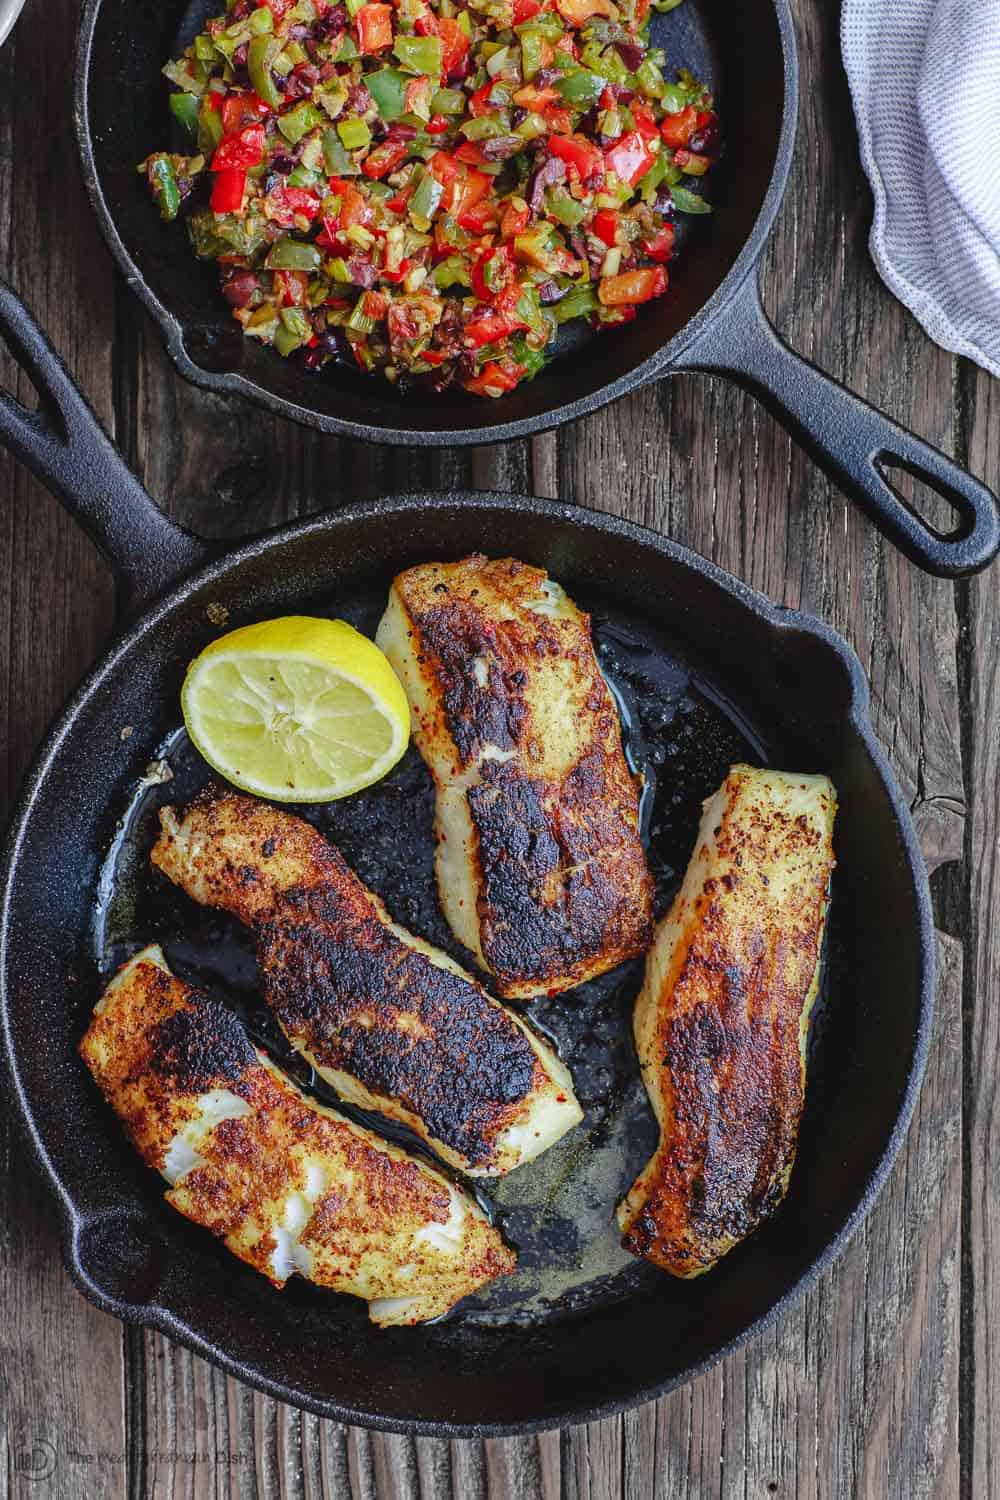 How to cook sea bassSea bass is a broad family of saltwater fish, and some fish with more than 400 species! This recipe uses a white sea bass, which is actually a type of fish called a drum. Not scientifically a “bassâ€, but delicious nevertheless. Generally, sea bass is a mild-tasting white fish, and you can cook it in a variety of mouthwatering ways. Most people will cook sea bass in the oven. It’s great baked with a lemon-garlic dressing like I do with cod in this recipe, or smothered in basil pesto, or even wrapped in parchment with sliced veggies of your choice. But another easy way to prepare sea bass filets is to pan-sear them in a bit of good extra virgin olive oil. This will take about 4 minutes or so on either side, depending on the thickness of your fish filets. Granted, this method might require a splatter guard, but that thin crust on the fish is so worth it! 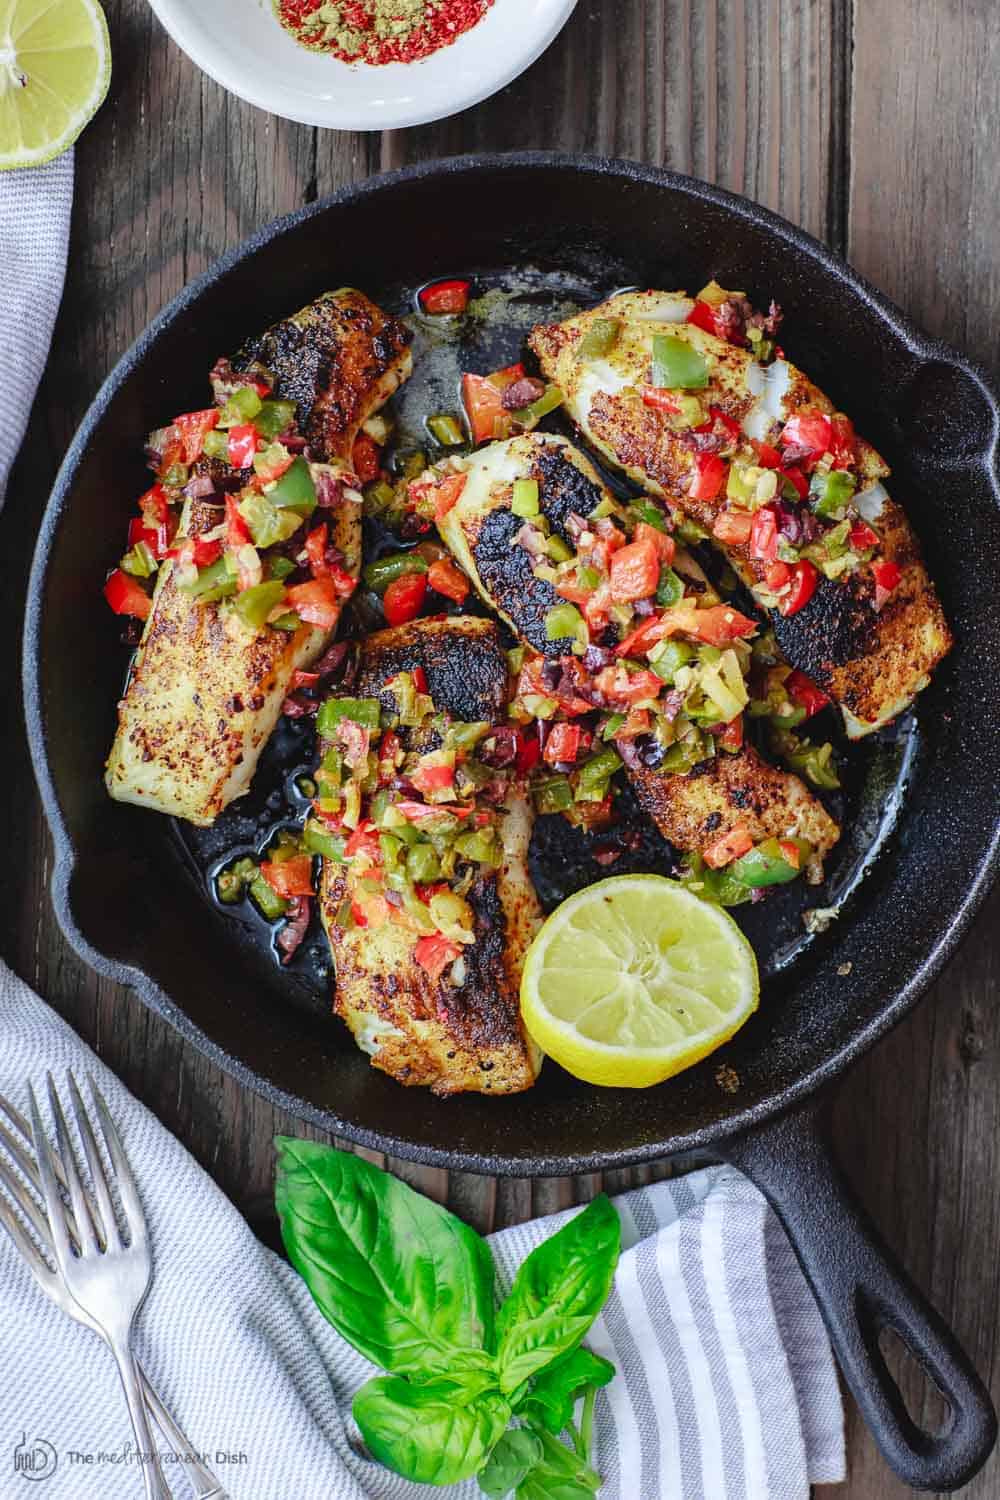 Sea bass recipe ingredients and substitutionsThis simple recipe has three components: the fish, seasoning, and the delicious topping of bell peppers and vegetables. Here are more notes on the ingredients you need to make this sea bass recipe: The fishSkinless sea bass or Chilean sea bass filet. You need about 1 ½ pounds cut into 4 filets. You can typically find wild-caught sea bass in the freezer section at your grocery store; you’ll just need to thaw it out properly overnight. Other mild white fish options like halibut or even cod will work here (more ideas below). The seasoningTo amp up the flavor on this simple pan-seared fish recipe, I used a spice rub or seasoning with ground coriander, garlic powder, Aleppo pepper (or Sweet Spanish paprika), ground cumin, and black pepper. The sauteed bell pepper toppingChopped bell peppers (any colors you have), with shallots, garlic, and pitted kalamata olives, all sauteed in a bit of olive oil and added on top of your fish. You can play around with this topping, adding other veggies you may have on hand. Chopped carrots, zucchini, or even chopped baby broccoli will work. How to make pan-seared sea bassHere are the simple steps to make this fish recipe. Remember, the print-friendly recipe with full ingredient list and measurements is just below:
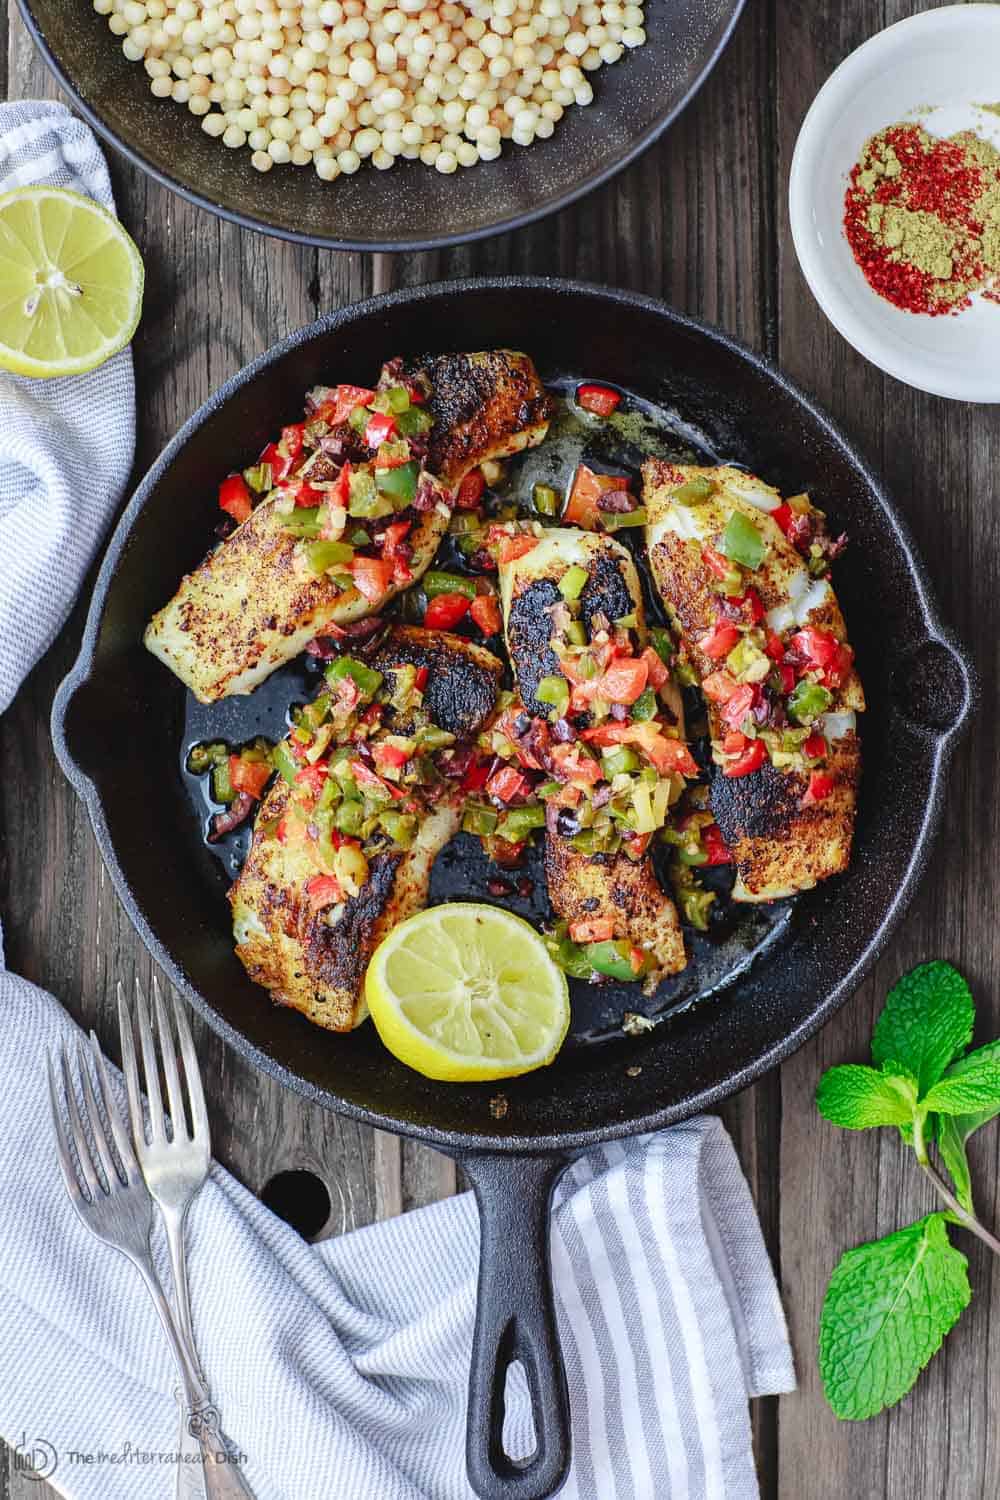 Important cooking tip for searing your fishSo for this pan-seared sea bass recipe, I have an important tip for perfectly flaky, never rubbery, fish. Before you turn the fish over, look for browned edges. And if parts of the fish are stuck to the skillet, carefully and gently scraping it with a spatula should be enough to loosen the fish. If the fish is entirely stuck, however, this is a sign that it is not ready to turn over. Leave it for about 30 seconds more and try again. The fish should release when ready, and it should be somewhat browned on both sides. How can I tell if my fish is cooked?While sea bass is easy to cook, like other fish, it is also easy to overcook. Generally, your fish is ready when the flesh turns from gray and translucent to opaque, and it should easily flake at the touch of a fork. To be sure you can use a thermometer to measure the internal temperature. Cooked fish is ready when its internal temperature is somewhere between 140 to 145 degrees F. What can I use instead of sea bass in this recipe?Any white fish with a firm texture and delicate flavor would work well in this recipe as a substitute for sea bass. Grouper, red snapper, mahi mahi, branzino, cod, and halibut are all good options if you cannot find sea bass. What to serve alongI like serving this sea bass and pepper medley with a few lemon wedges and plain pearl couscous or bulgur wheat. And if you’re looking for something to start the meal, try panzanella or grilled zucchini salad and a side of whipped labneh with pita chips! Leftovers and storageLeftover pan-seared sea bass and vegetables will keep in an airtight container in the fridge for 2 to 3 days. I like eating leftover fish at room temperature so it does become rubbery when heated. But you can reheat it over medium-low heat until just warmed through. More easy pan seared fish recipes to try:If you like this pan seared sea bass recipe, here are a few more seared fish recipes to try next Visit Our Shop to browse quality Mediterranean ingredients  Mediterranean Pan Seared Sea Bass Recipe with Garlic Bell Pepper Medley
Don't skip the garlic and bell peppers, they are far more than a garnish on this crispy pan seared sea bass recipe! This quick fish dinner is great served with plain pearl couscous (or another grain of your choice) or lemon rice.
Servings 4 people
Calories 132kcal
Ingredients
Spice Mixture
Instructions
VideoNotes
Nutrition
Calories: 132kcal | Carbohydrates: 10.9g | Protein: 2.1g | Fat: 10.1g | Saturated Fat: 1.4g | Monounsaturated Fat: 7.2g | Cholesterol: 0.8mg | Sodium: 279.1mg | Potassium: 259.7mg | Fiber: 3.4g | Sugar: 4g | Vitamin A: 1268.7IU | Vitamin C: 71.8mg | Calcium: 42.6mg | Iron: 1.3mg
*This post first appeared on The Mediterranean Dish in 2018 and has been recently updated with new media and information for readers' benefit. The post Easy Pan-Seared Sea Bass Recipe (15 minutes) appeared first on The Mediterranean Dish. via The Mediterranean Dish https://www.themediterraneandish.com/mediterranean-pan-seared-sea-bass-recipe/ |
ABOUT MEHi, I am Daniel Jones from Overland Park, MO. I am a chef by profession, & also publish my recipe tips online on blogs and social media. Archives
April 2023
Categories |


 RSS Feed
